Platform feature update completed on August 18th, 2025
August 18, 2025
New Feature

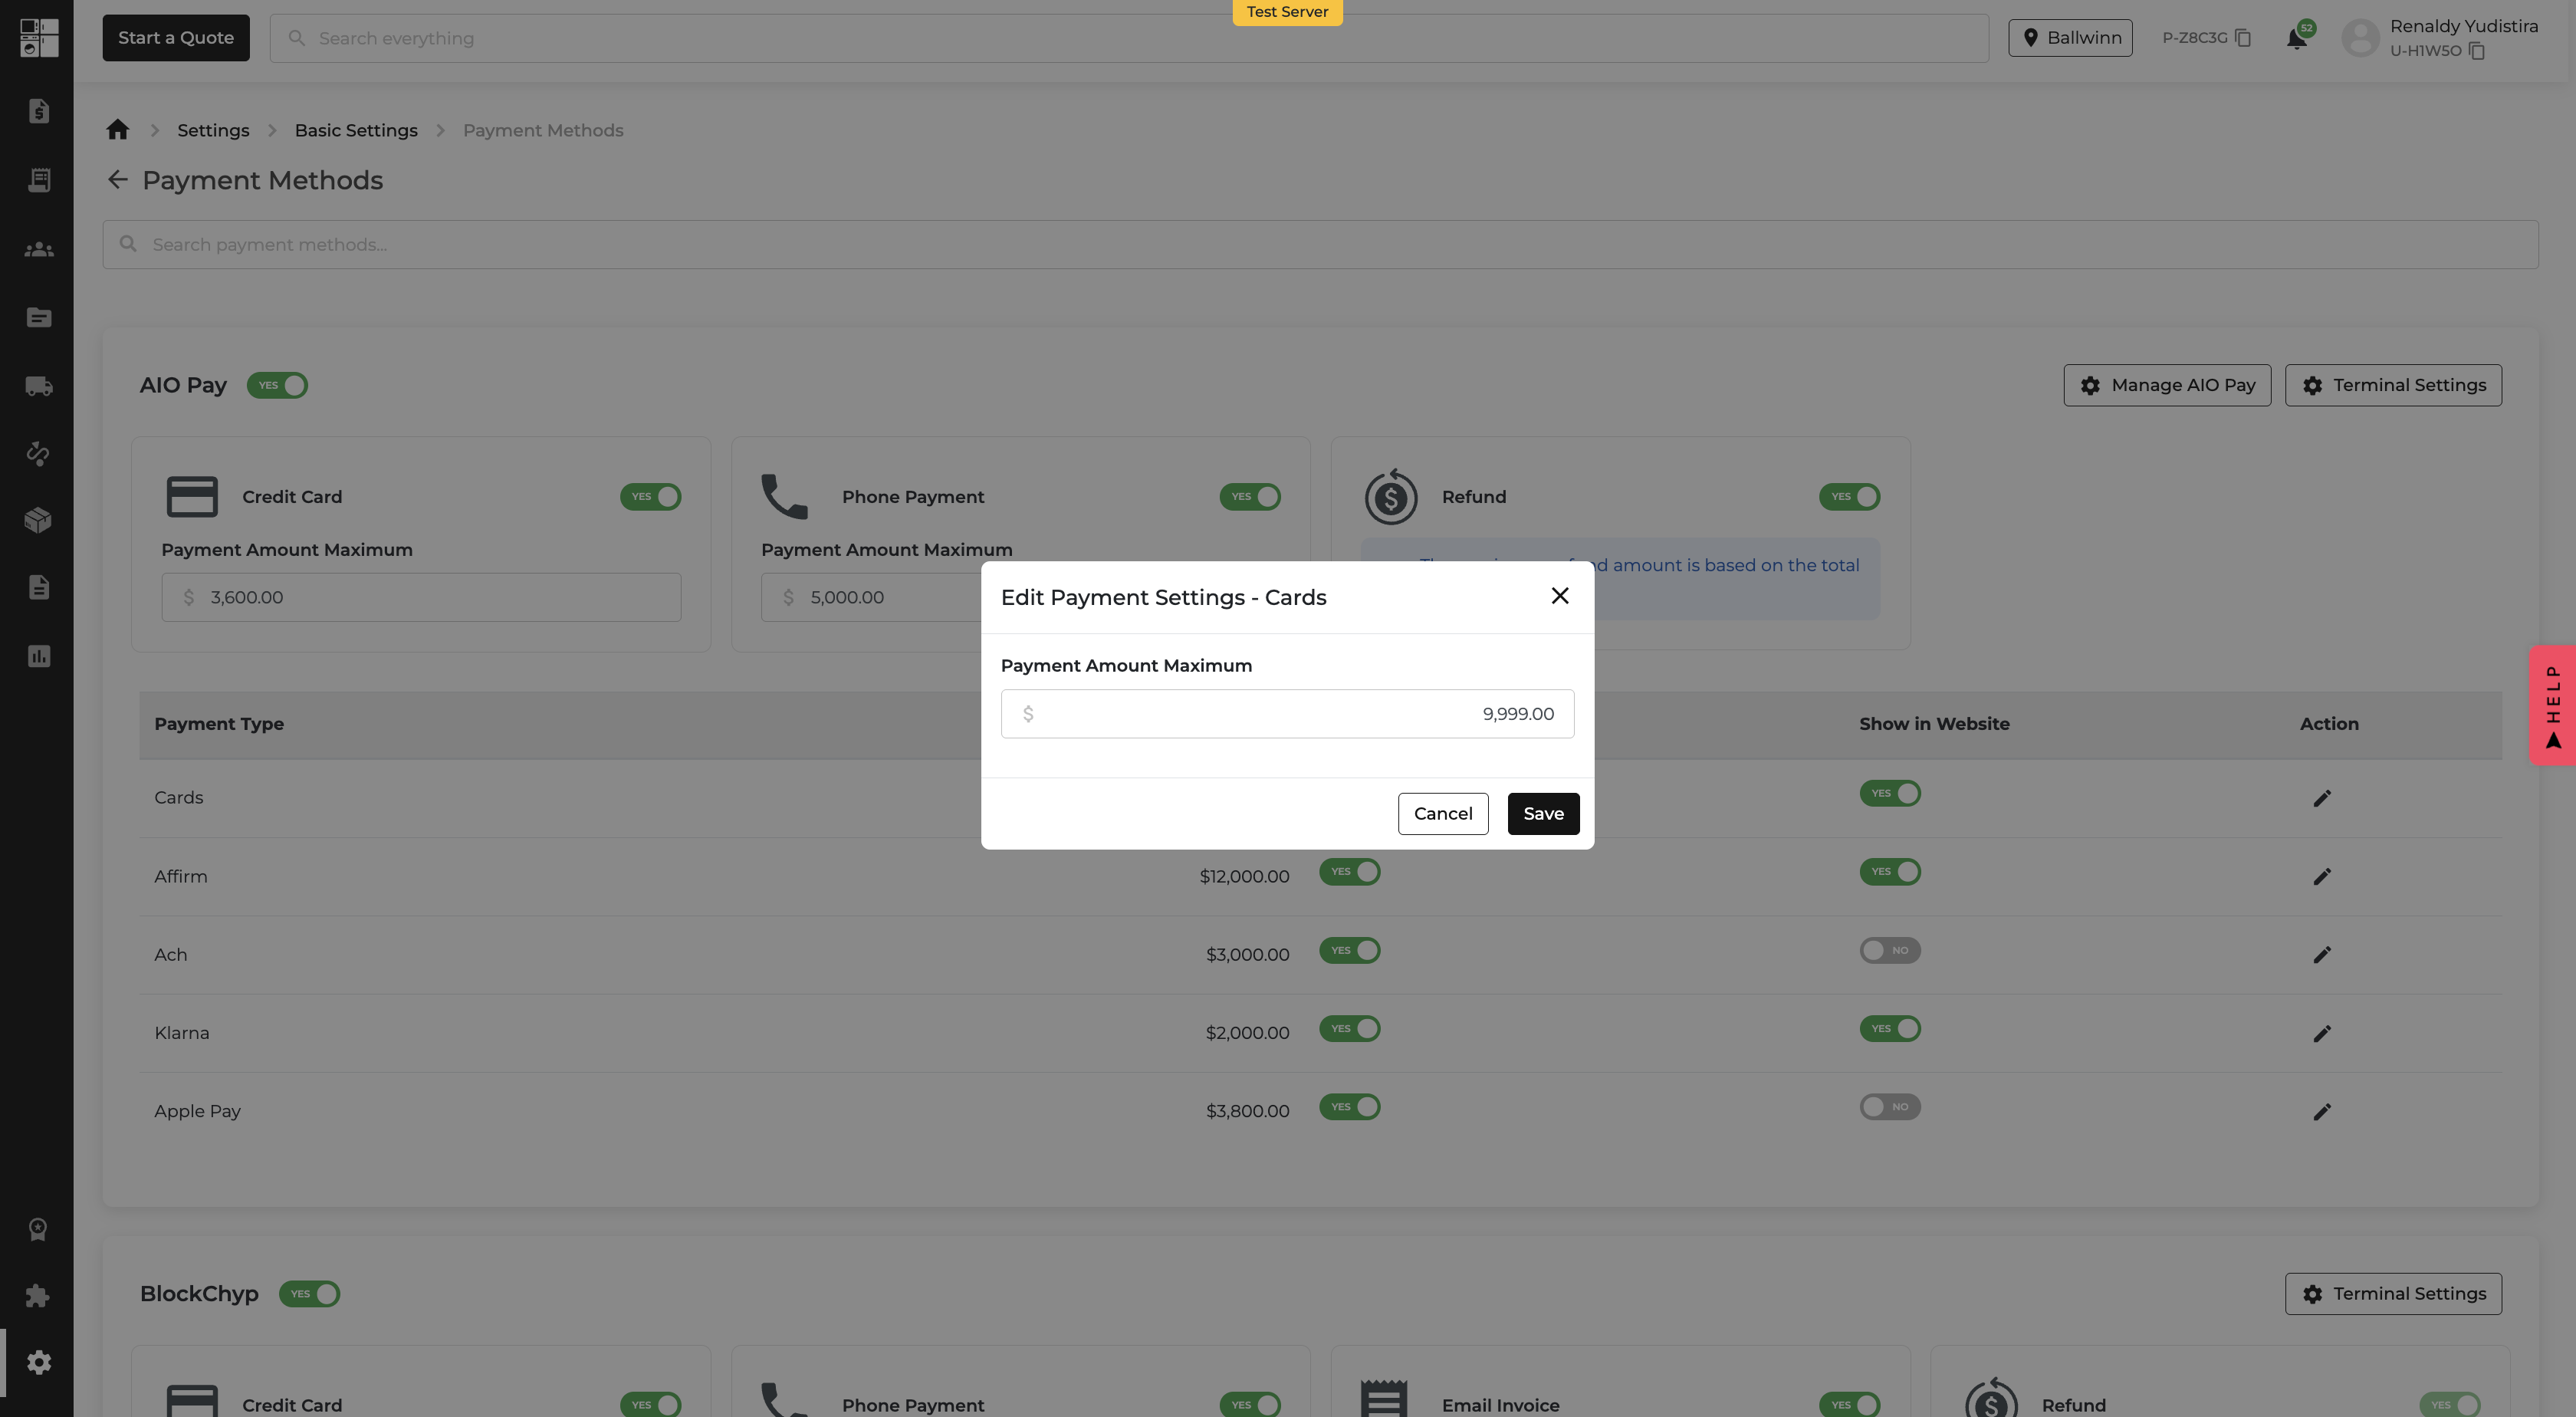
💳 Take Control of Payment Method Visibility & Limits

What’s New?

You can now decide exactly where (and when) ACH, Affirm, and Klarna appear in both your AIO Pay Links and Website checkout — and set your own max payment amounts without calling your developer. 🙌

💡 Here’s How It Works:

  • New Payment Settings Table in your AIO Pay admin.
  • Set a maximum allowed order amount for each method — if the total’s higher, that option won’t show.
  • Toggle visibility for AIO Pay Links and Website Checkout separately.
  • Quick-edit modal lets you update settings instantly without reloading the page.
  • For Klarna, you’ll even see a handy reminder of its maximum limit.

📸 Where You’ll See It

  • SettingsPayments
  • A neat, easy-to-use table with edit icons for each payment type.

Now you can stop worrying about checkout surprises and make sure the right payment options show up exactly where you want them. 🎯

✉️ Send Invoices Without a Pay Link

What’s New?

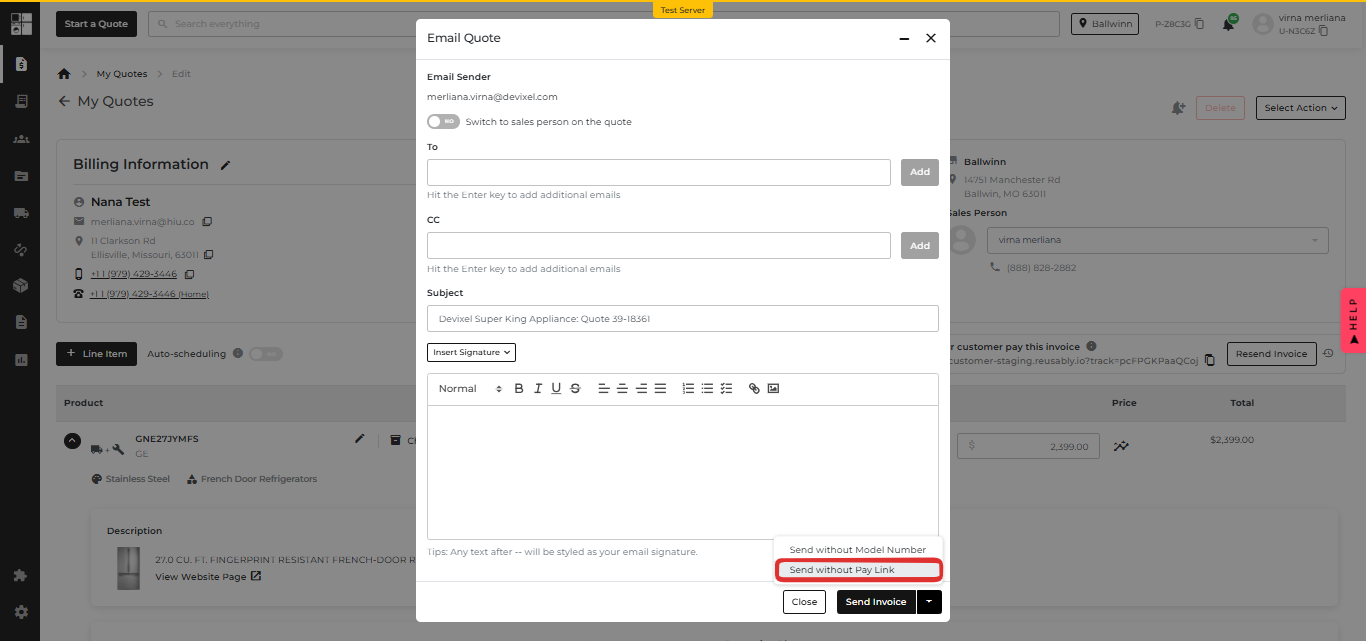
Sometimes you just want to send an invoice or quote without giving customers a way to pay right away — maybe you’re waiting on approval, confirming details, or just not ready to take payment. Now, you can do exactly that with the shiny new “Send without Pay Link” option. 🎉

💡 Here’s How It Works:

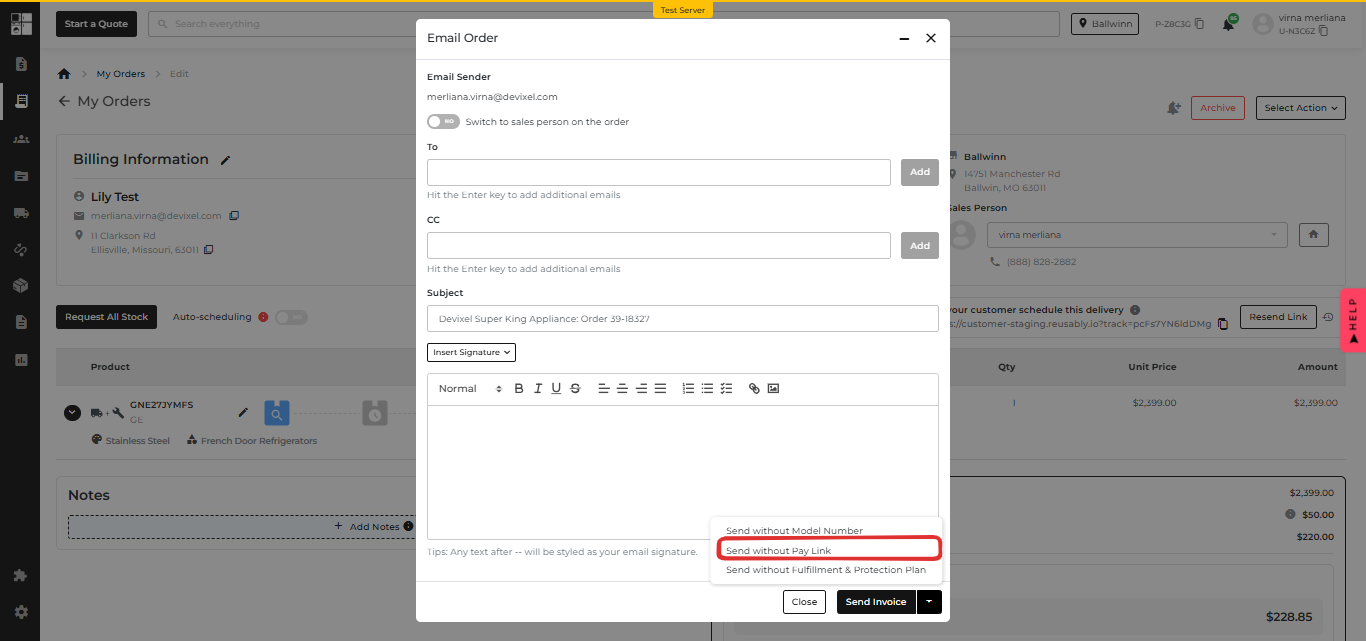
On the Email Quote or Email Order pop-up:

  • Click the Send Invoice dropdown.
  • You’ll see a new option: Send without Pay Link.
  • Select it, and your customer gets a clean copy of the invoice/quote — no payment button, no pay link.
  • Perfect for when you want to share details but keep payment off the table for now.

📸 Where You’ll See It

  • In the Email Quote/Order pop-up, under the Send Invoice dropdown menu.

Perfect for when you just need to share the numbers — not collect the cash (yet). 💼
📦 “Partially Delivered” Orders Get Their Own Tab

What’s New?

We’ve made it easier to tell the difference between orders that are fully done and those that are only partly delivered. No more mixing the two! 🎉

💡 Here’s How It Works:

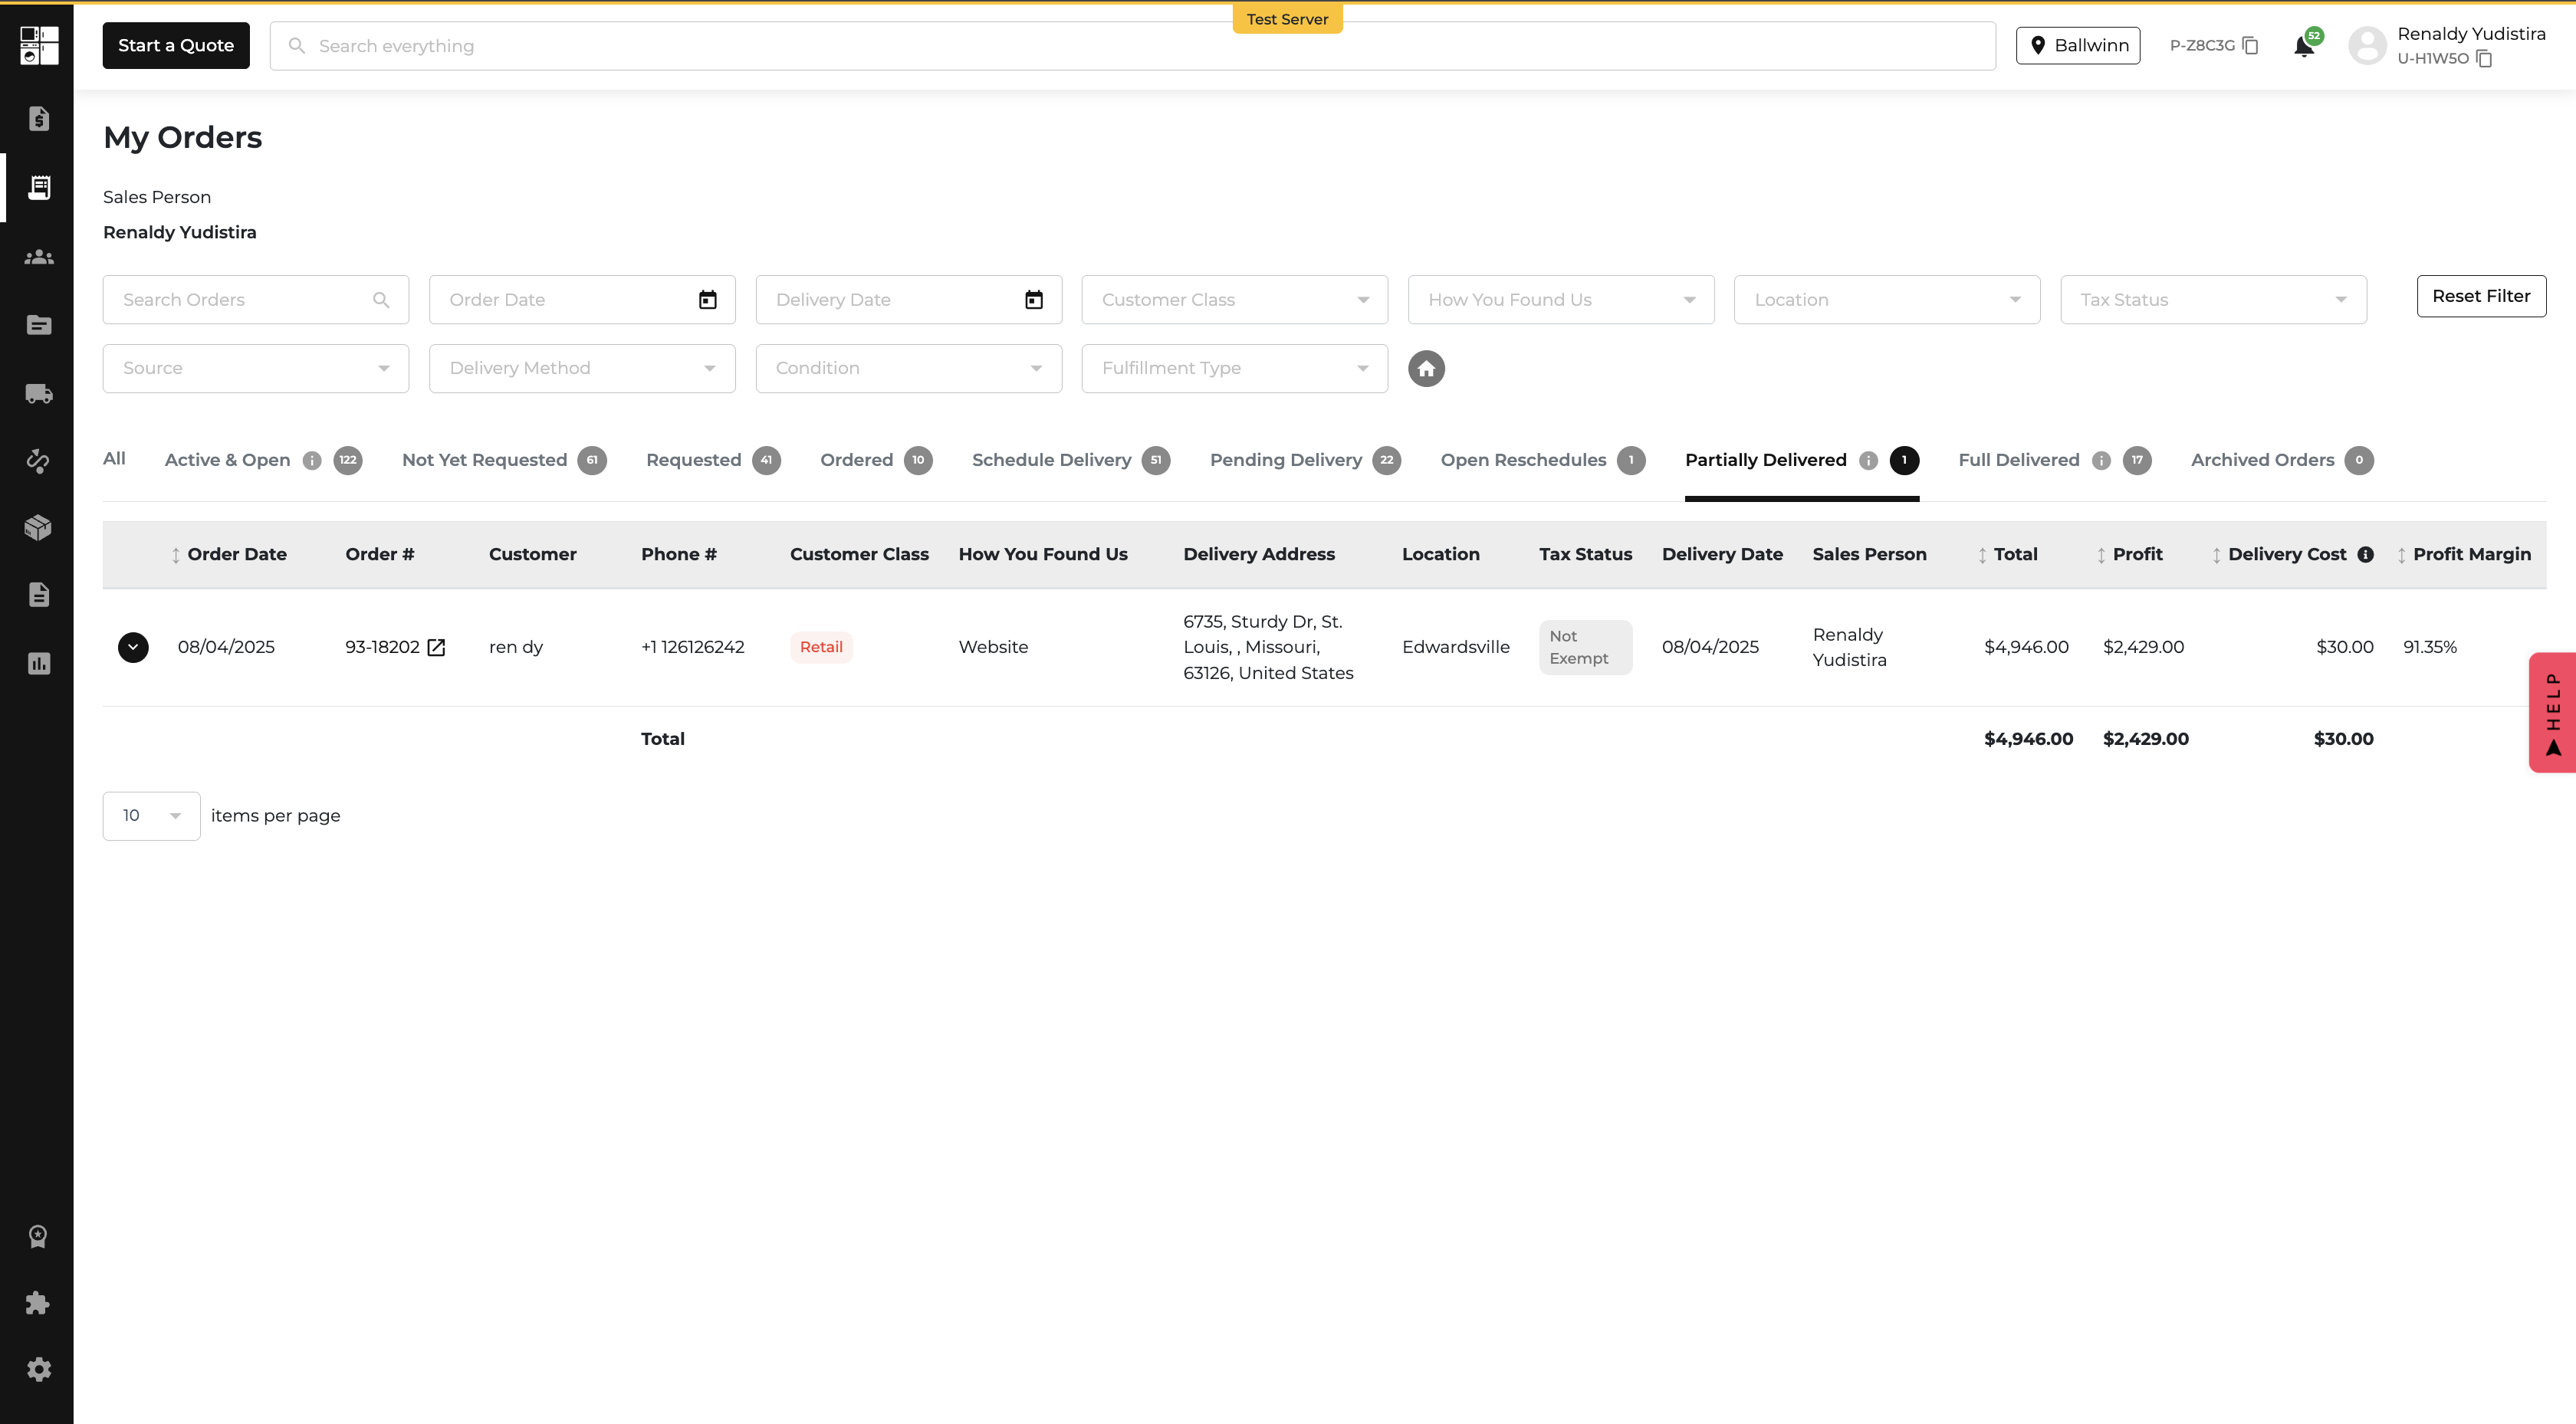
  • New “Partially Delivered” Tab
    • Shows orders where at least one item has been delivered but others are still on the way.
    • Includes item-by-item delivery status so you can see exactly what’s left.
    • Adds a friendly note with expected delivery dates for remaining items.
  • Renamed “Delivered” → “Full Delivered”
    • Only shows orders where everything has been delivered.
    • Keeps your reporting and tracking clean and accurate.

📸 Where You’ll See It

  • My Orders page — customers get clearer delivery statuses.
  • Order Report page — staff can instantly spot orders needing follow-up.

Now everyone — customers and staff alike — can see exactly what’s been delivered and what’s still in progress. Less confusion, fewer support calls, happier people all around. 🙌
⏱ Real-Time Delivery ETAs with ADC Inventory

What’s New?

ADC Buying Group members can now make their website delivery estimates match real-time warehouse inventory — and even set their own rules for what’s “in stock.” No more guesswork or outdated ETAs. 🎉

💡 Here’s How It Works:

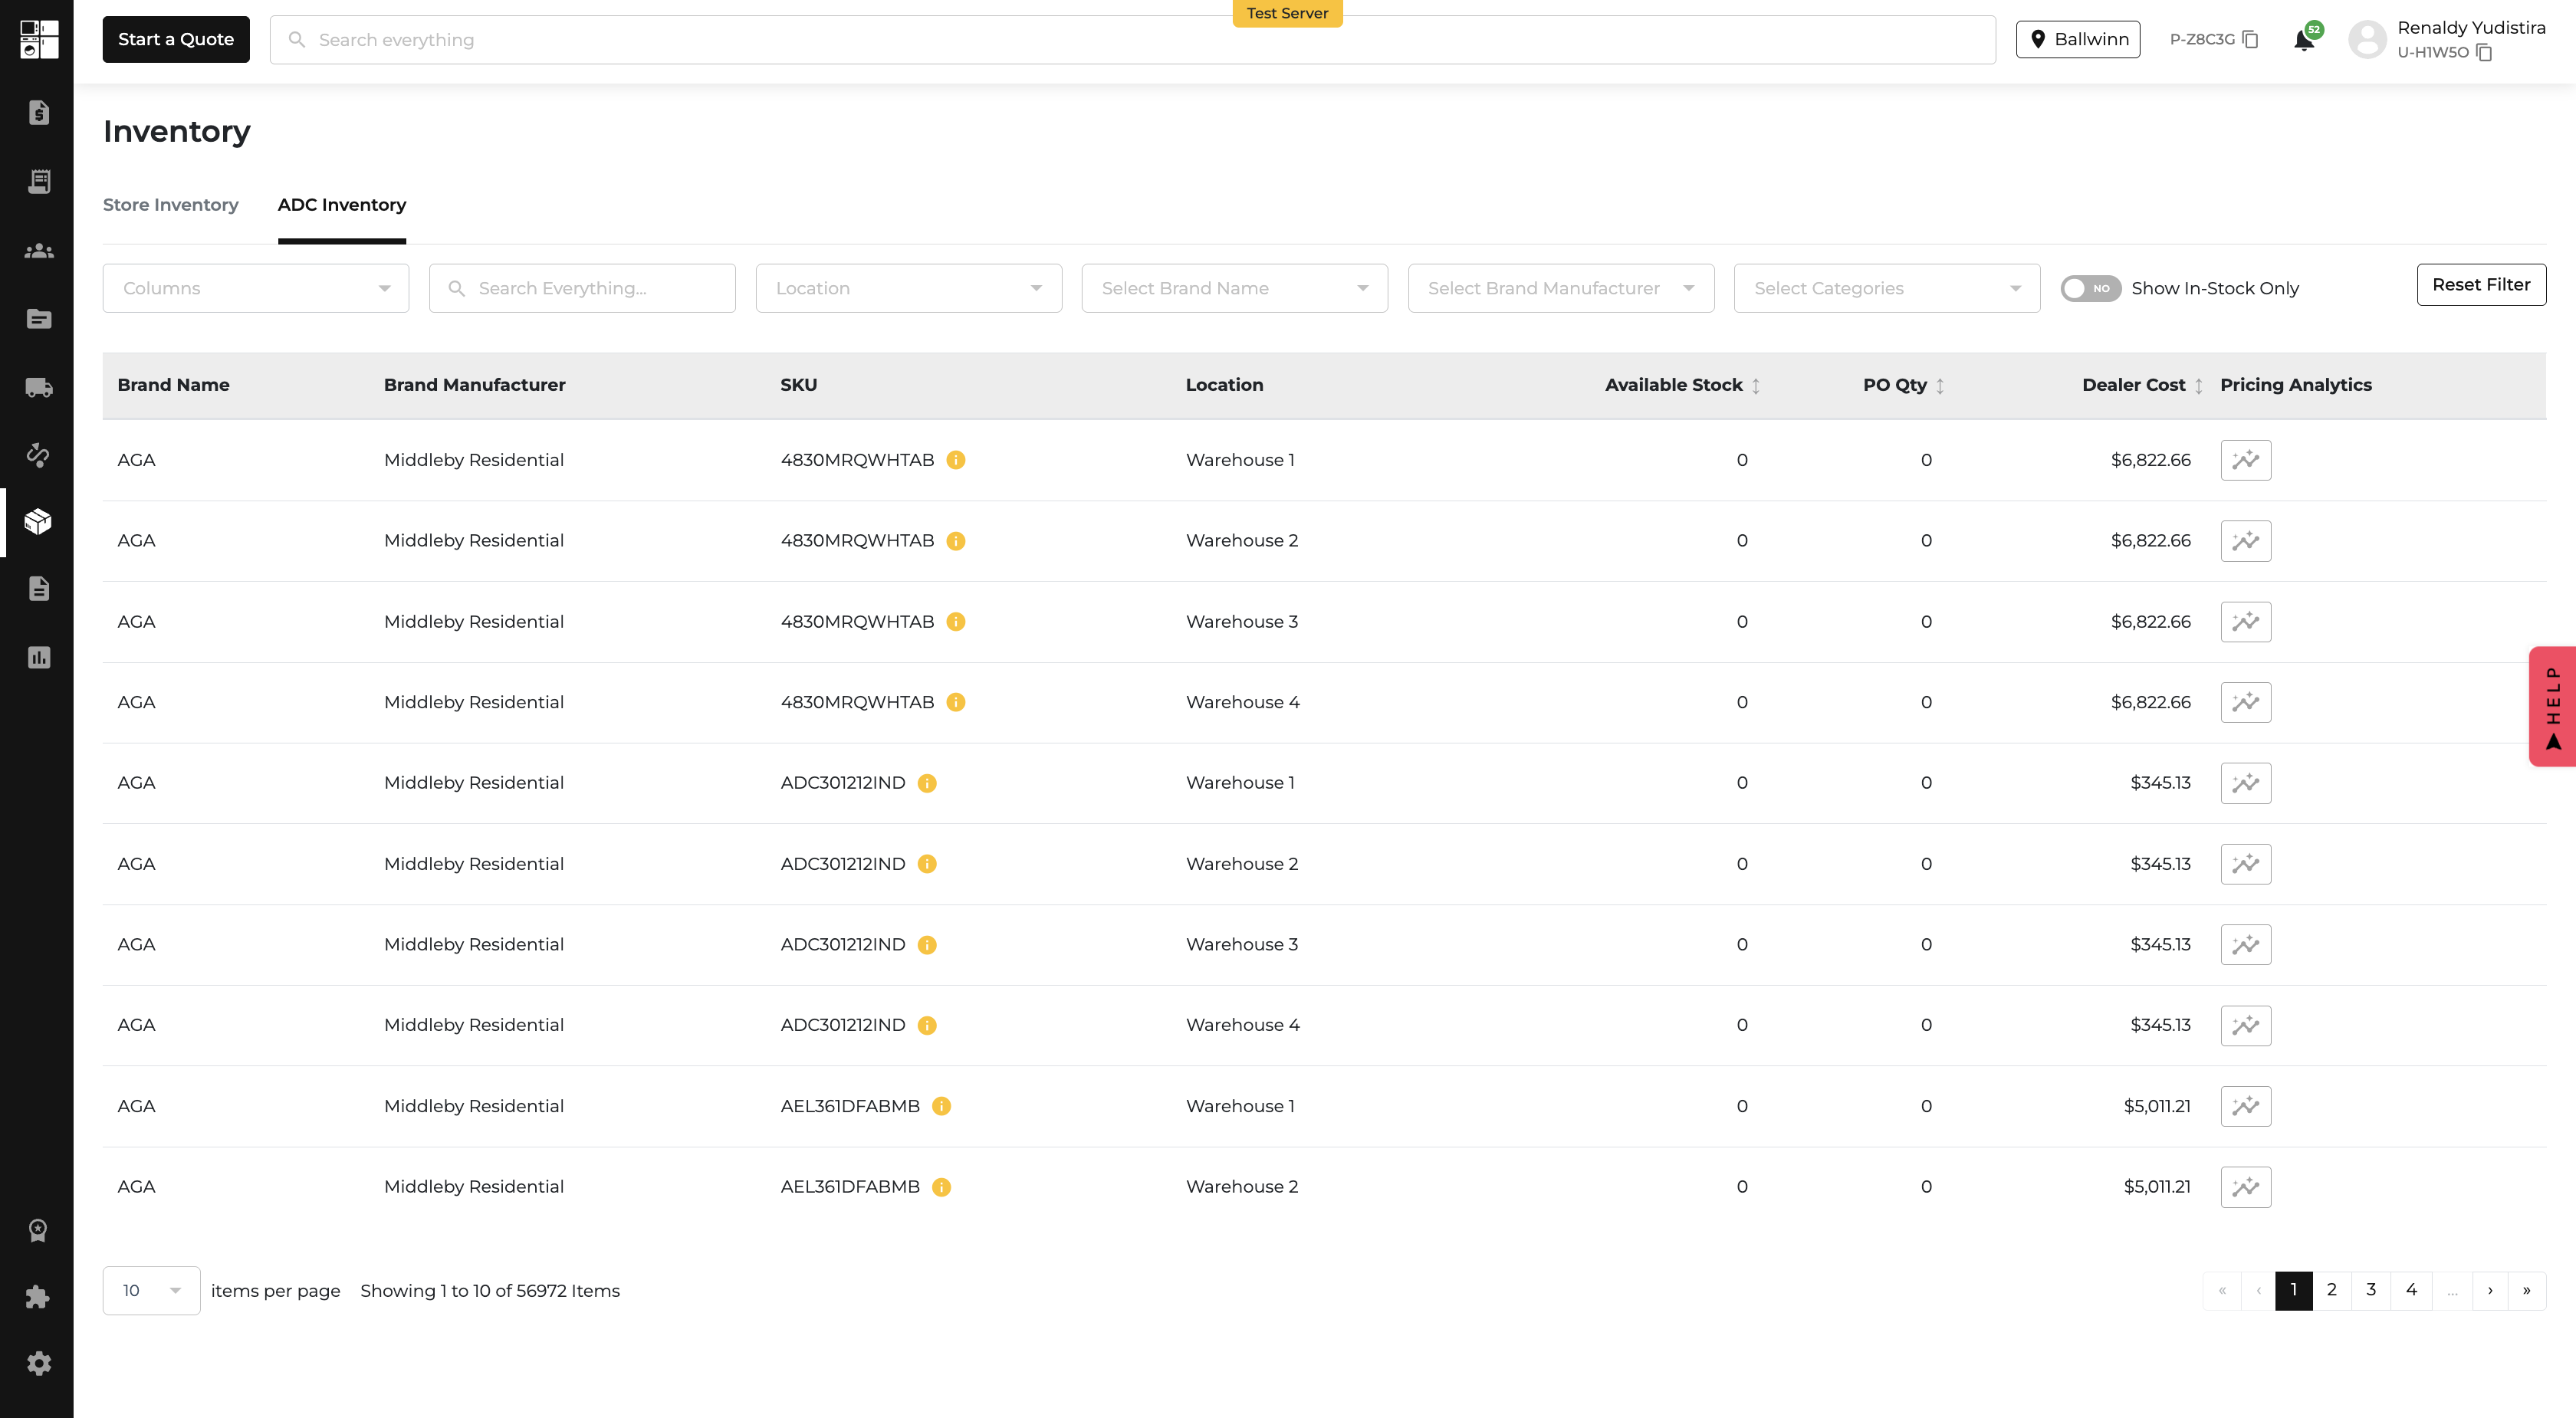
  • Live Inventory from ADC
    • Pulls real-time stock levels from your selected ADC warehouse (starting with PIT).
    • If stock meets your minimum threshold → shows “Available for delivery in X days.
    • If stock is low → shows “Estimated delivery in Y days.
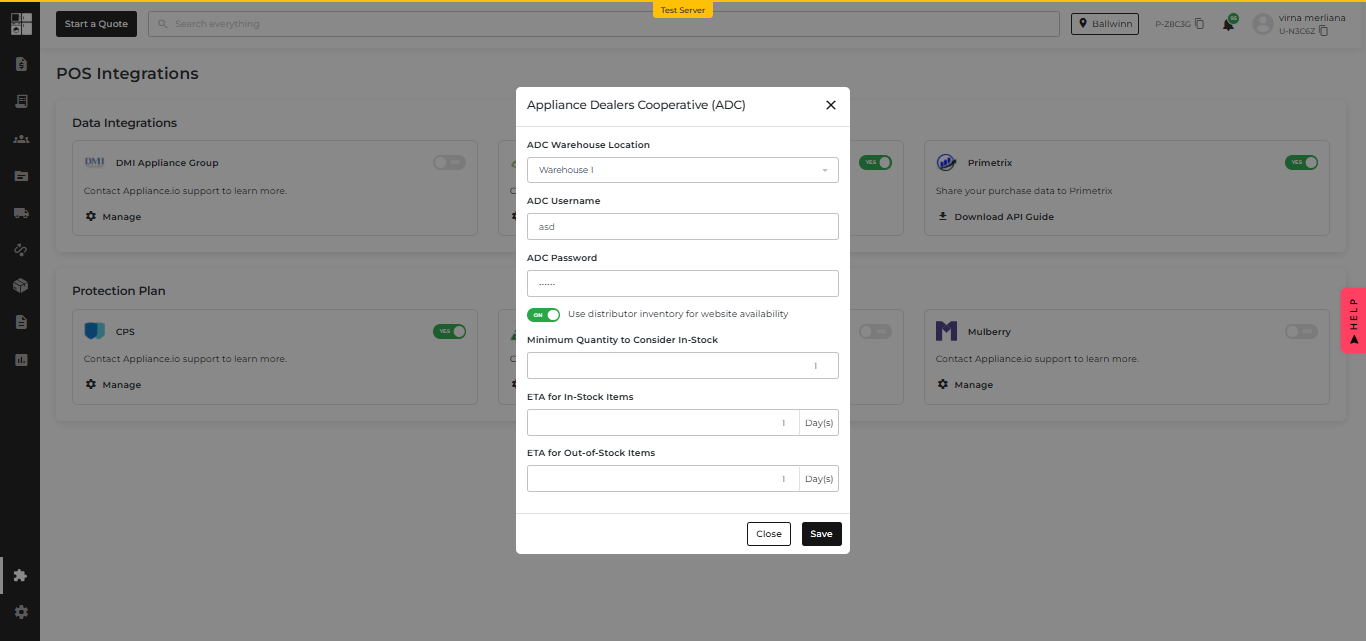
  • New Manage Button for ADC Integration
    • Found on the POS Integrations page under ADC.
    • Opens a settings modal where you can:
      • Select your warehouse location
      • Toggle whether to use distributor inventory for your website
      • Set your Minimum Quantity, In-Stock ETA, and Out-of-Stock ETA

📸 Where You’ll See It

  • POS Integrations page → ADC Card → new Manage button.
  • Inventory → ADC Tab
  • Website (Product Pages, Cart, Checkout) → accurate ETAs based on your settings.

Now you can give customers delivery dates they can trust — and create urgency when stock is low. 🛒

🚀 Real-Time Delivery ETAs with DMI Inventory

What’s New?

If you’re part of the DMI Buying Group, your customers will now see delivery dates that match actual warehouse stock — not vague estimates. That means faster-looking ETAs when inventory is ready to ship, and more accurate timelines when it’s not. 🎯

💡 Here’s How It Works:

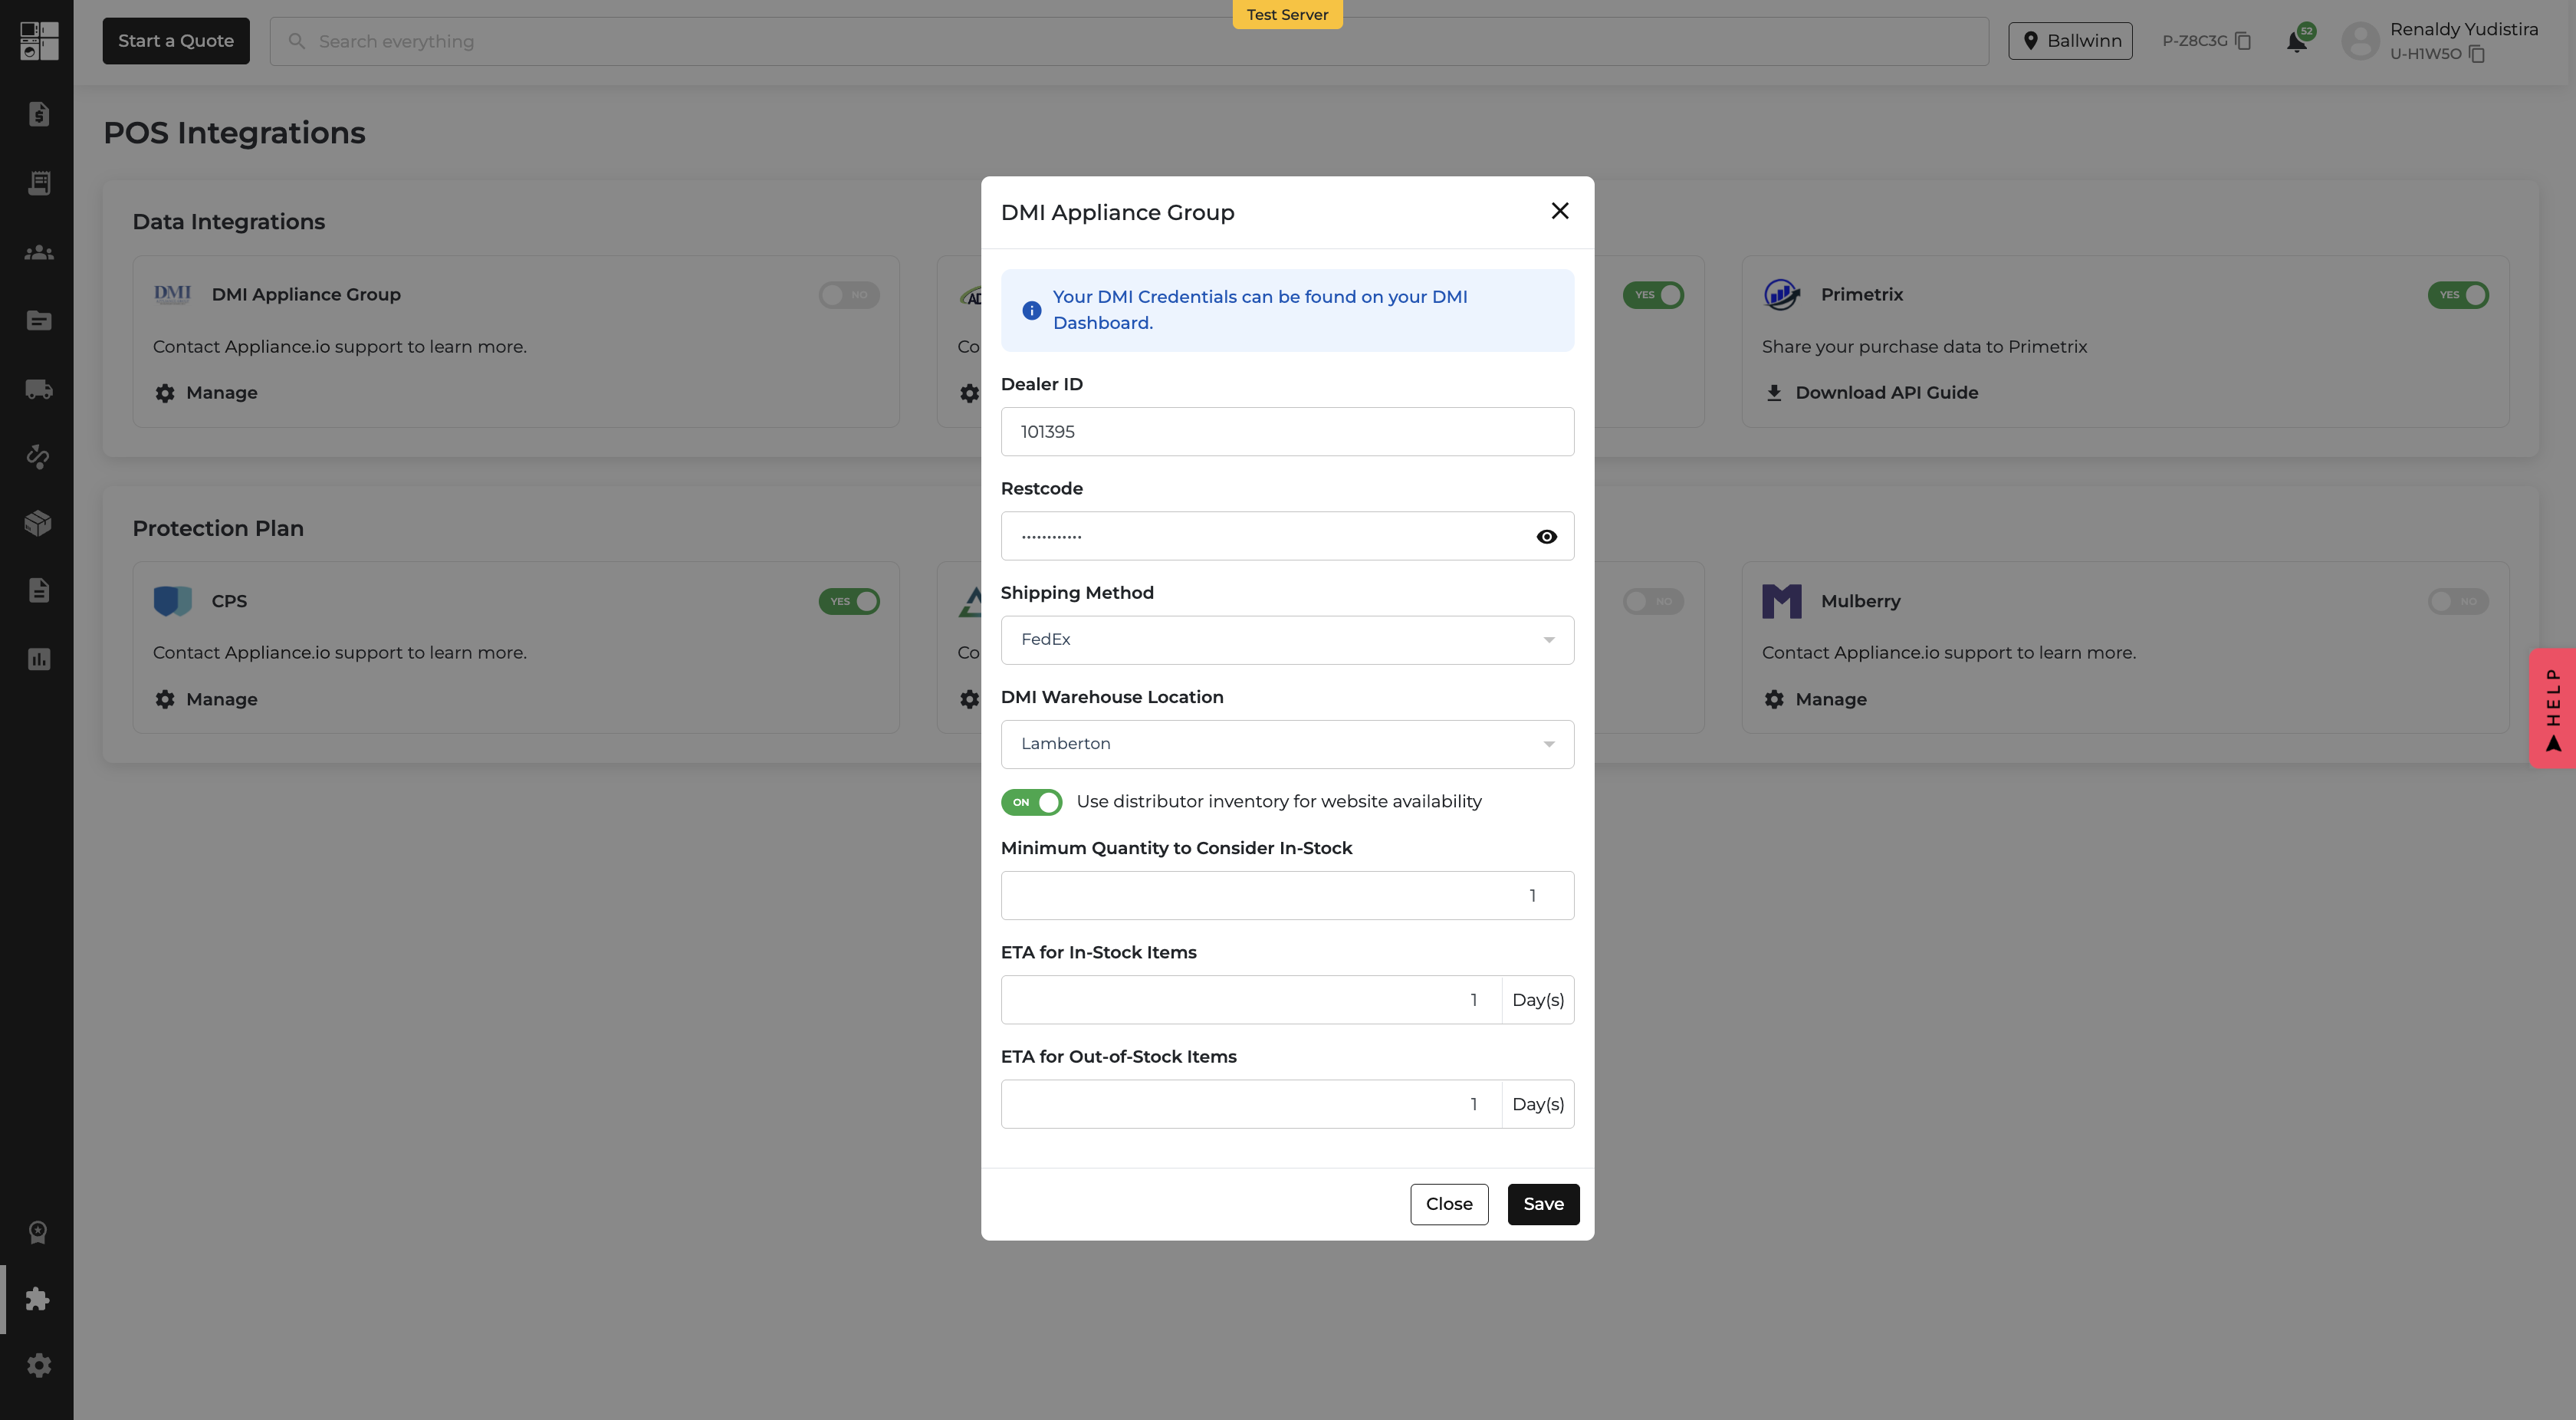
  • New Setting in DMI Integration
    • Toggle “Use distributor inventory for website availability.
    • Set your own rules:
      • Minimum Quantity to consider an item “In Stock.”
      • ETA for In-Stock Items (e.g., 1–2 business days).
      • ETA for Out-of-Stock Items (e.g., 5–7 business days).
  • Live Data from DMI Warehouses
    • Pulls real-time inventory directly from your configured DMI locations.
    • Matches model numbers to your site so product pages show the right ETA instantly.
  • Better Customer Messaging
    • In stock? → “Delivery available in X days.”
    • Low or no stock? → “Estimated delivery in Y days.”

📸 Where You’ll See It

  • Admin → DMI Integration Settings → new toggle & fields.
  • Website → Product Pages, Cart, and Checkout ETAs now reflect DMI inventory rules.

This update helps you show off your real fulfillment speed — and gives customers the confidence to click “Buy” faster. 🛒
💳 Apple Pay Is Here!

What’s New?

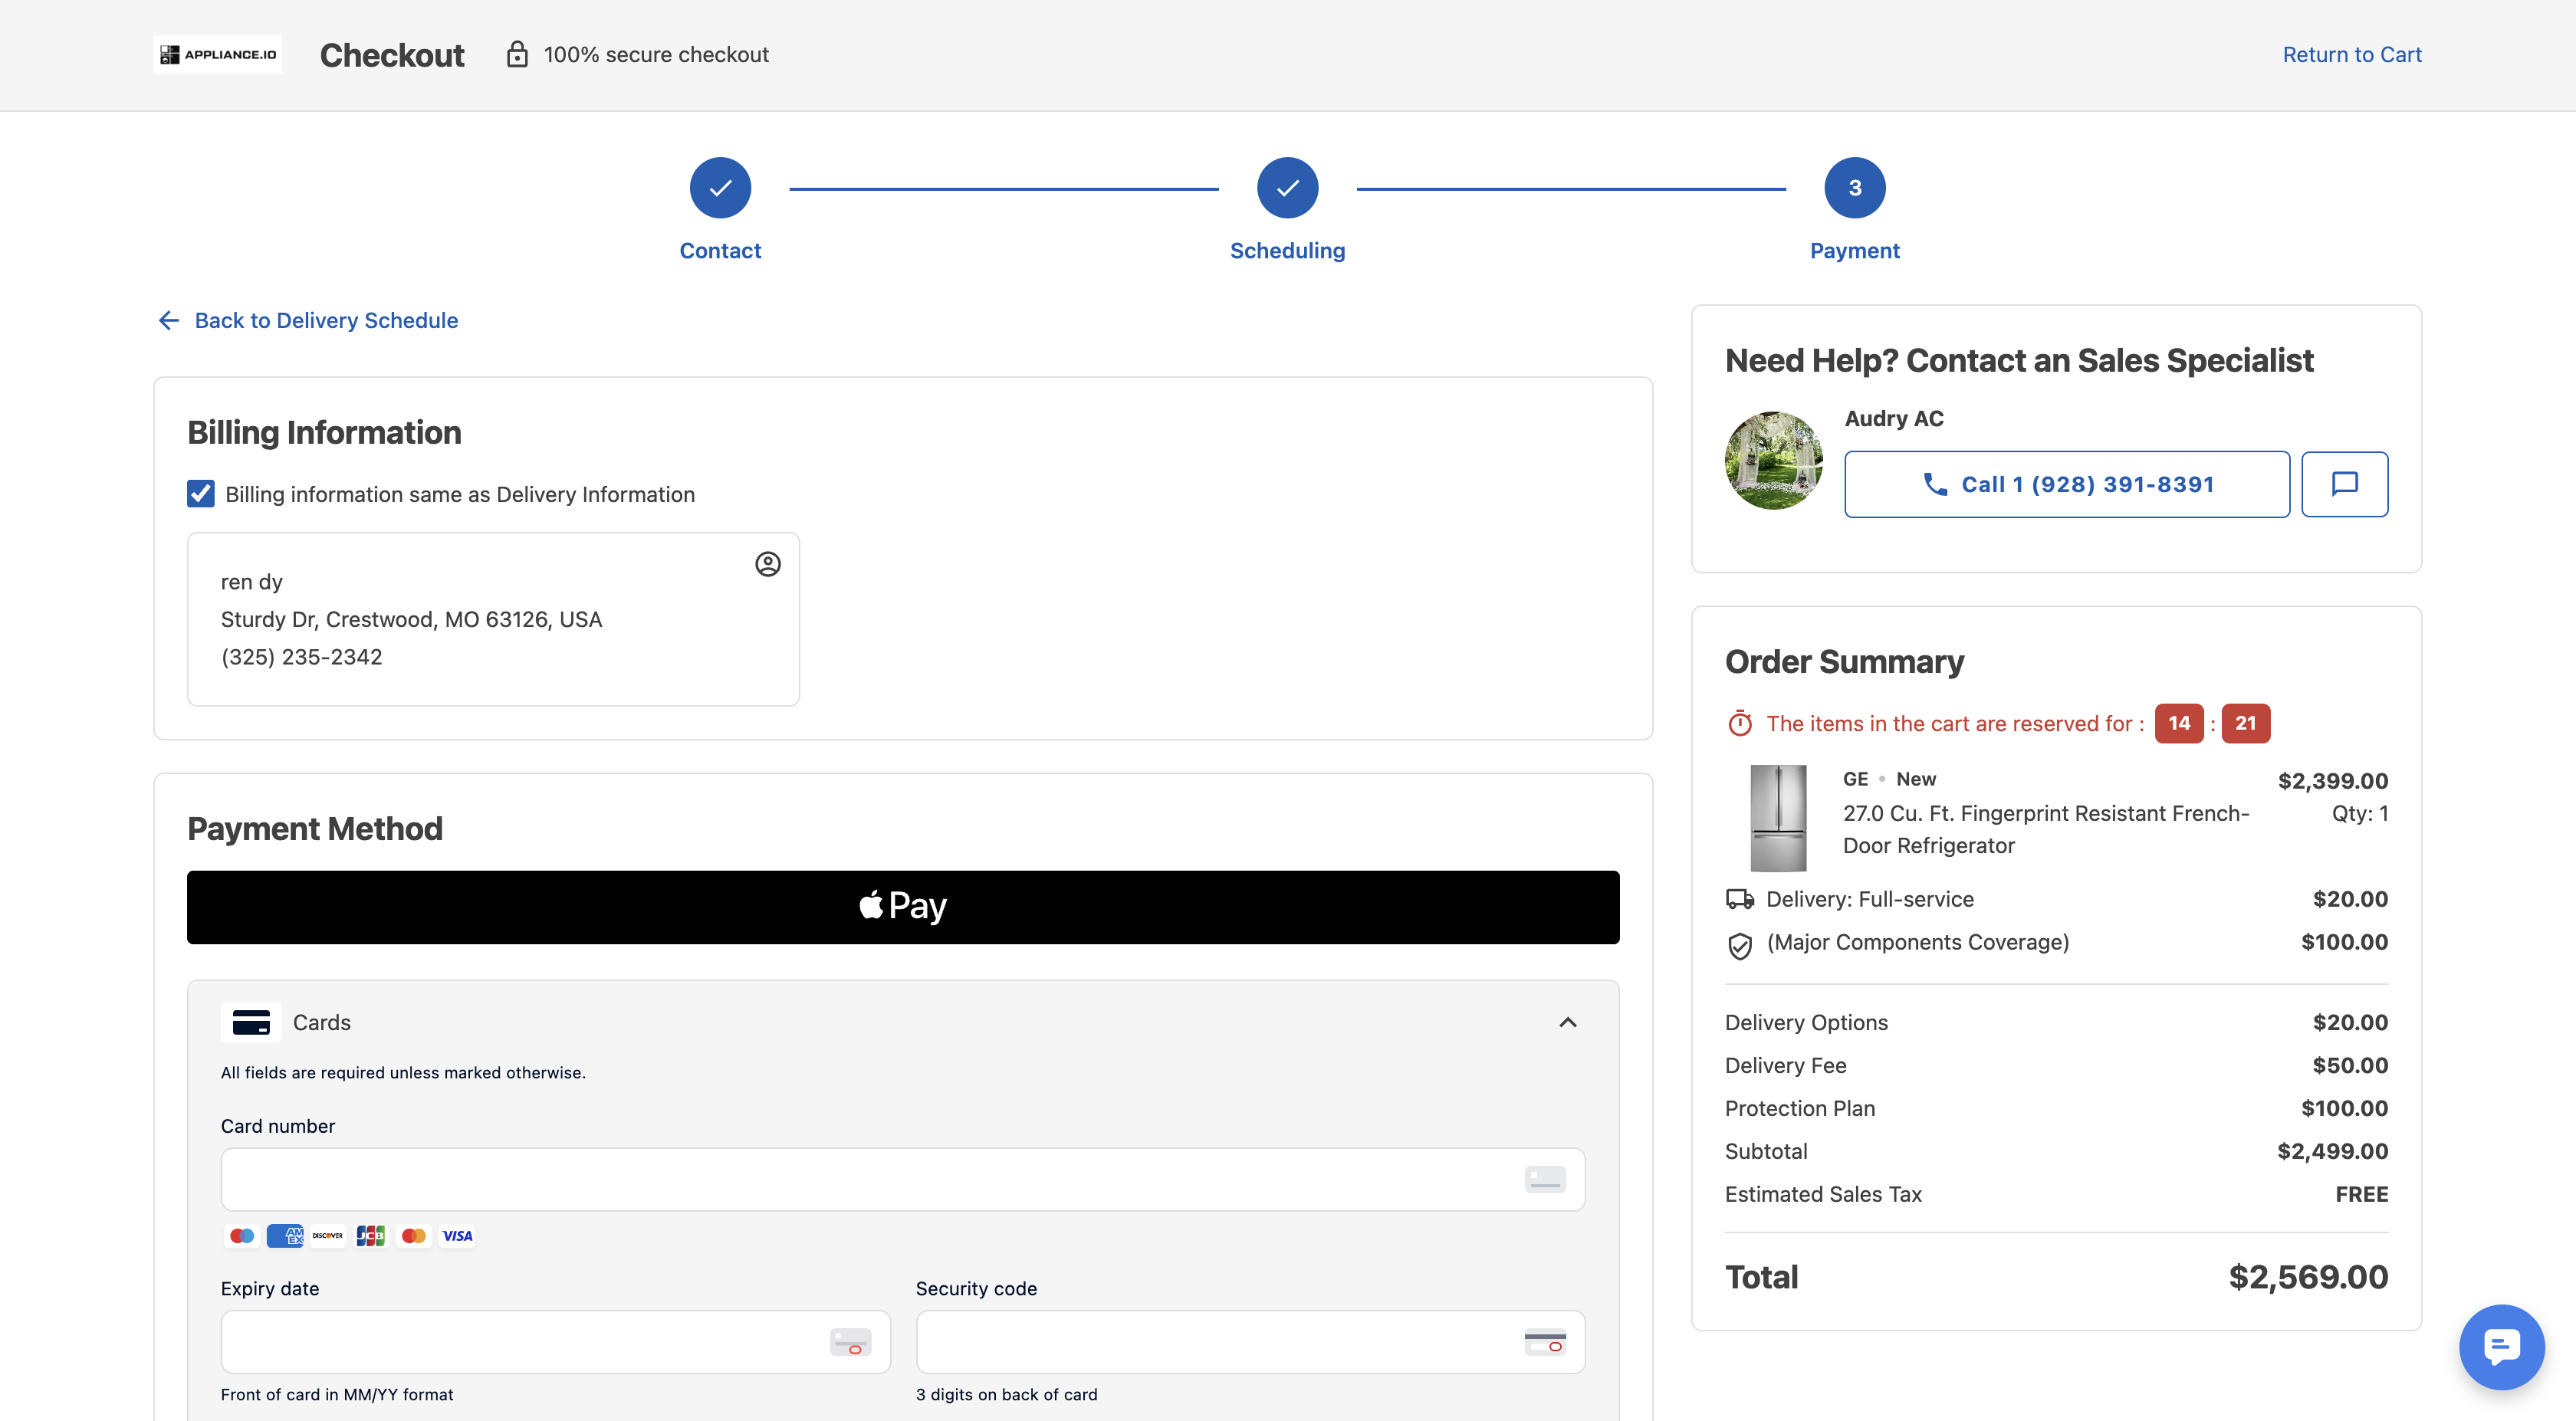
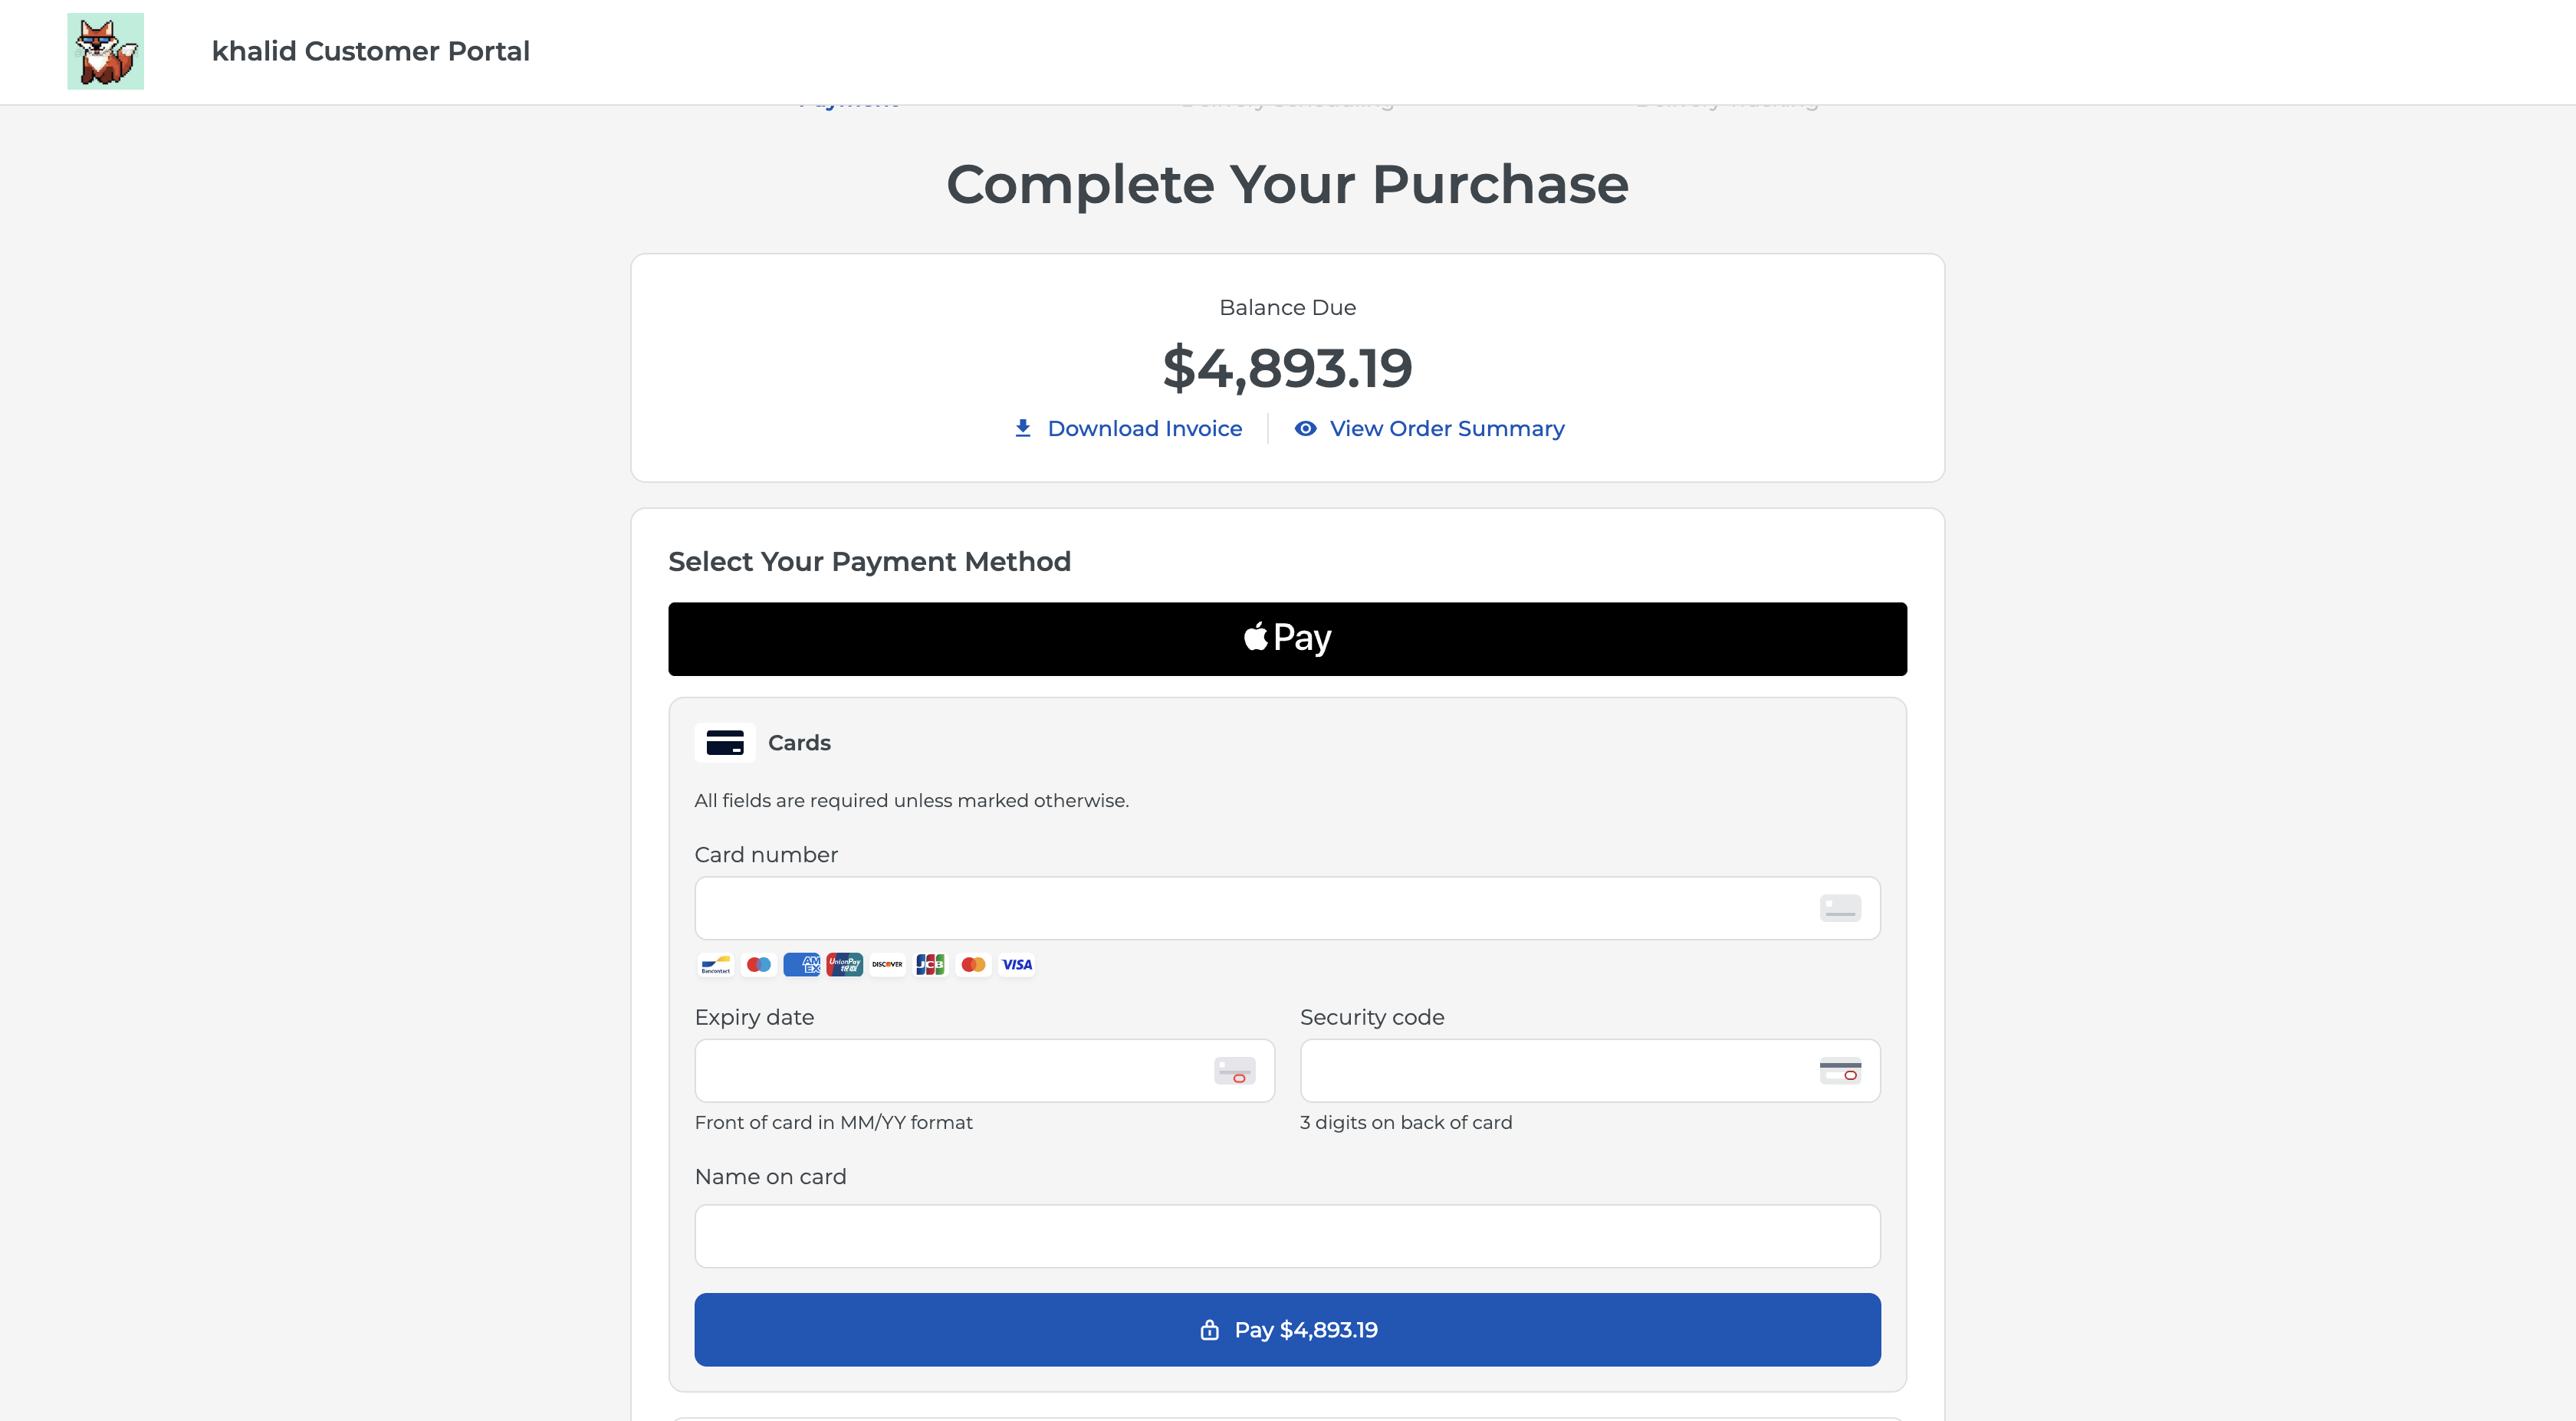
Your customers can now pay with Apple Pay — whether they’re in the customer portal or shopping on your website. Faster checkouts, fewer clicks, and way more convenience. 🎉

💡 Here’s How It Works:

  • Customer Portal:
    • Apple Pay is now a payment option at checkout.
    • Works seamlessly on iPhone, iPad, and Mac.
  • All Client Websites:
    • Apple Pay button appears right in the checkout flow for eligible devices.
    • Customers can complete purchases with just a quick Face ID, Touch ID, or passcode.

📸 Where You’ll See It

  • Customer Portal → Checkout page.
  • Your Website → Checkout payment options.

Now your shoppers can pay in seconds — and you can say goodbye to abandoned carts caused by long checkout forms. 🚀
📊 Upload Product Costs via CSV

What’s New?

You can now upload product cost data directly via CSV. This gives you better control over margin protection and ensures you always have cost data, even when inventory-based costs aren’t available. 🎉

💡 Here’s How It Works:

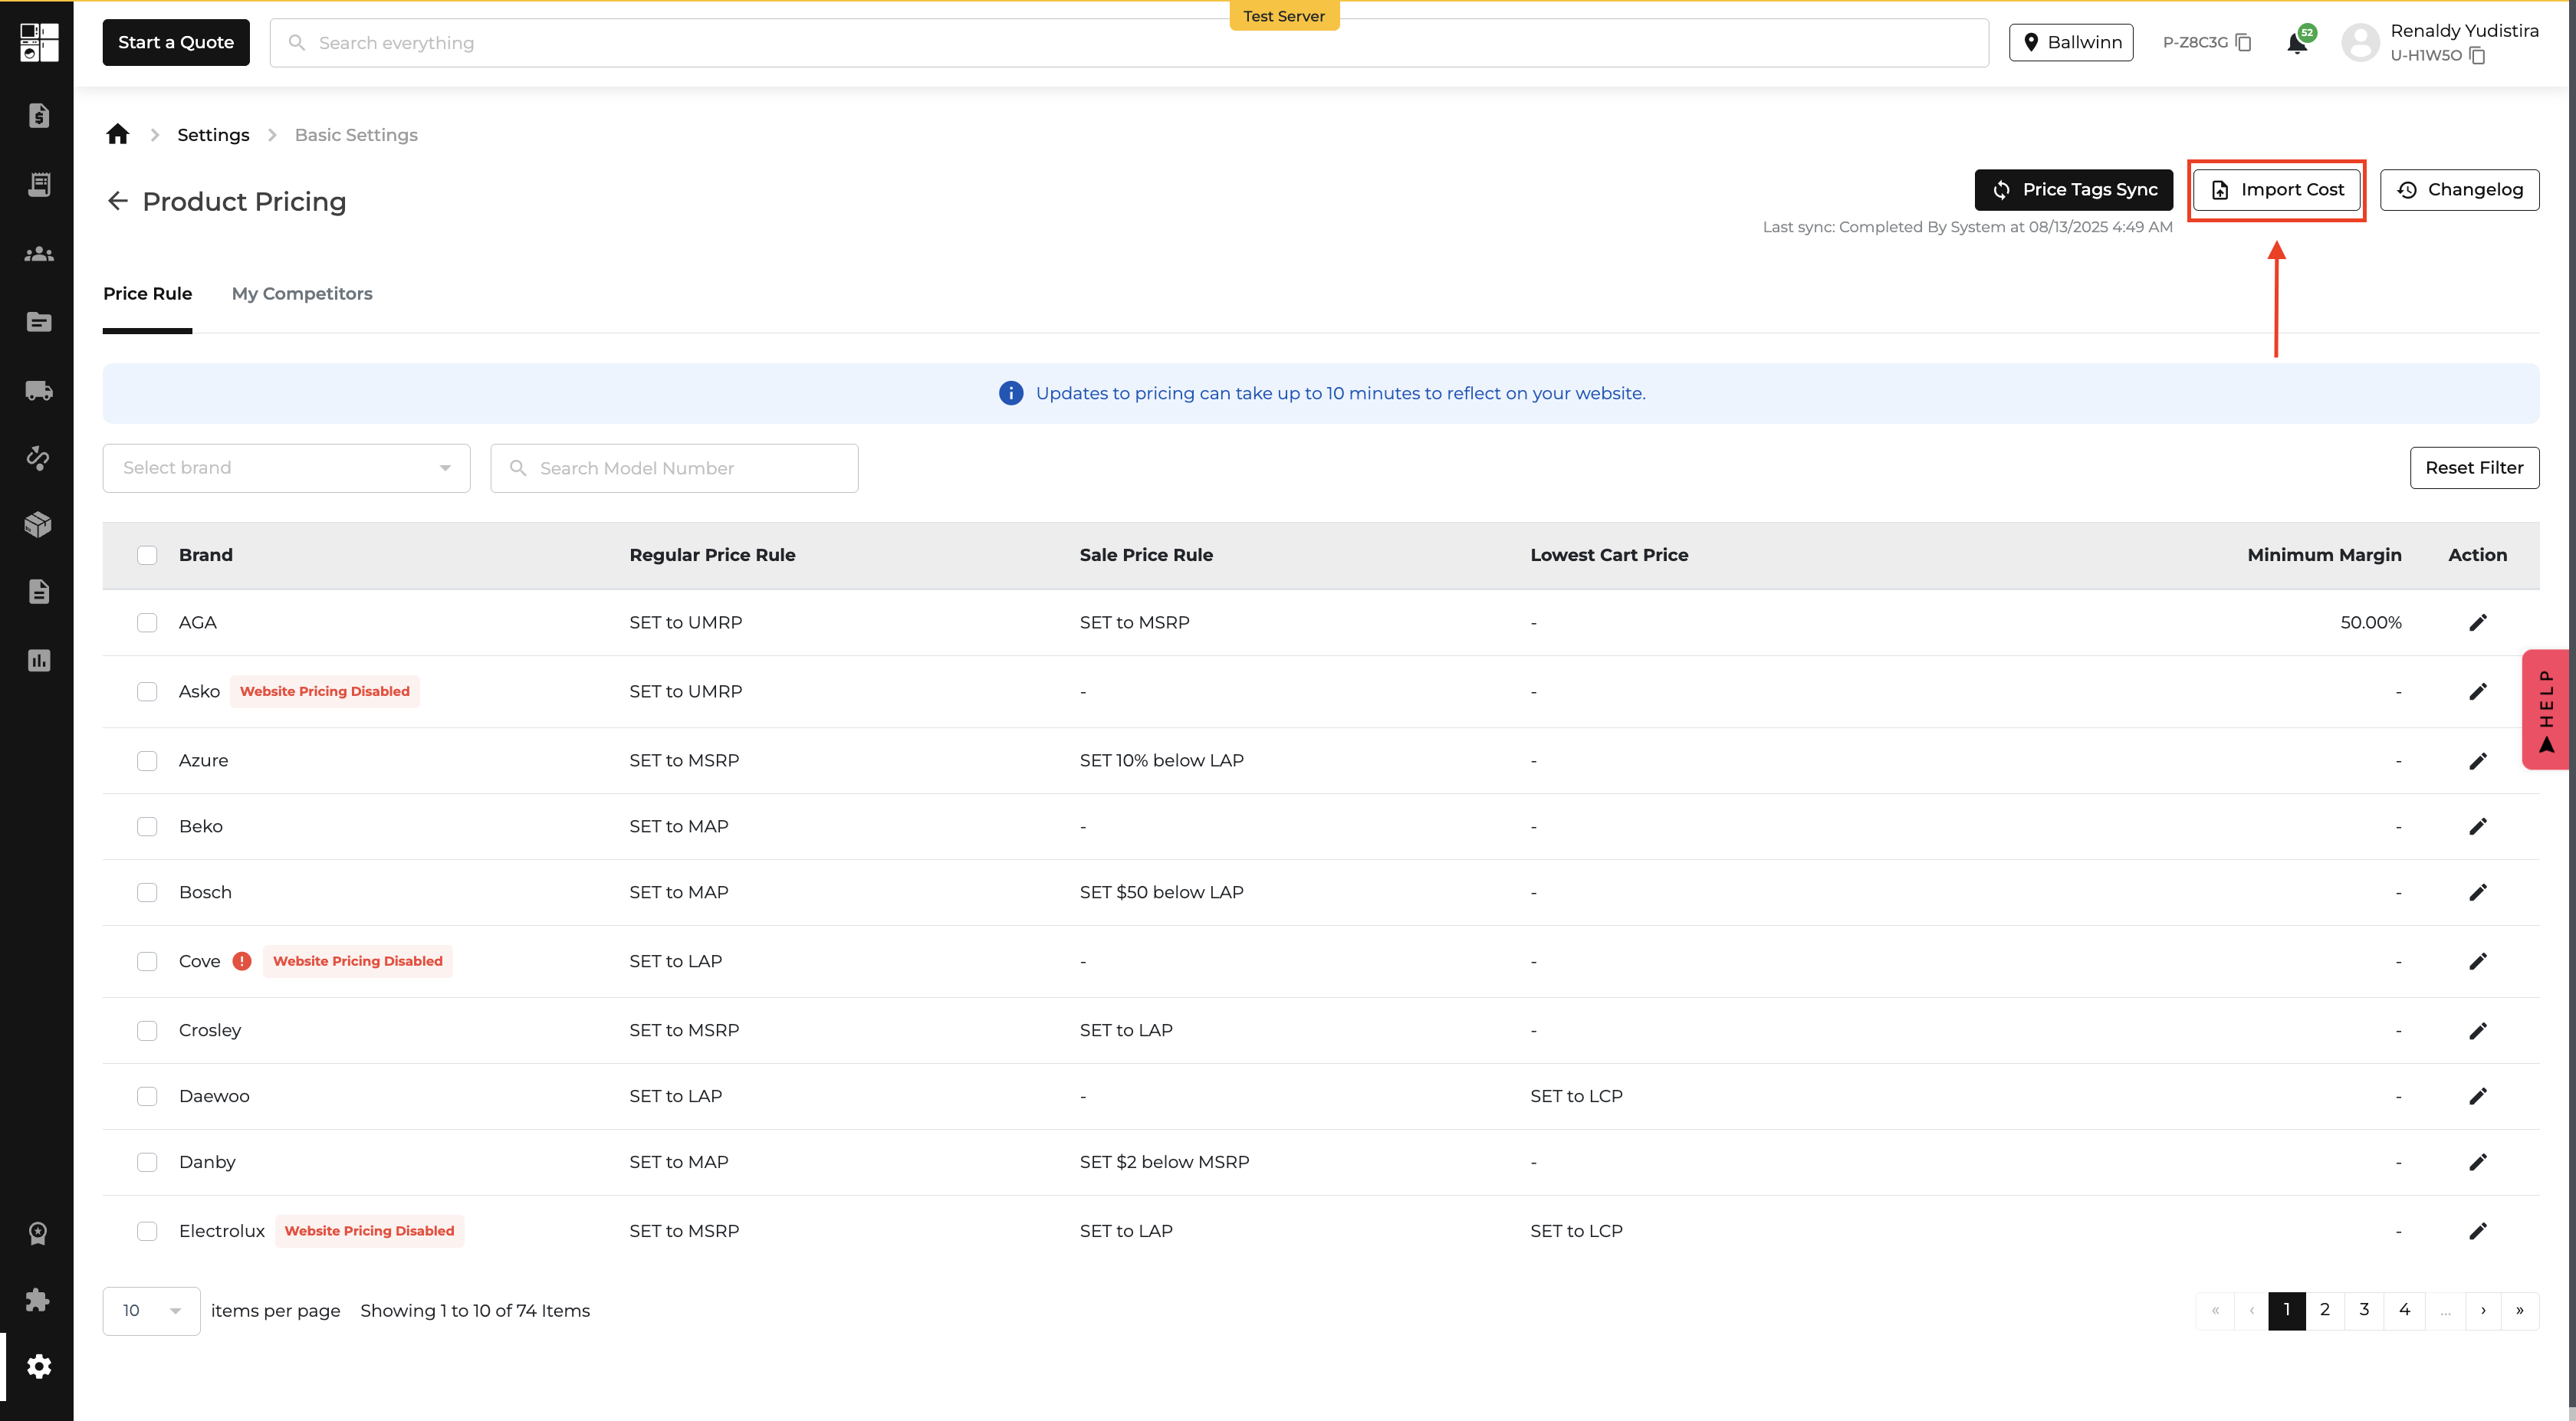
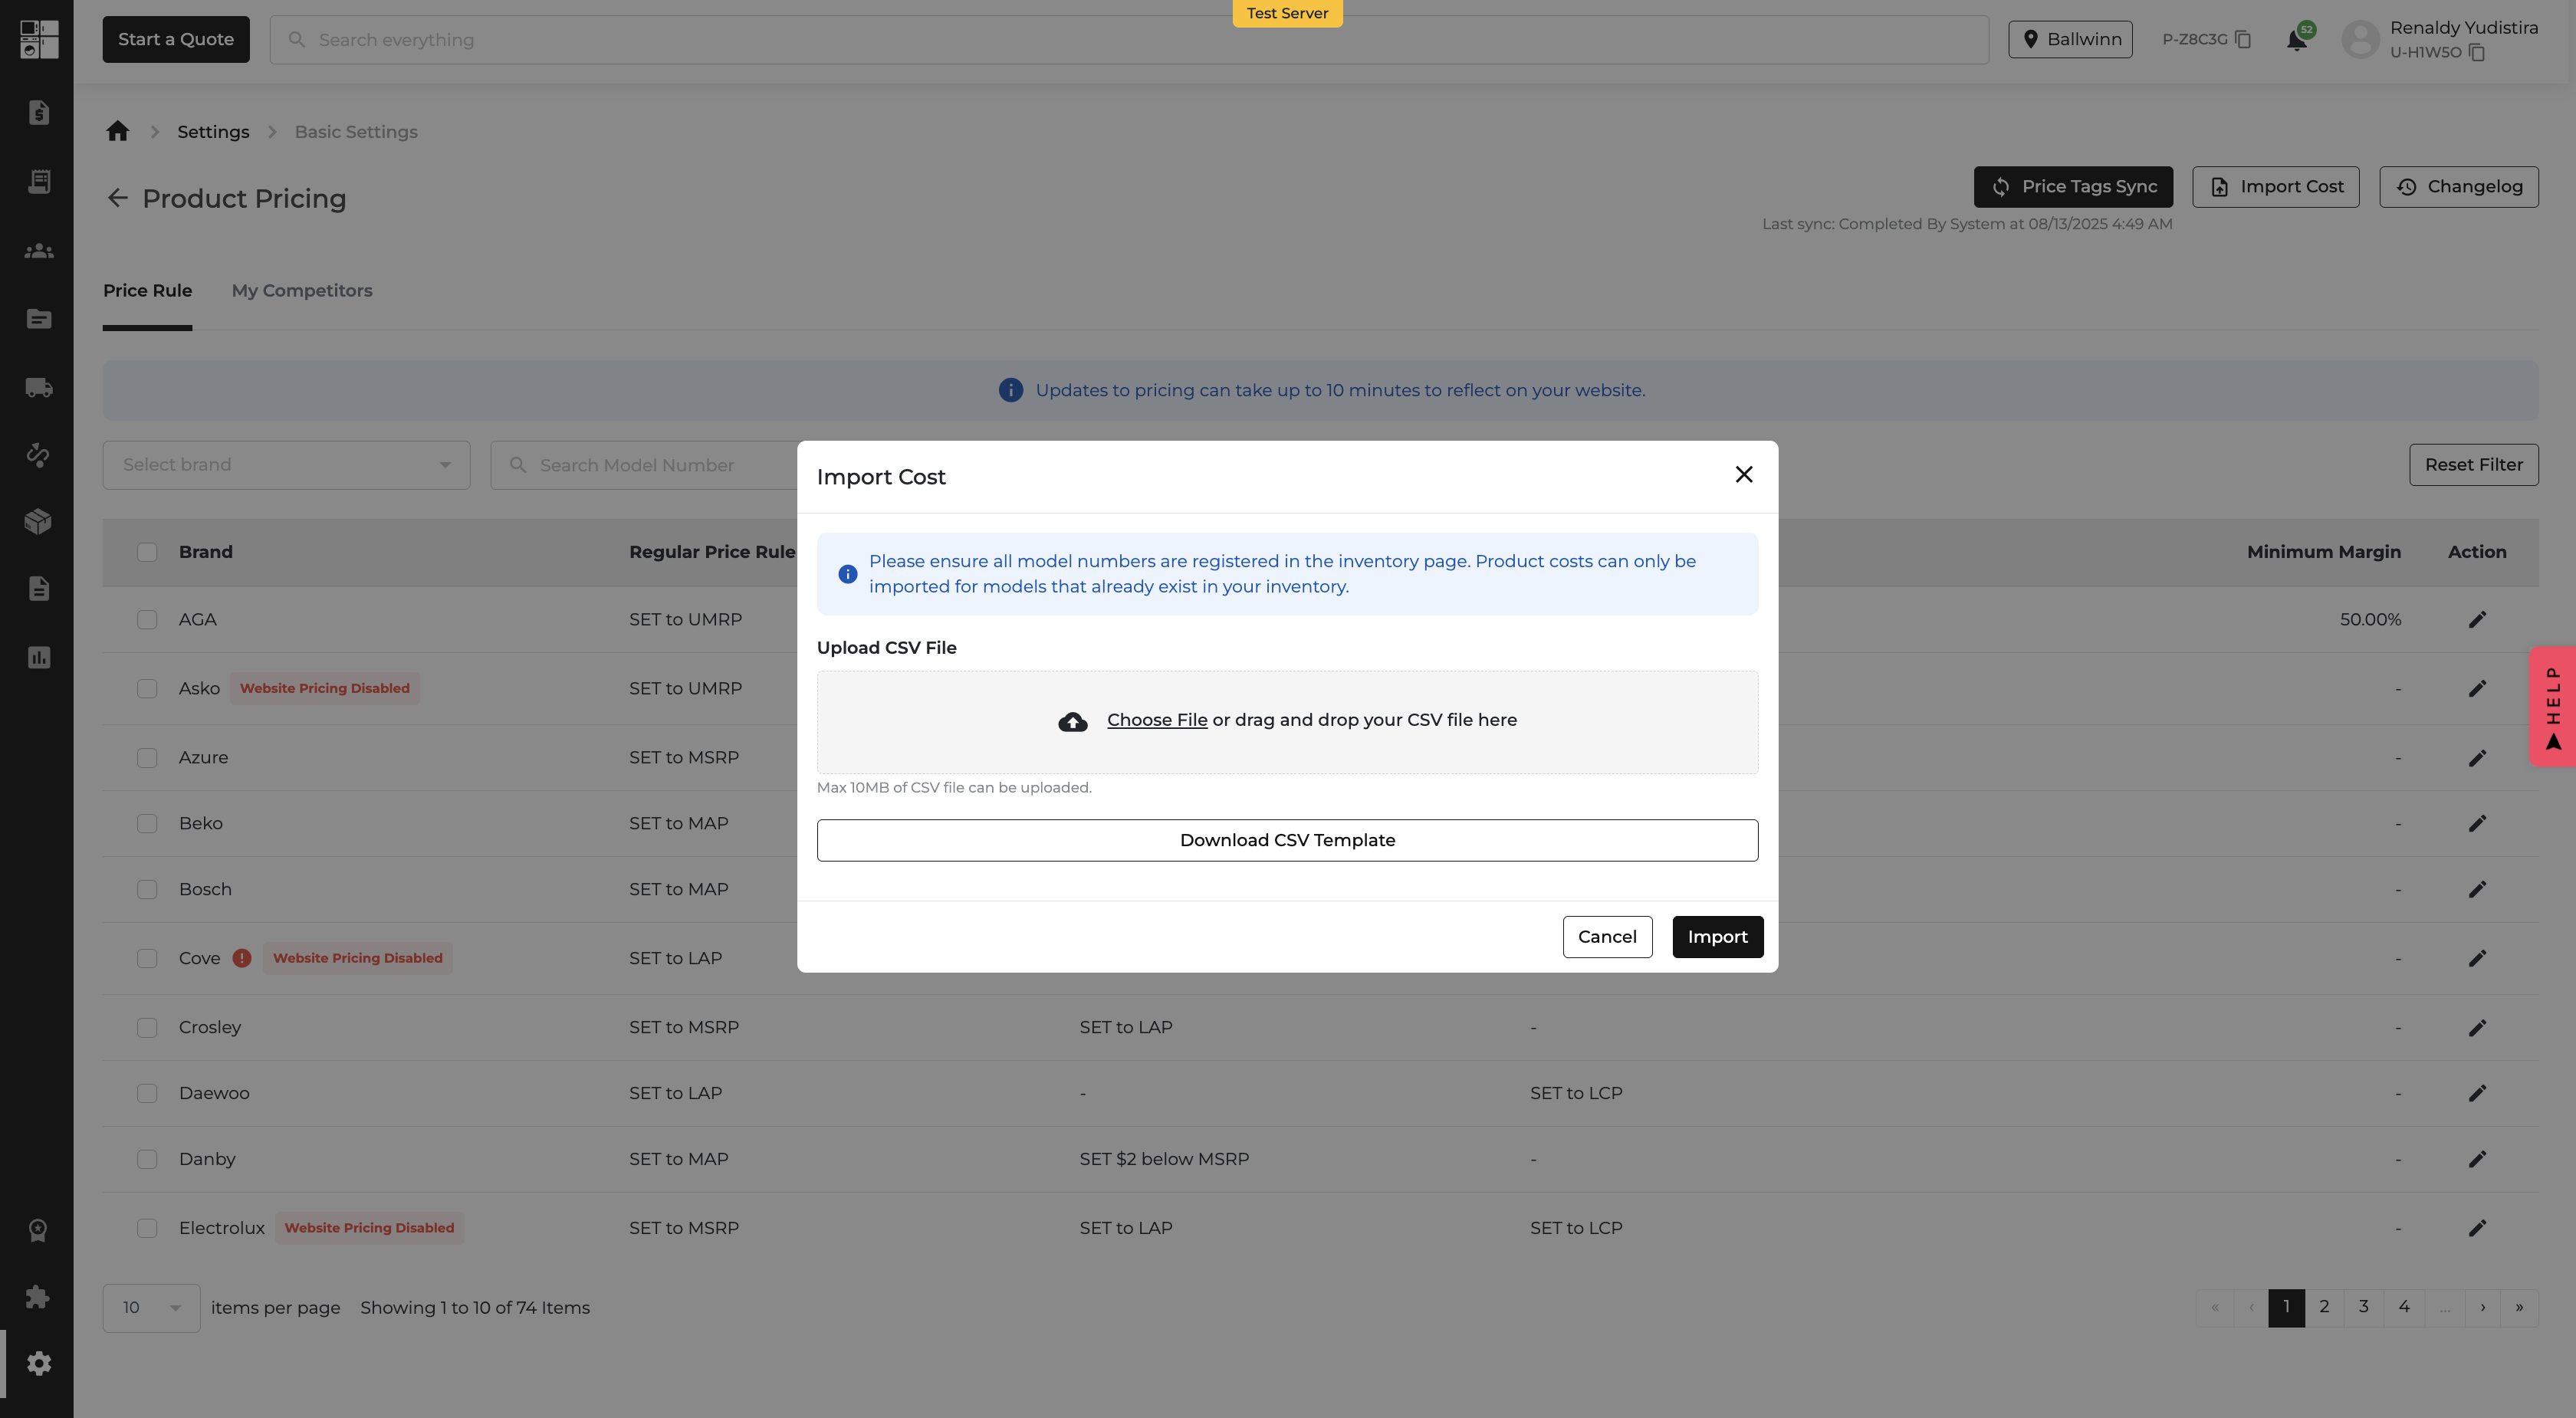
  • CSV Upload on the Price Rules page lets you import costs for all your products.
  • We’ll validate every SKU before processing — if something’s off, you’ll get a downloadable CSV of failed entries to fix and re-upload.
  • Once uploaded, these costs act as a fallback when inventory costs aren’t available, helping future pricing rules enforce cost-based price floors.
  • New Cost Column in Product Pricing:
    • See costs for all brands in one place.
    • Inline editing lets you update costs instantly.
    • A small label shows whether the cost came from inventory, upload, or manual entry.

📸 Where You’ll See It

  • Price Pricing Settings page → CSV upload interface.
  • Product Pricing page → new Cost column with inline editing.

Now you can keep your cost data complete, your margins protected, and your pricing rules running smoothly. 💪
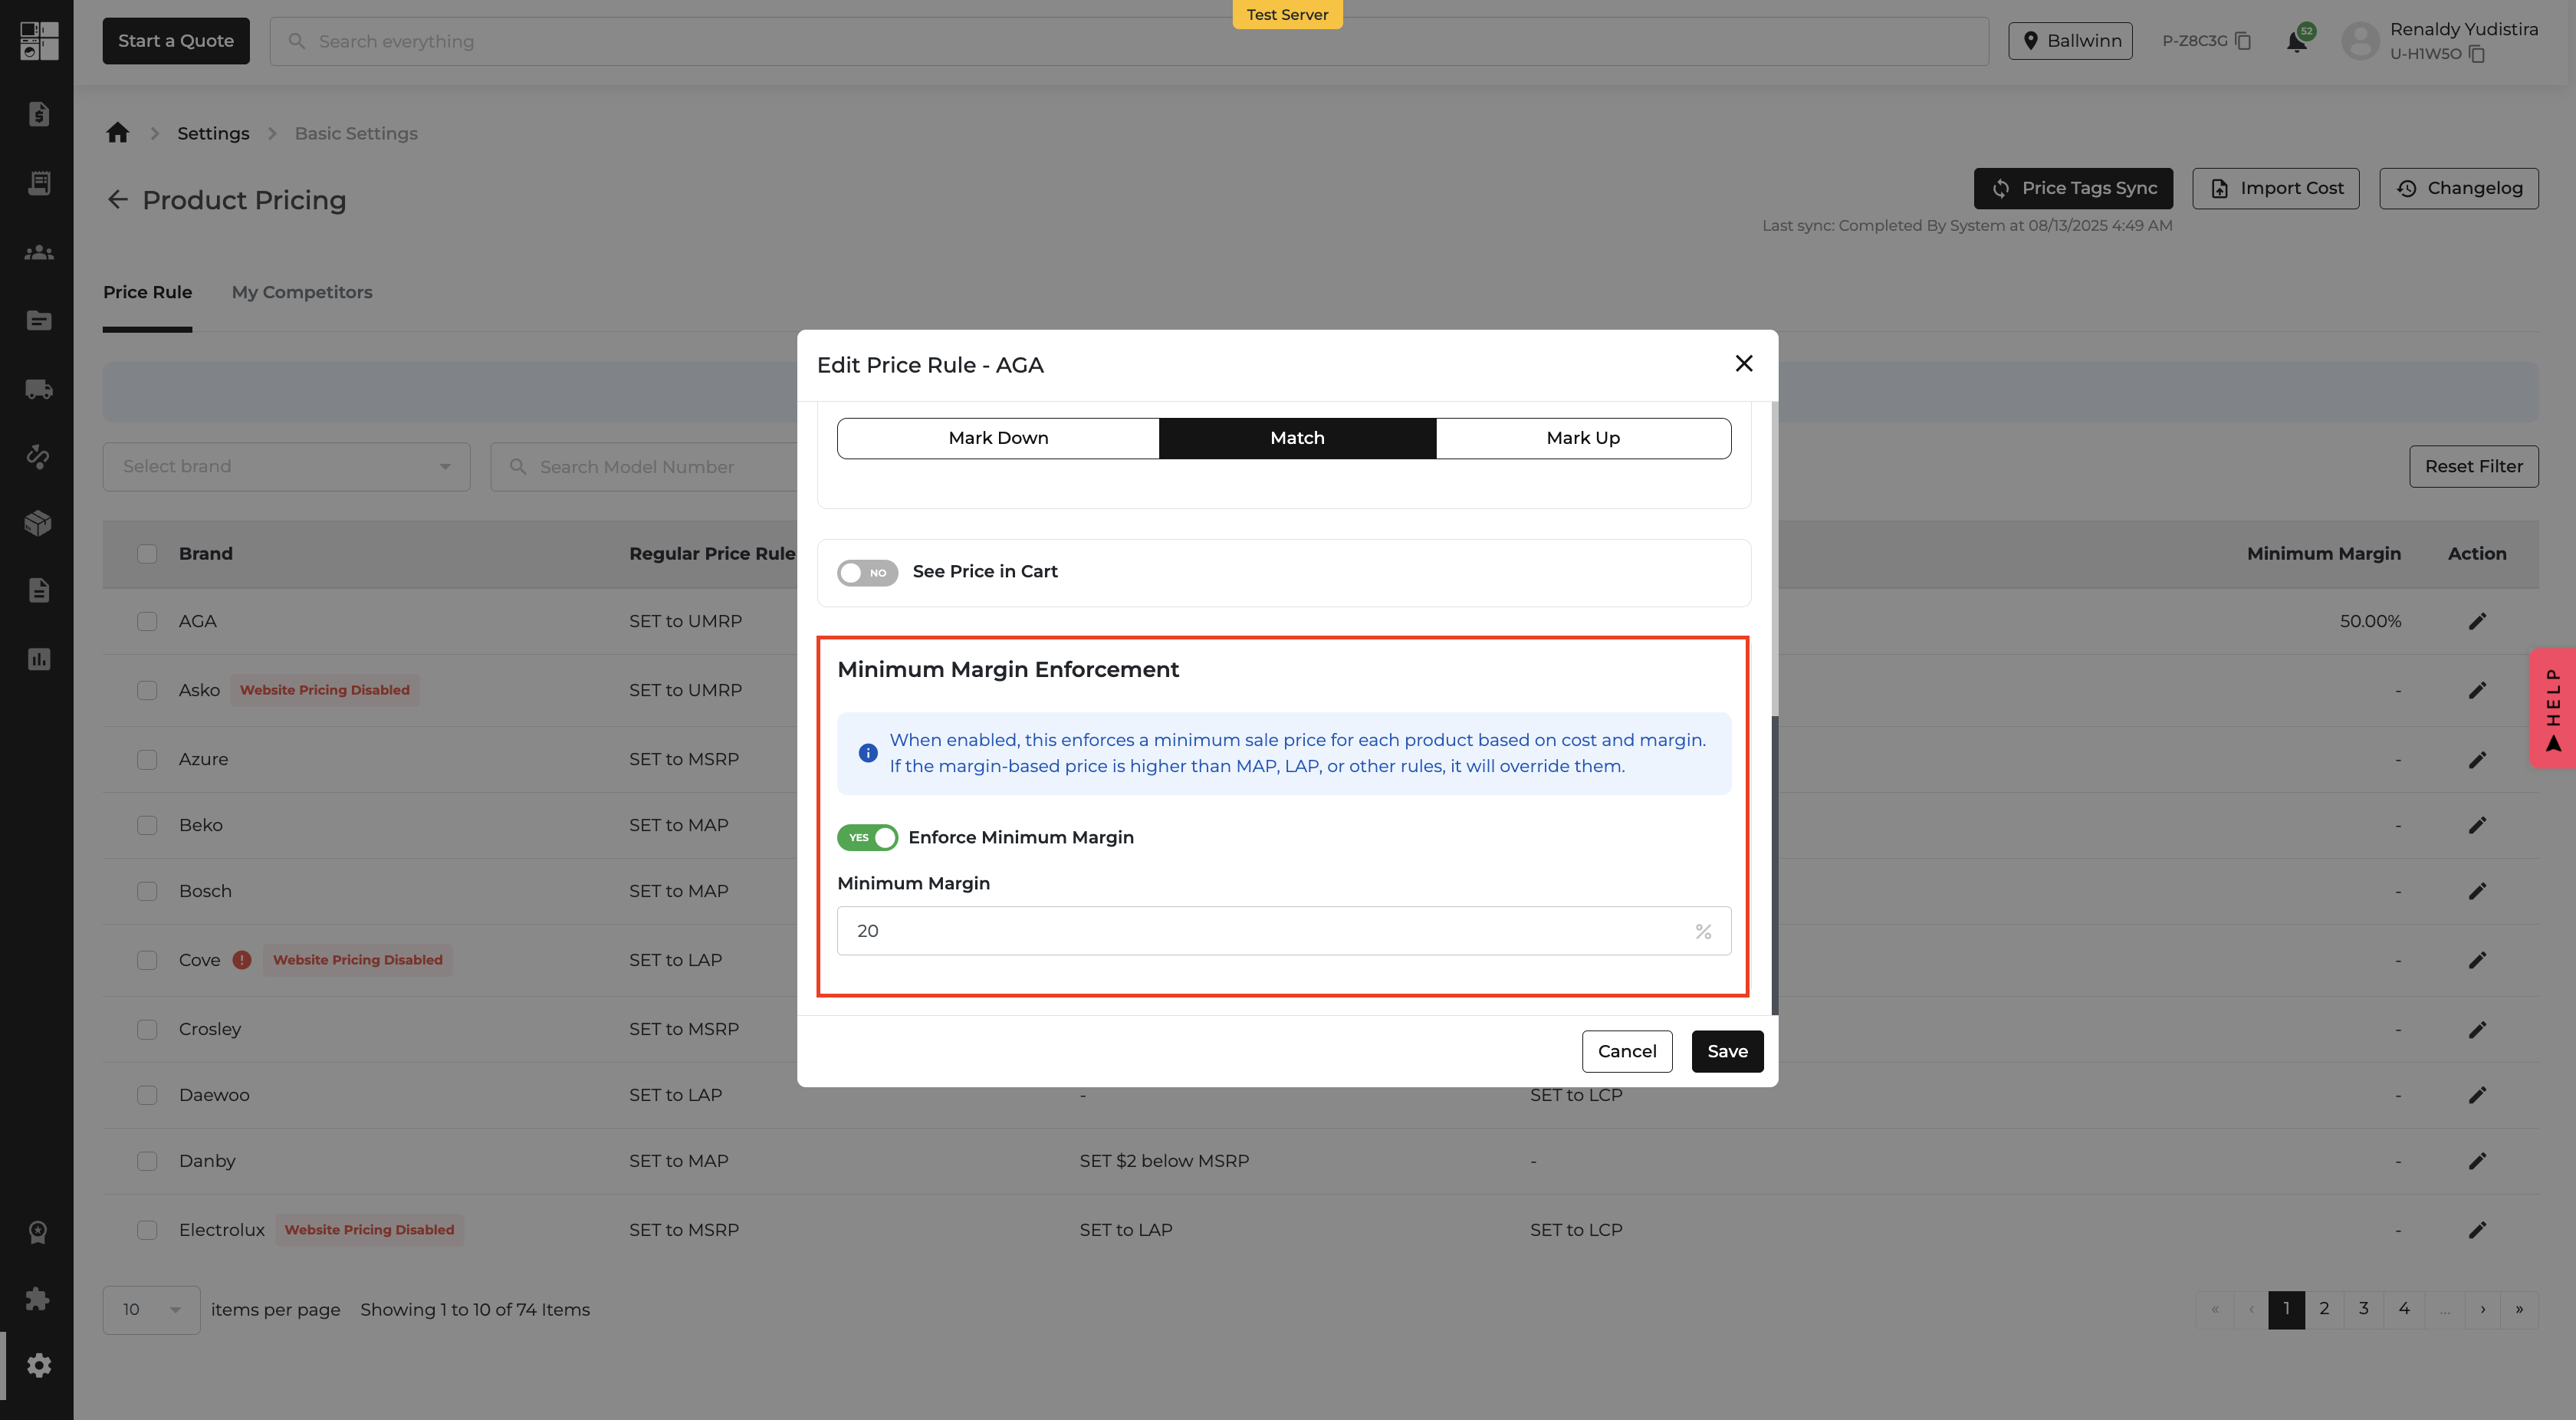
💰 Minimum Margin Enforcement

What’s New?

You can now make sure your products never sell below your profit-safe margin — no matter what pricing rules you’re using. Plus, you’ll be able to spot SKUs that are underperforming with just a glance. 🎉

💡 Here’s How It Works:

  • Set Your Margin
    • In the Edit Price Rule modal, turn on Minimum Margin Enforcement.
    • Enter your target margin % (e.g., 20%).
    • We’ll calculate the lowest possible sale price for each product — and make sure prices never drop below it.
  • See Margins at a Glance
    • New Margin % column in the Product Pricing table.
    • Badges show each SKU’s status:
      • Below Min → Not meeting your margin rule.
      • Healthy → Good to go.
      • No Cost → Cost data missing.
  • Quickly Find Problem SKUs
    • Flip the Show only SKUs below minimum margin toggle to instantly filter down to products that need attention.

📸 Where You’ll See It

  • Product Pricing page → new Margin column, status badges, and filter toggle.
  • Edit Price Rule modal → Minimum Margin Enforcement settings.

Now you can protect your margins, catch leaks before they happen, and keep your pricing as profitable as it is competitive. 🚀
📊 Compare Salespeople Side-by-Side in KPI Reports

What’s New?

Say goodbye to flipping back and forth between reports! You can now select up to five salespeople and compare their KPI metrics in one clean, side-by-side view. Whether you're coaching, reviewing performance, or making decisions — this visual comparison makes it way easier to spot patterns and take action. 🚀

💡 Here’s How It Works:

On the Sales KPI Report Page (Reports > Management Tools):

  • ✅ You’ll now see checkboxes next to each salesperson.
  • 🔢 Select 2–5 salespeople to enable the Compare button.
  • 🛑 Trying to select a 6th? We’ll block it and show a tooltip explaining the limit.
  • 👀 Click Compare to open the new Comparison View

In the Comparison View:

  • KPI metrics are listed in rows; selected salespeople appear as columns.
  • 📈 The highest values in a row are highlighted in green, and the lowest in red.
  • 📥 You can Export the comparison as a PDF, Excel, or CSV

📸 Where You’ll See It:

  • New checkboxes and a Compare button on the Sales KPI Report page.
  • Comparison View displaying your selected salesperson team side-by-side.
  • Export option directly within the comparison view.

💰 AIO PAY Fee Now Visible in Income Statement

What’s New?

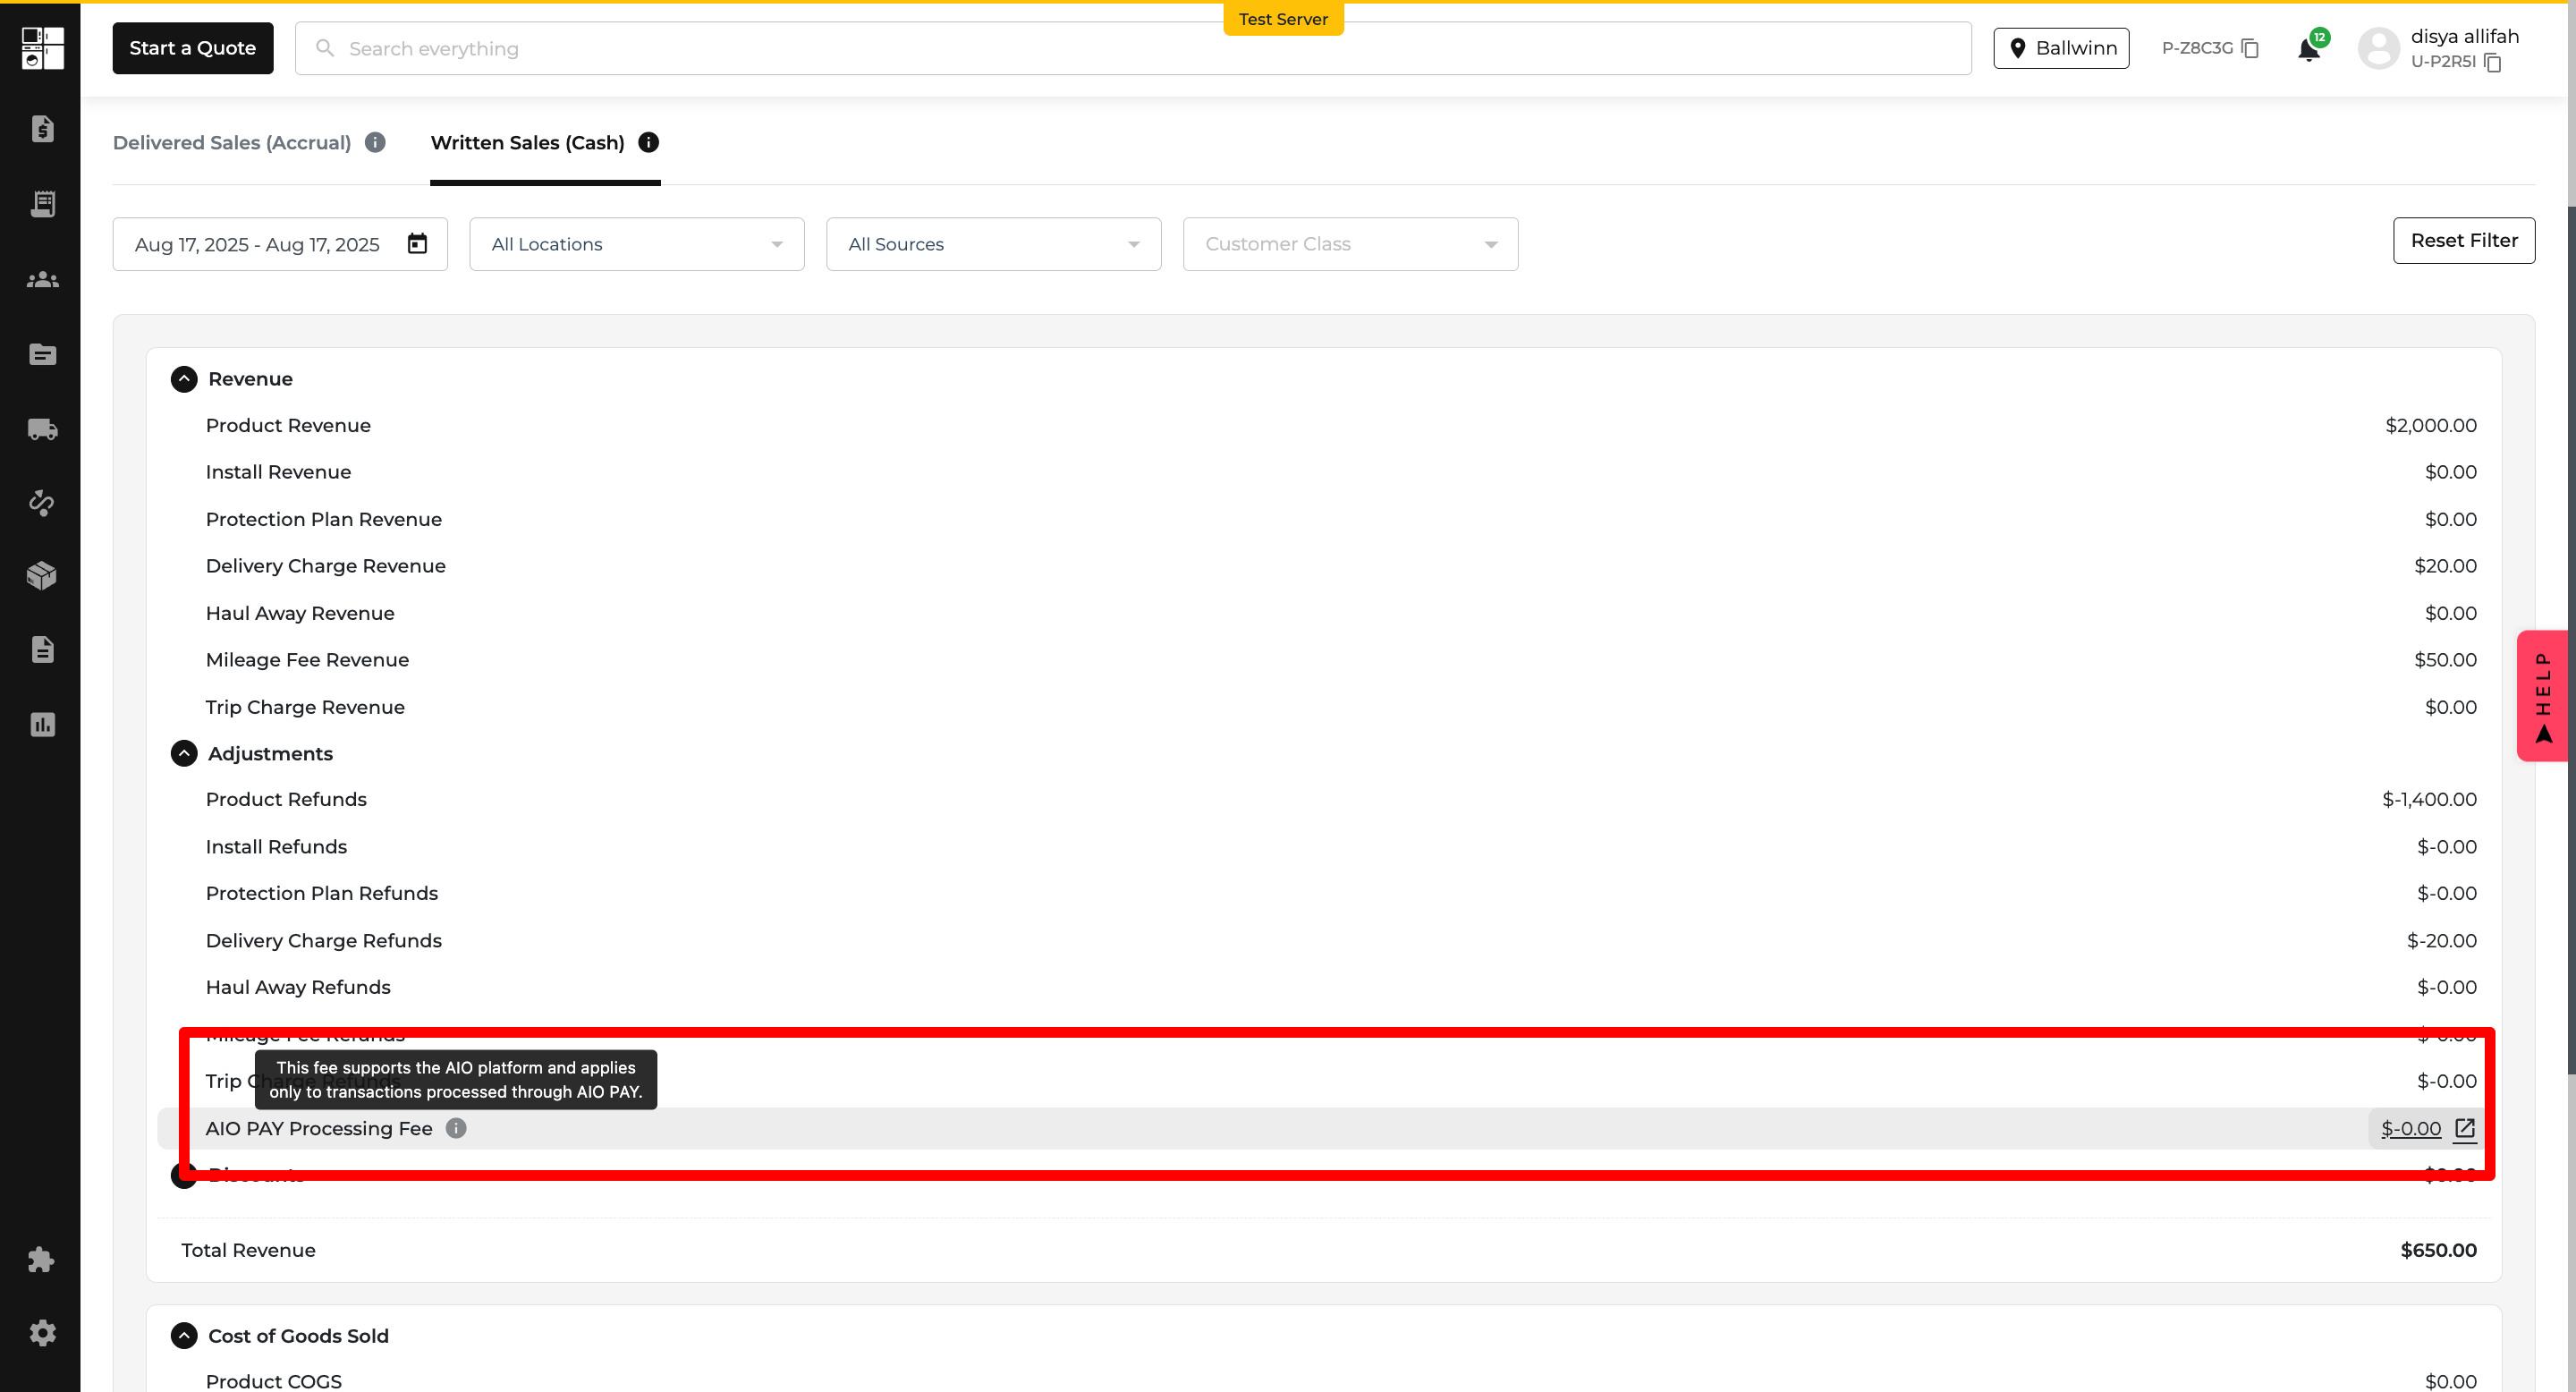
Wondering where those AIO PAY charges show up? You're not alone. We've added a dedicated line in the Income Statement so you can now clearly see the AIO PAY Processing Fee — no more guesswork, no more hidden costs. 🧾✨

💡 Here’s How It Works:

On the Income Statement Report:

  • A new line labeled “AIO PAY Processing Fee” appears under the Adjustments section.
  • The line shows the total AIO PAY fees for the reporting period.
  • Hover over the label to view a helpful tooltip:“This fee supports the AIO platform and applies only to transactions processed through AIO PAY.
  • It follows the same journal-style format you're used to — just clearer and more complete.

📸 Where You’ll See It:

  • Under Income Statement Report → Written Sales (Cash) → Adjustments
  • Hover tooltip explaining the fee

📅 Due Date Now Added to Accounts Receivables Reports & Statements

What’s New?

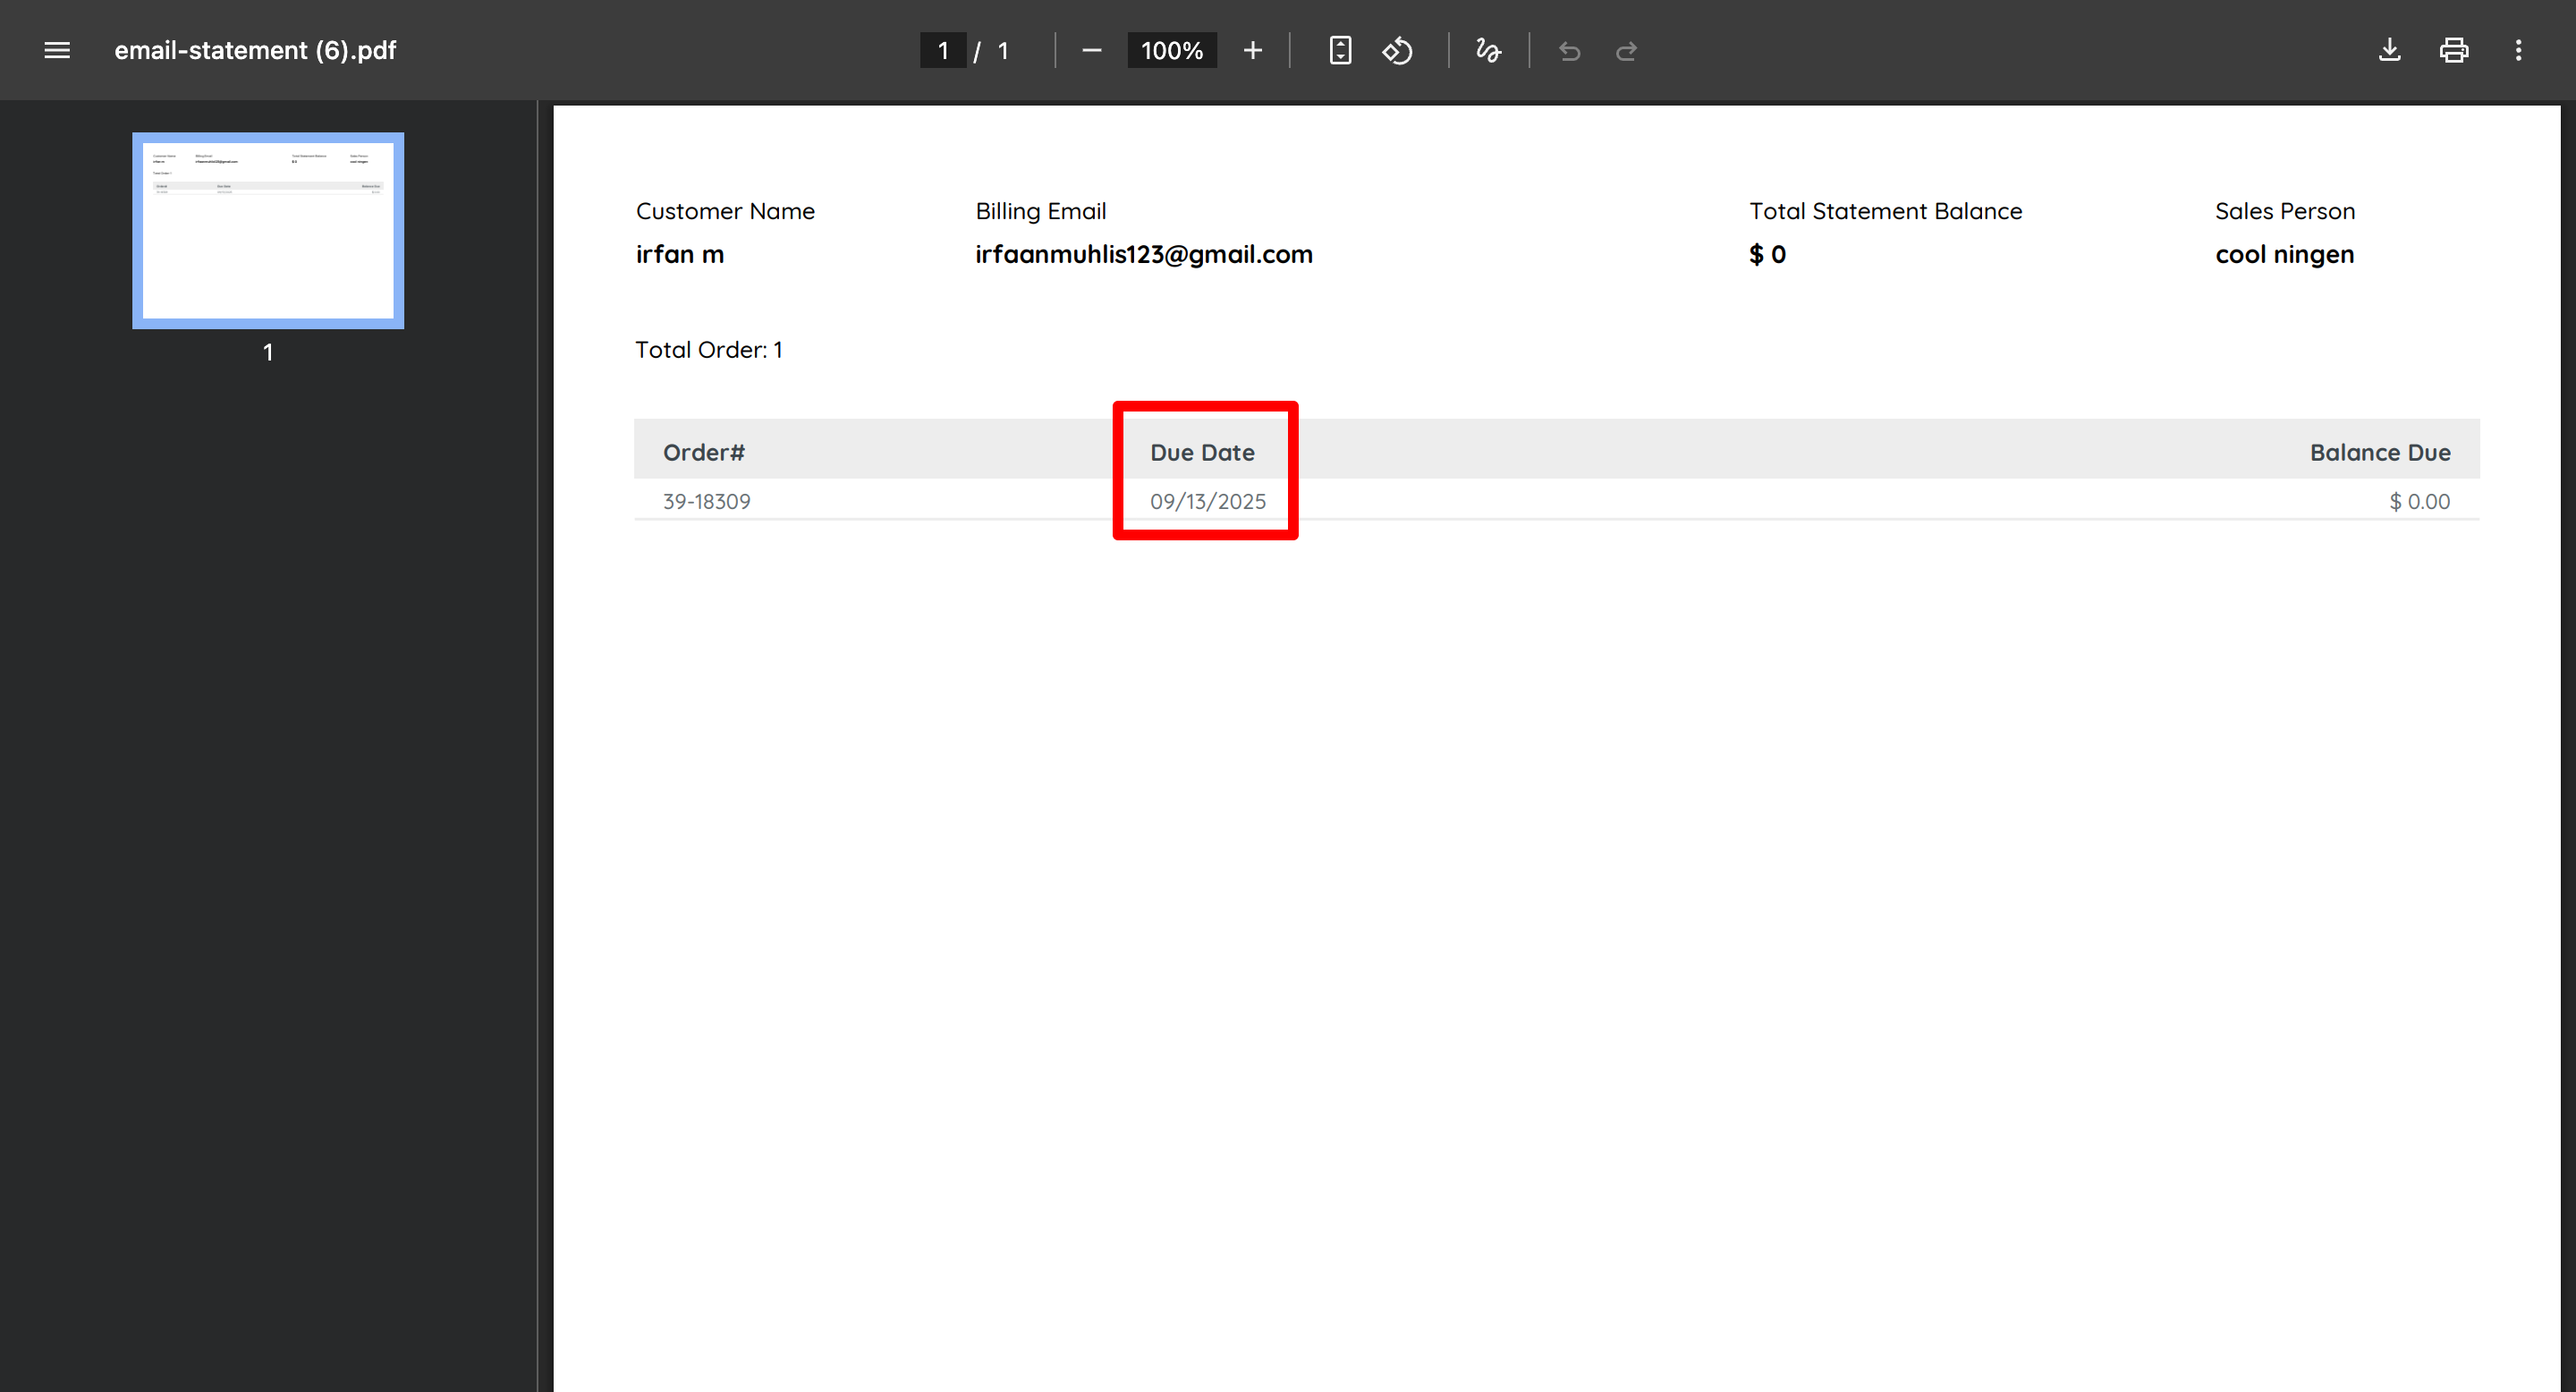
We’ve added a clear Due Date to your Accounts Receivable Report, Email Statements, and Print Templates. Now, everyone’s on the same page — literally — when it comes to payment deadlines. 💸✅

💡 Here’s How It Works:

On the Accounts Receivable Report:

  • You’ll see a new “Due Date” column for every entry.
  • The due date is calculated from the first item delivered — based on your payment terms (e.g., Net 30 = 30 days from first delivery).
  • A helpful tooltip explains how the due date is set so there’s no confusion.

On Email & Print Statements:

  • The same Due Date now appears clearly in both formats.

🧠 Tooltip Copy:

Due Date is calculated based on the first item delivered. For net 30 terms, this will be 30 days from the delivery date of the first item. If multiple items are delivered, the date of the first delivery determines the due date.

📸 Where You’ll See It:

  • New Due Date column in the Accounts Receivable Report (pic4)
  • Updated Email Statements with due date(pic5)
  • Enhanced Print Templates with clearly labeled due dates(pic6)

Pic 4

Pic 5

Pic 6

🏷️ Update: More Accurate Coupon Reporting with Qualified Order Amount

What’s New?

Confused by coupon values in your reports? You weren’t alone. We’ve made improvements to the Retailer Coupon Report so you can now clearly see where and how much of the order the coupon was actually applied to. No more guesswork, no more misinterpretation. 🧠💡

💡 Here’s How It Works:

In the Retailer Coupon Report:

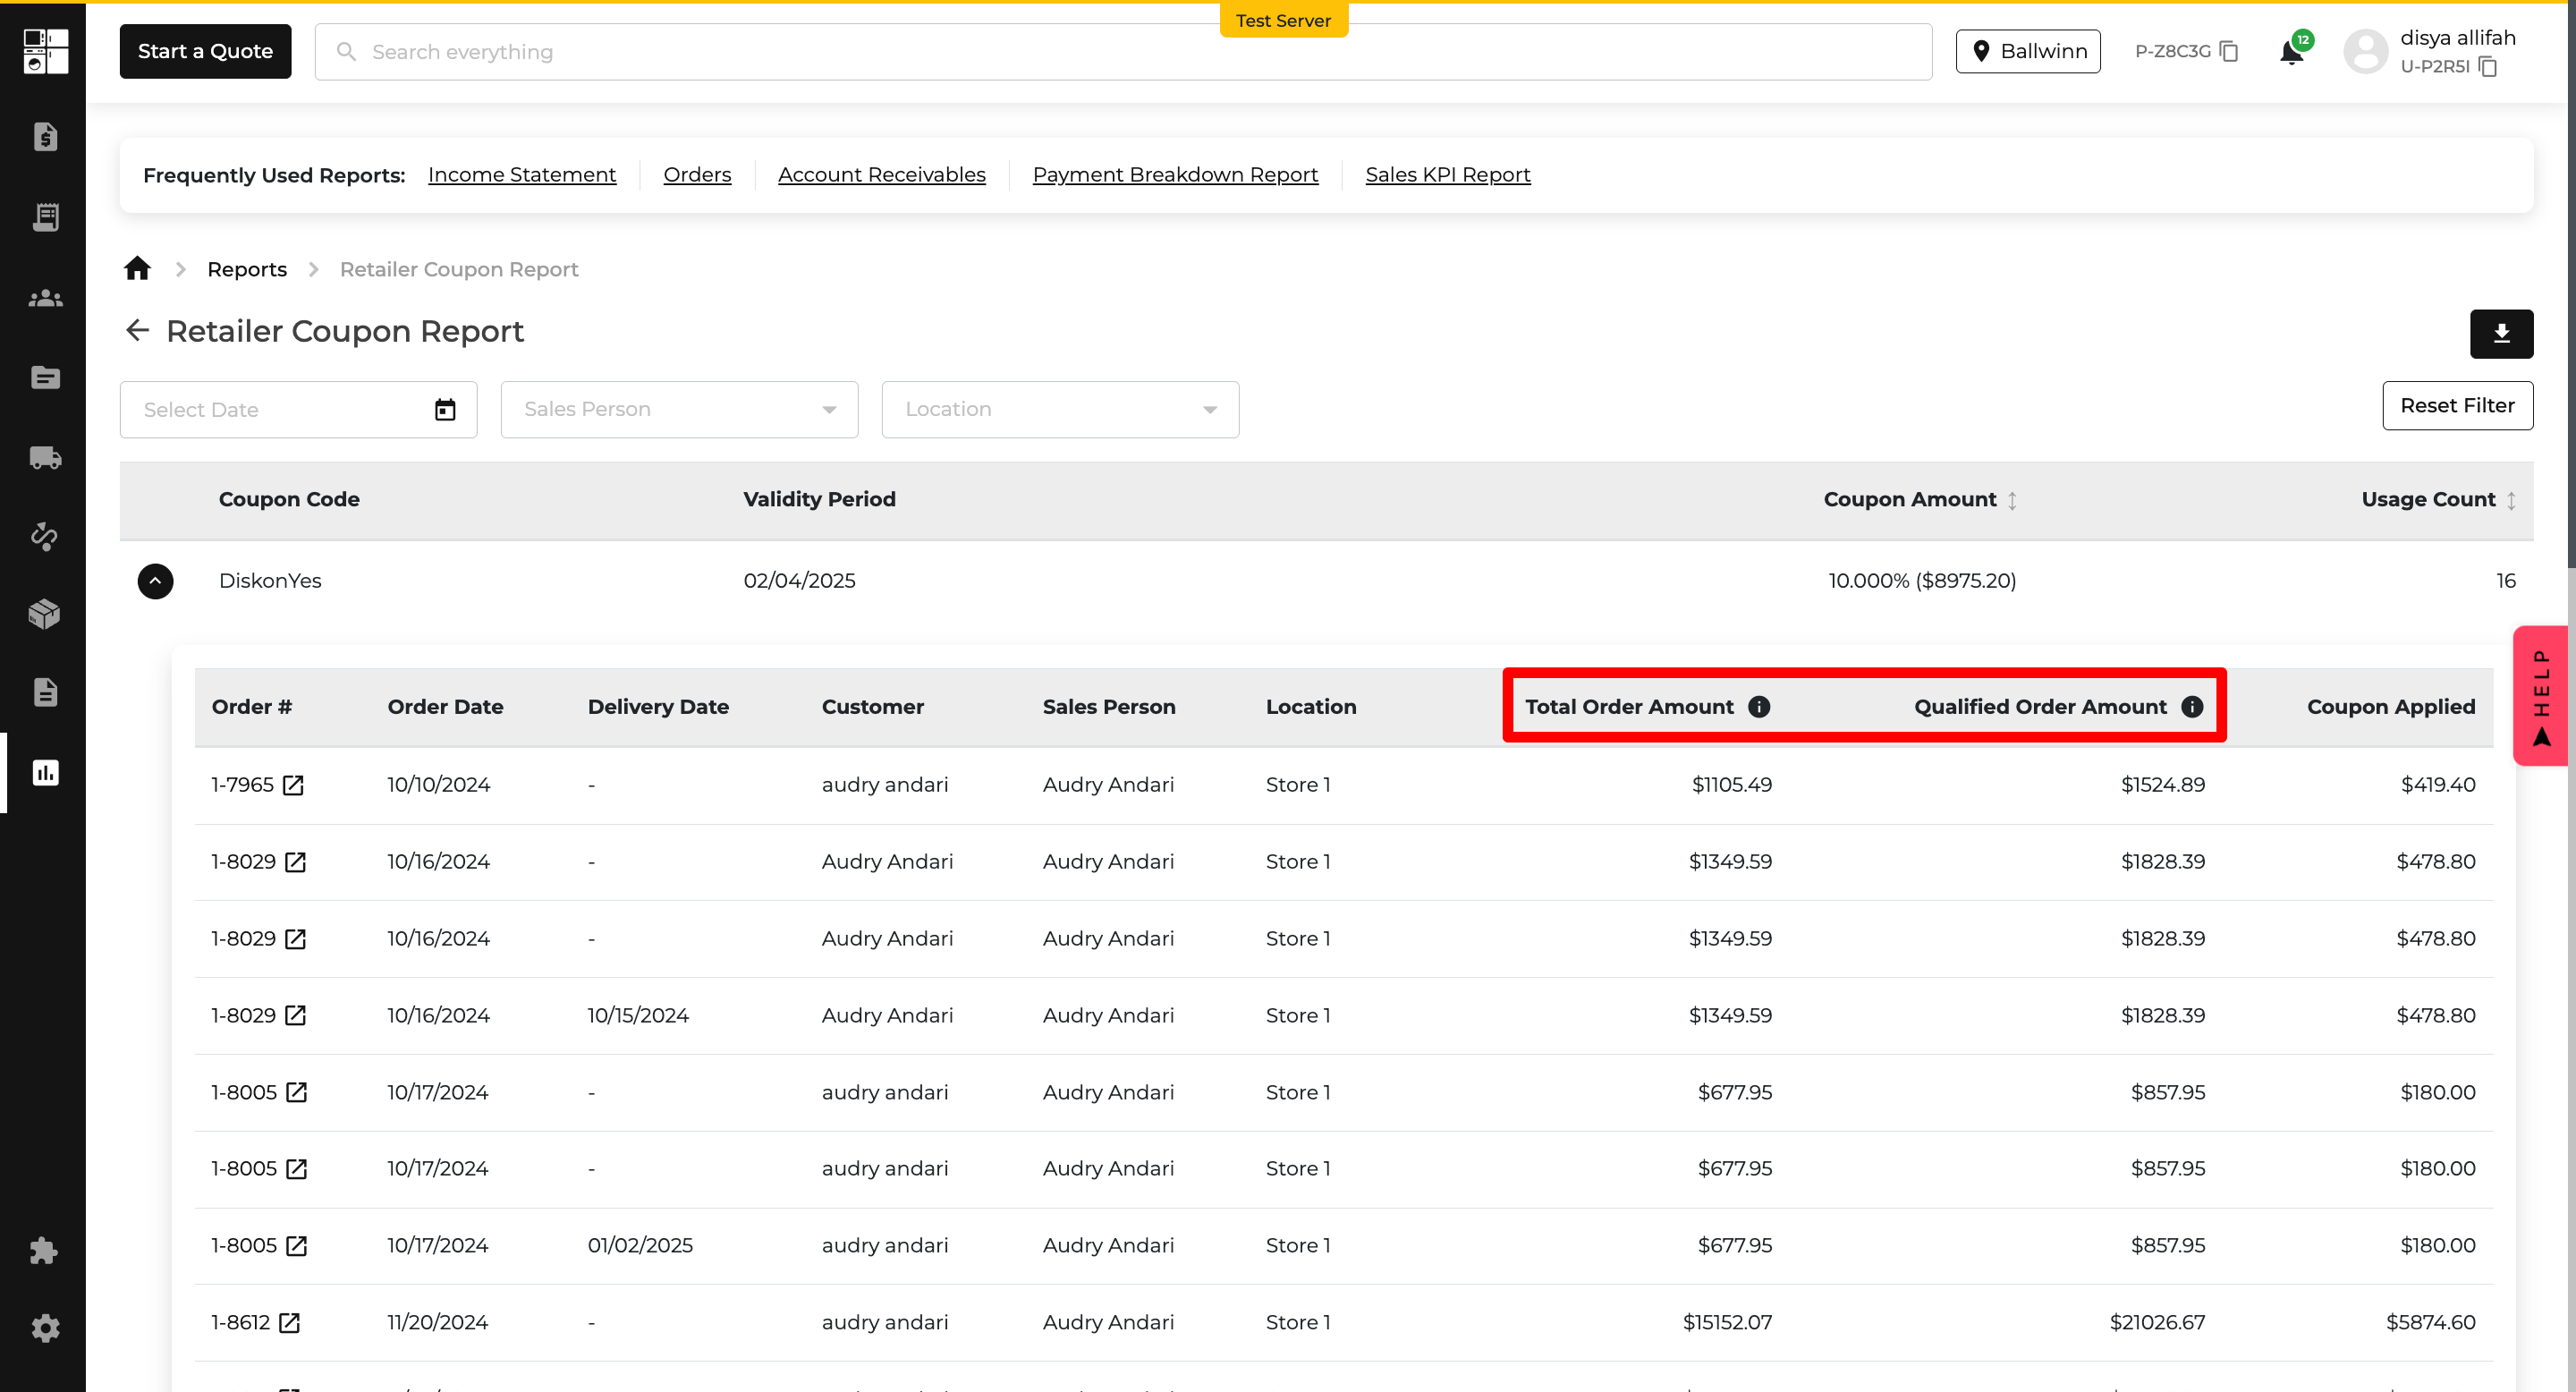
  • 📊 The old "Order Amount" column is now called "Total Order Amount" — to show the full value of the order before any discounts.
  • ➕ We’ve added a new "Qualified Order Amount" column to highlight just the portion of the order that the coupon was applied to.
  • 🧾 Tooltips on both columns explain exactly what they mean, so your team stays aligned and confident when analyzing coupon performance.

🧠 Tooltip Text:

  • Total Order Amount: “The total value of the order before applying any coupons.”
  • Qualified Order Amount: “The value of the order to which the coupon was applied. This reflects the discounted portion of the total order.”

📸 Where You’ll See It:

  • New column names and tooltips inside the Retailer Coupon Report
  • Easily compare total vs qualified order values to assess coupon impact more accurately

📊 Smarter Insights in the Floor Model Planner Report

What’s New?

Your Floor Model Planner report just got a data upgrade! Now you’ll see three brand-new columns that give you clearer insights into performance and trends — without digging through separate reports.

💡 Here’s How It Works:

On the Floor Model Planner Report:

  • Average Profit Margin → Calculated only from delivered data for the most accurate picture of true profitability.
  • Average Sold Price → Pulled by order date so you can track real sales performance over time.
  • Average Inventory Aging → Shows how long items are hanging around before they’re sold, helping you spot slow movers.

On the Export File:

  • All three new columns are included automatically in your report export, so your spreadsheets are instantly more powerful.

📸 Where You’ll See It

  • New columns added to the Floor Model Planner Report table. (pic7)
  • Matching data available in the export file.(pic8/pic9)

Pic 7

Pic 8

Pic 9

🗒️ Customer Profile Notes — Never Miss a Special Instruction Again

What’s New?

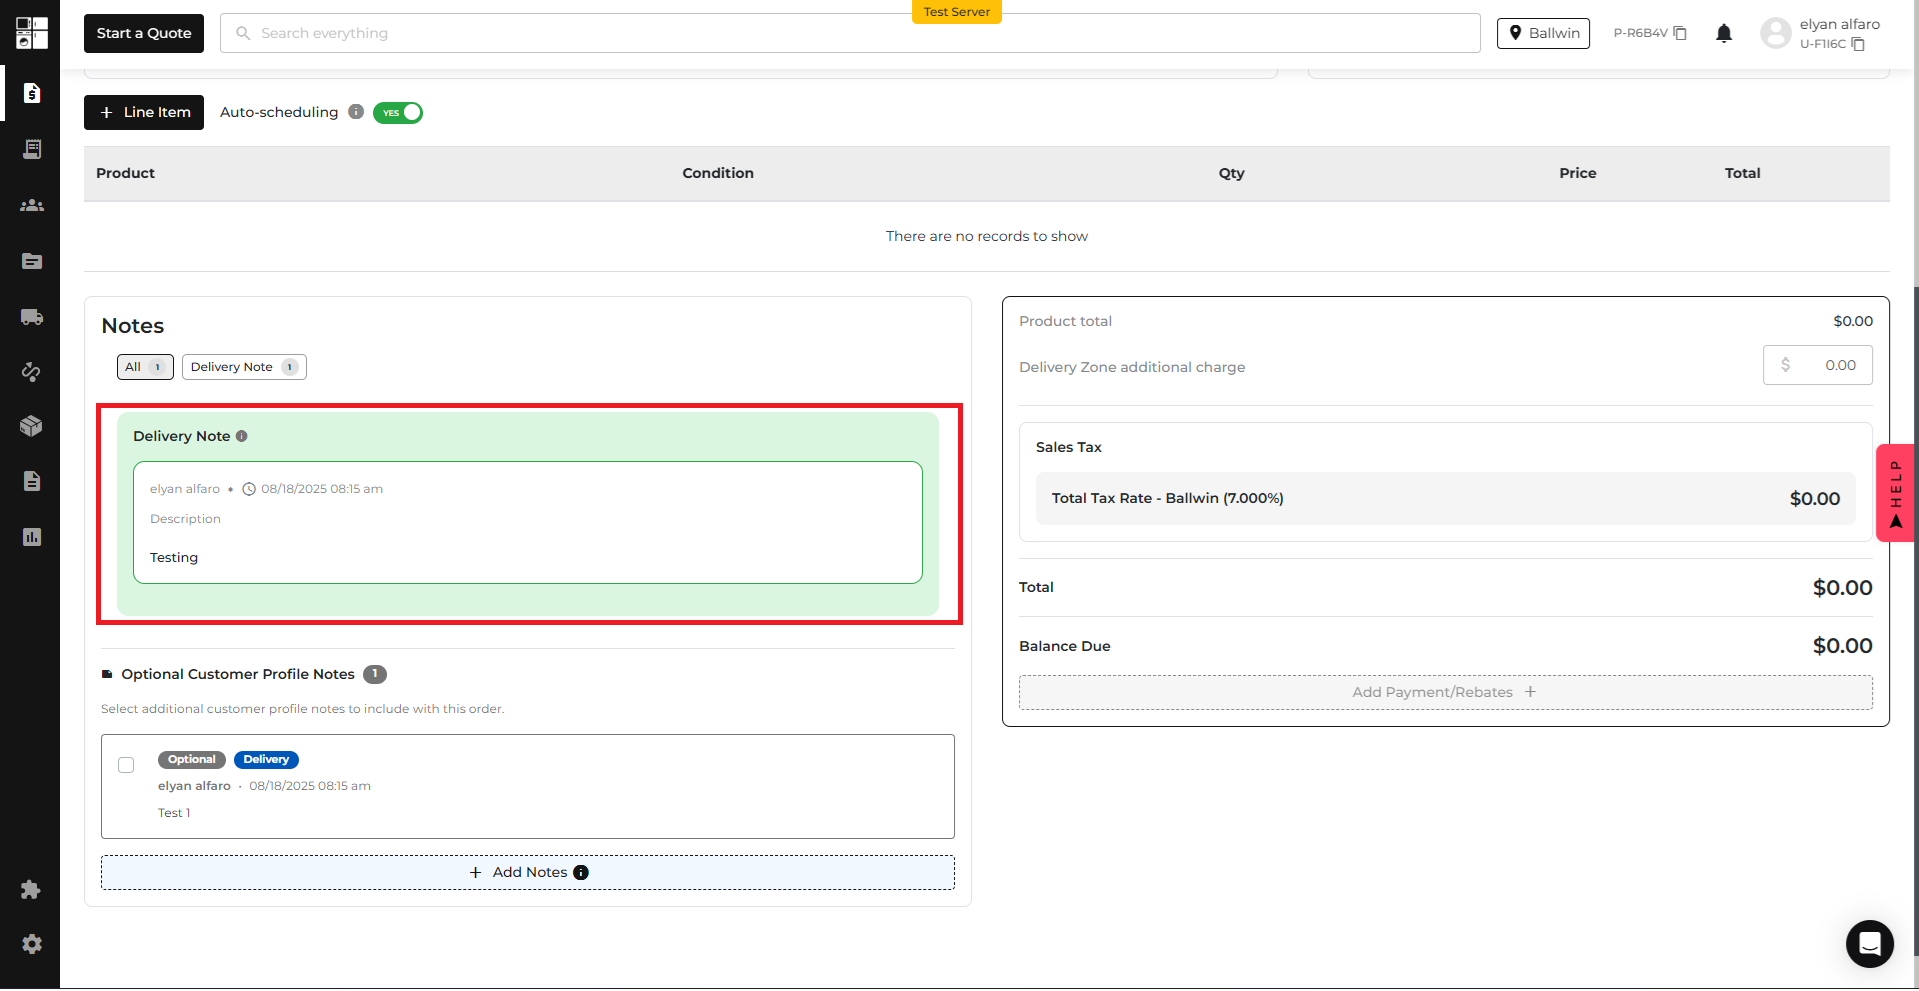
No more sticky notes, Slack messages, or memory gymnastics. You can now add structured, persistent, or optional Customer Profile Notes that follow your team during quoting and ordering. From delivery instructions to internal reminders, everything is right where you need it — every time. 🧠📌

💡 Here’s How It Works:

On the (newly renamed!) Customer Profile Page:

  • 🧾 Customer Profile Notes section is now live.
  • Superadmins can create notes with the following fields:
    • Persistence: Persistent (auto-included) or Optional (choose when needed)
    • Note Type: Delivery, Internal, or Customer
    • Created by + Timestamp

In the Quote & Order Flow:

  • Persistent Notes = automatically appear every time for that customer.
    • Delivery notes show to the driver.
    • Internal and customer notes stay visible to your team only.
    • Displayed in red with tooltips, so no one misses a beat.
  • Optional Notes = can be added manually during quote/order creation.
    • Choose the type and decide what’s relevant for that transaction.
    • Only shows up if you select it.

🔐 Permissions:

  • Only Superadmins can create, edit, or delete notes (for now).
  • Coming soon: flexible role-based access for account managers and more.

📸 Where You’ll See It:

  • Customer Profile Page → New Notes section (pic10)
  • Quote/Order Creation → Auto-populated Persistent Notes + Optional Note Selector (pic11)
  • Driver App & My Orders → Delivery Notes appear when needed (pic12)
  • Internal Tools → Internal and Customer Notes shown to your team (pic13)

Pic 10

Pic 11

🚨 System Alert for SMS Outages

What’s New?

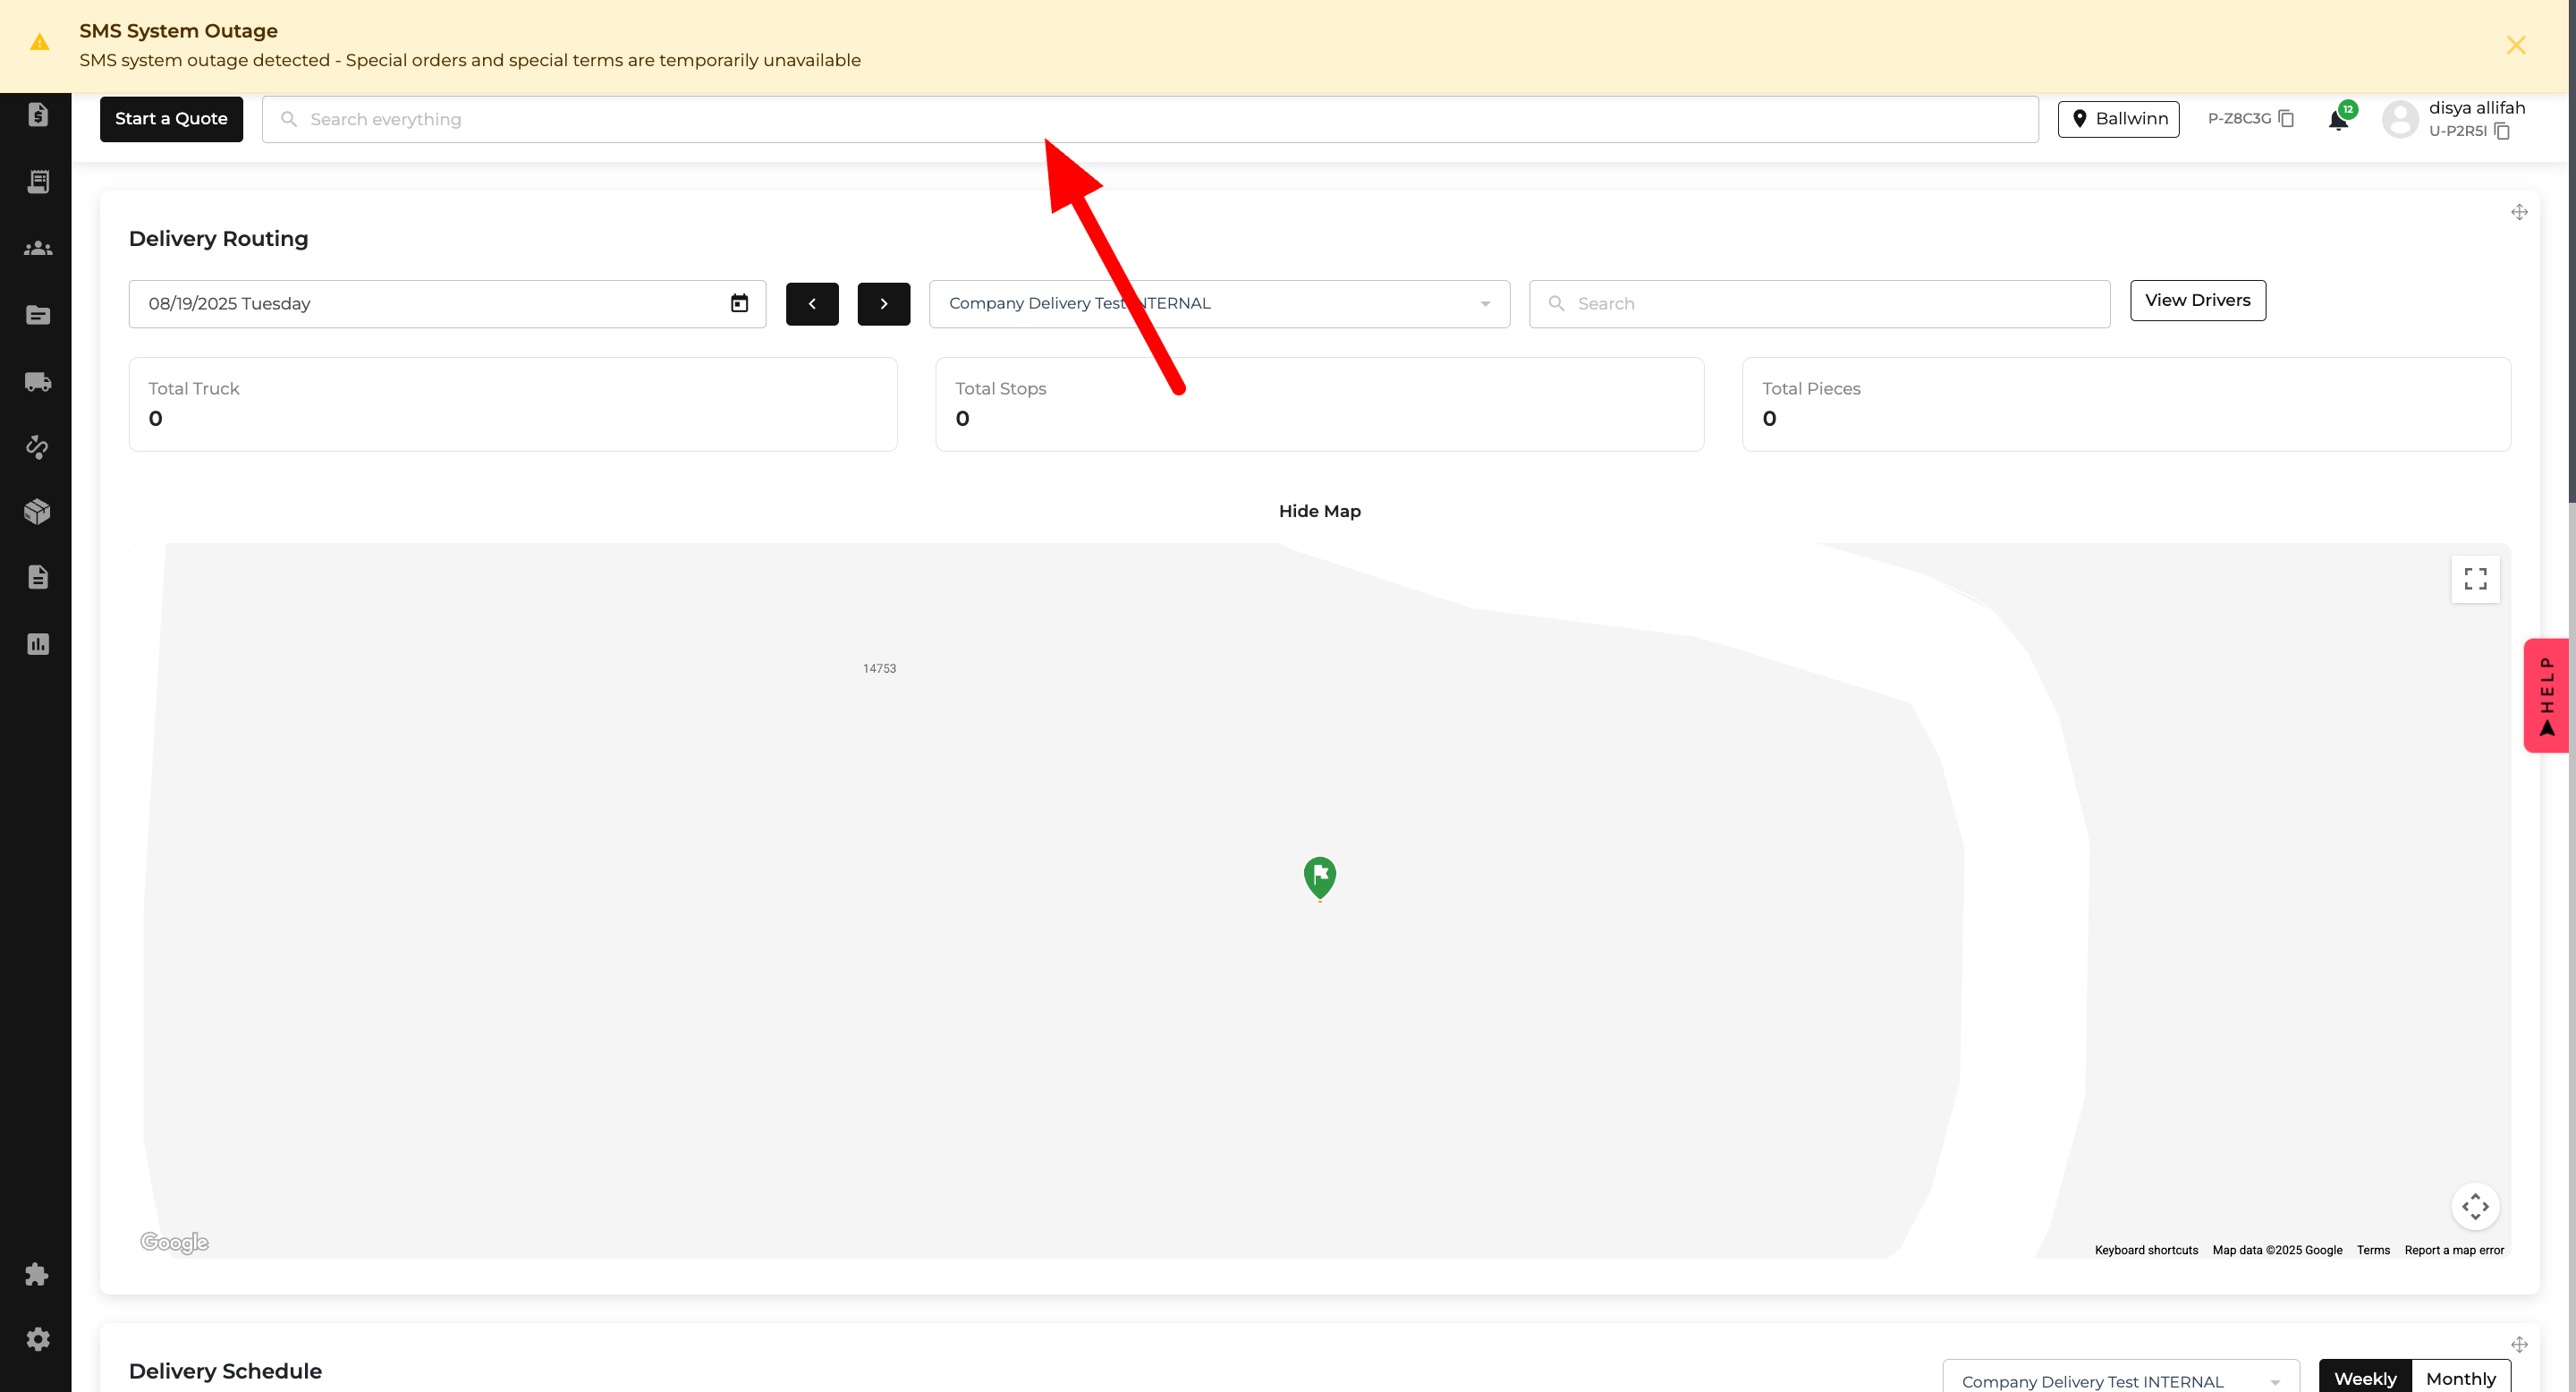
We’ve added a smart alert system to keep you in the loop when our SMS system goes down. No more guessing why special orders aren’t available — you’ll see a clear message explaining everything upfront. As soon as things are back to normal, the alert vanishes, and full functionality is restored. ✨

💡 Here’s How It Works:

🔔 During an Outage:

  • A banner appears at the top of the app:
  • Special orders are unavailable (auto-converted to regular orders).
  • Users can still complete payment and scheduling without needing to sign terms & conditions.

When It’s Fixed:

  • The system auto-detects when the service is back.
  • The alert disappears automatically.
  • Special orders return to normal.
  • Any regular order that was auto-converted will revert back to special order, requiring users to sign terms & conditions before payment and scheduling.

📸 Where You’ll See It:

  • A bright alert banner at the top of every page in the app during SMS outages.