Platform feature update completed on August 7th, 2025
August 7, 2025
New Feature
Platform

📦 New: One-Click “Request All Stock” for Faster Ordering

What’s New?

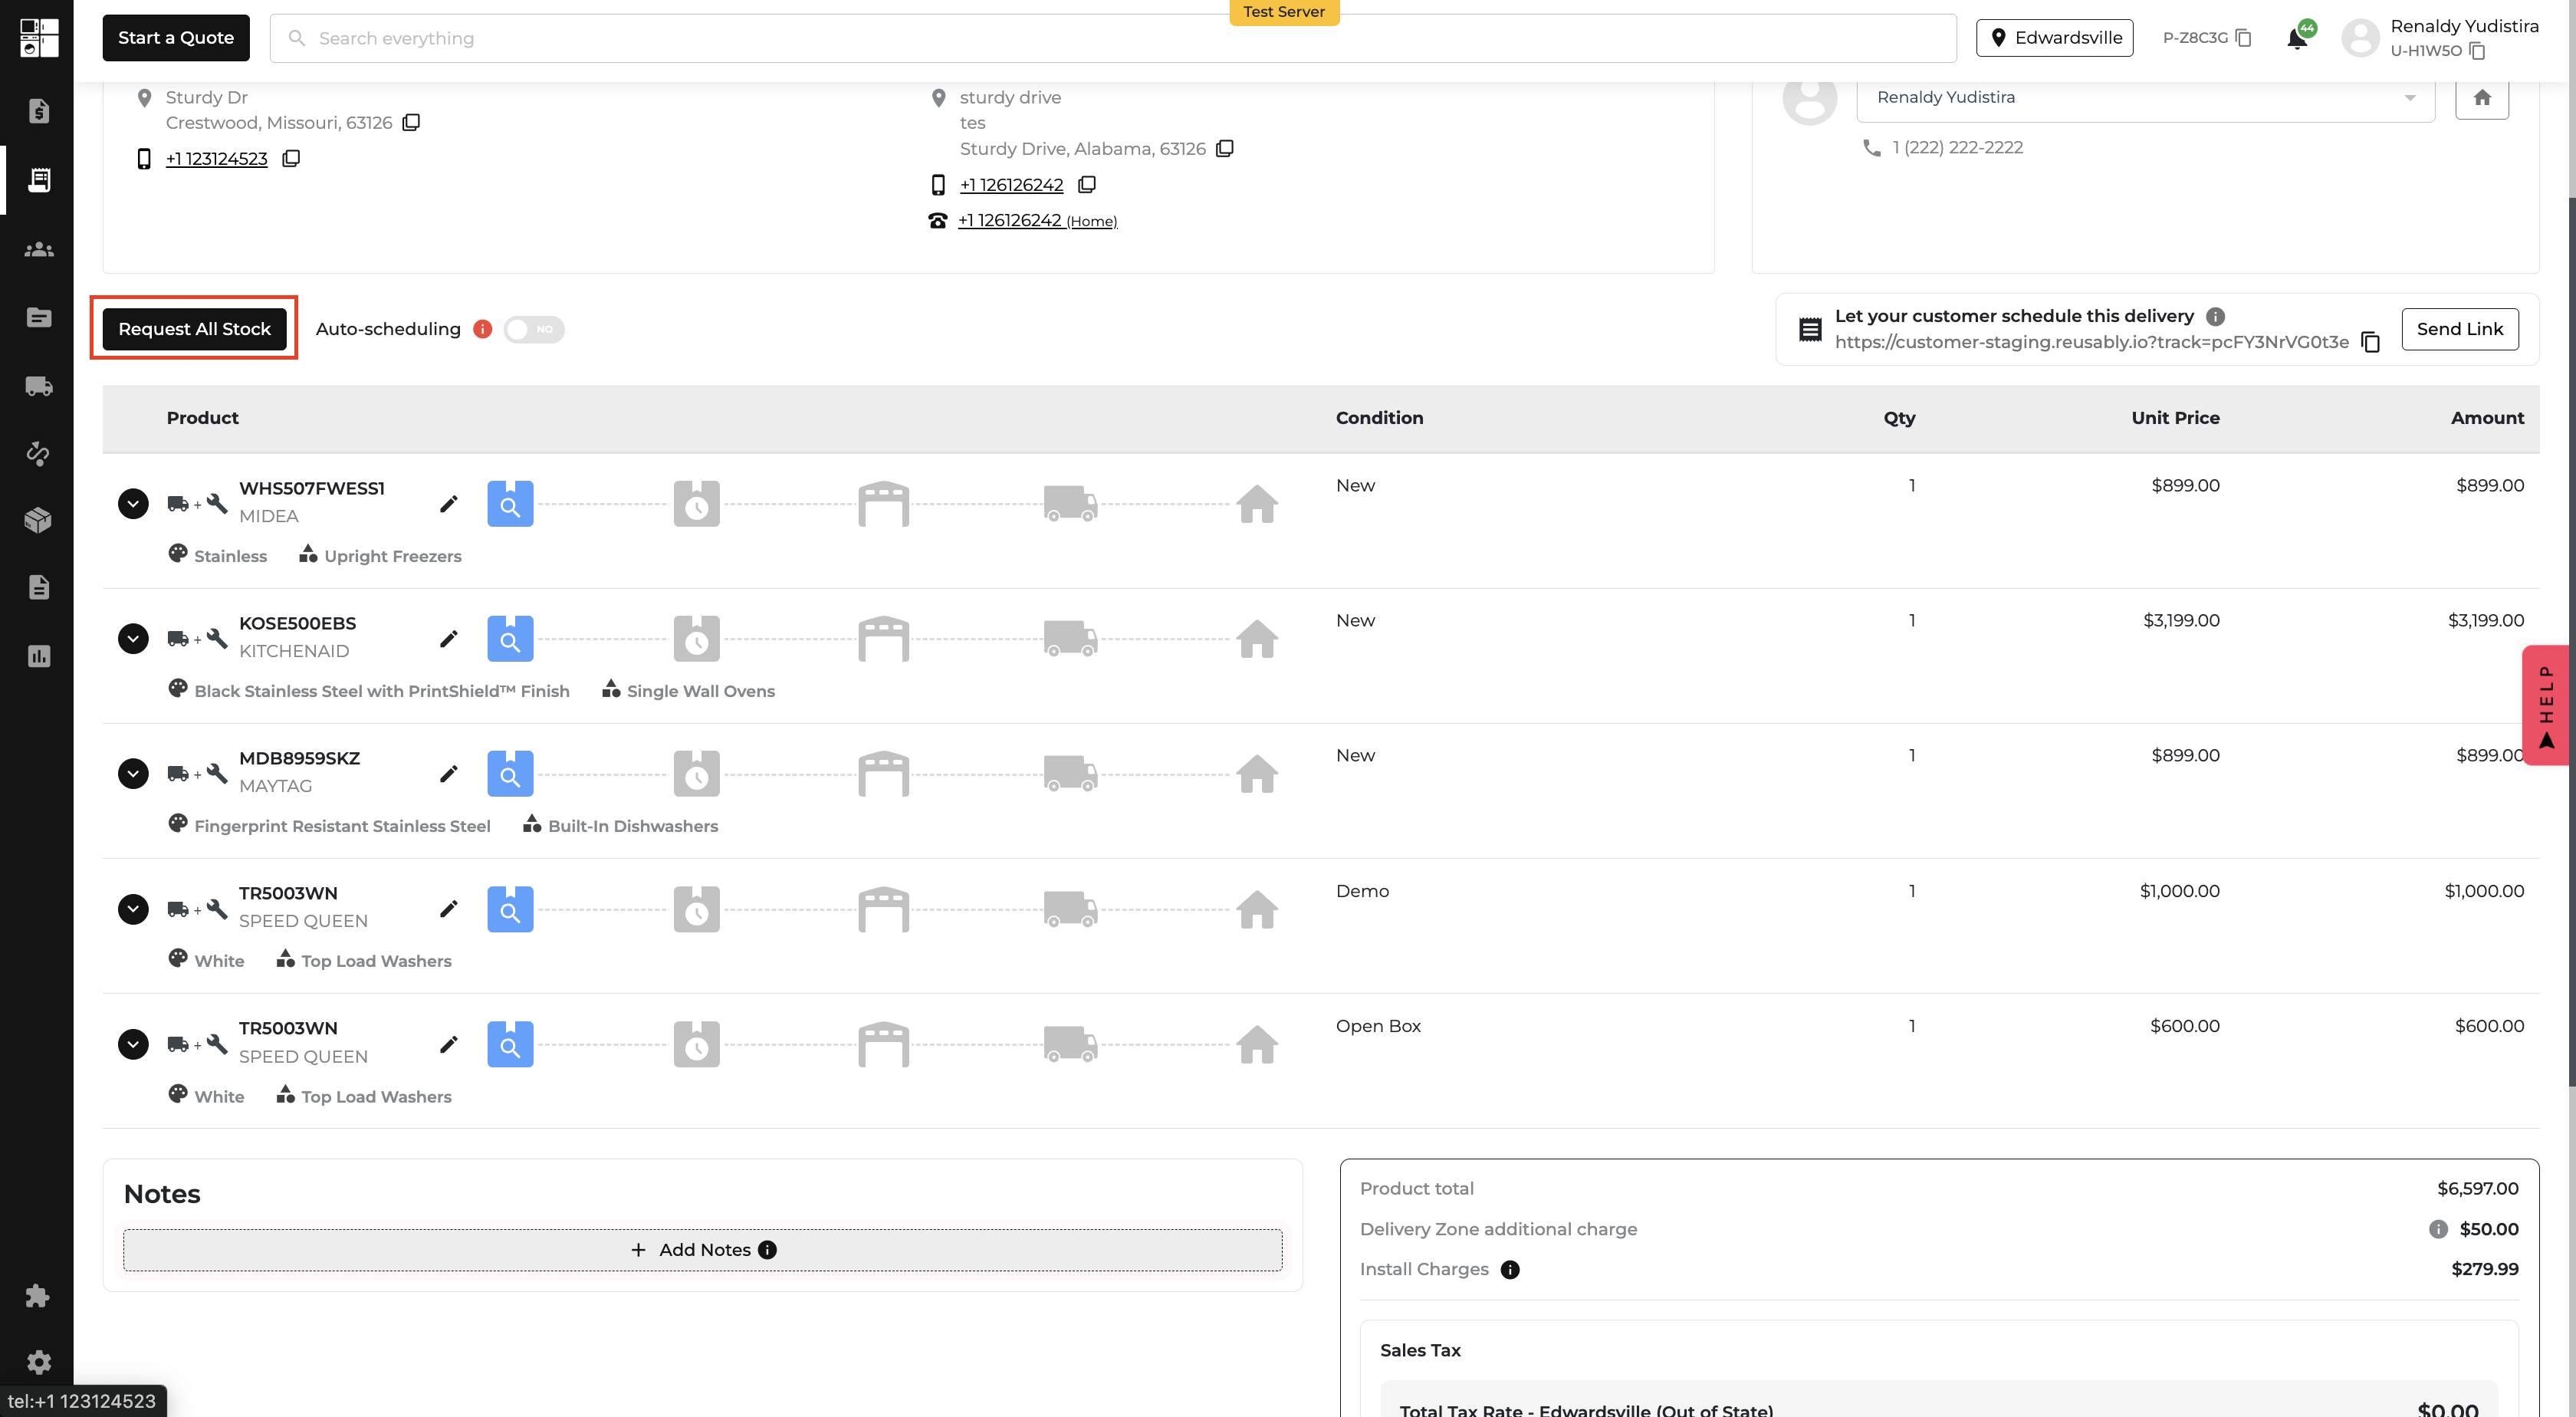
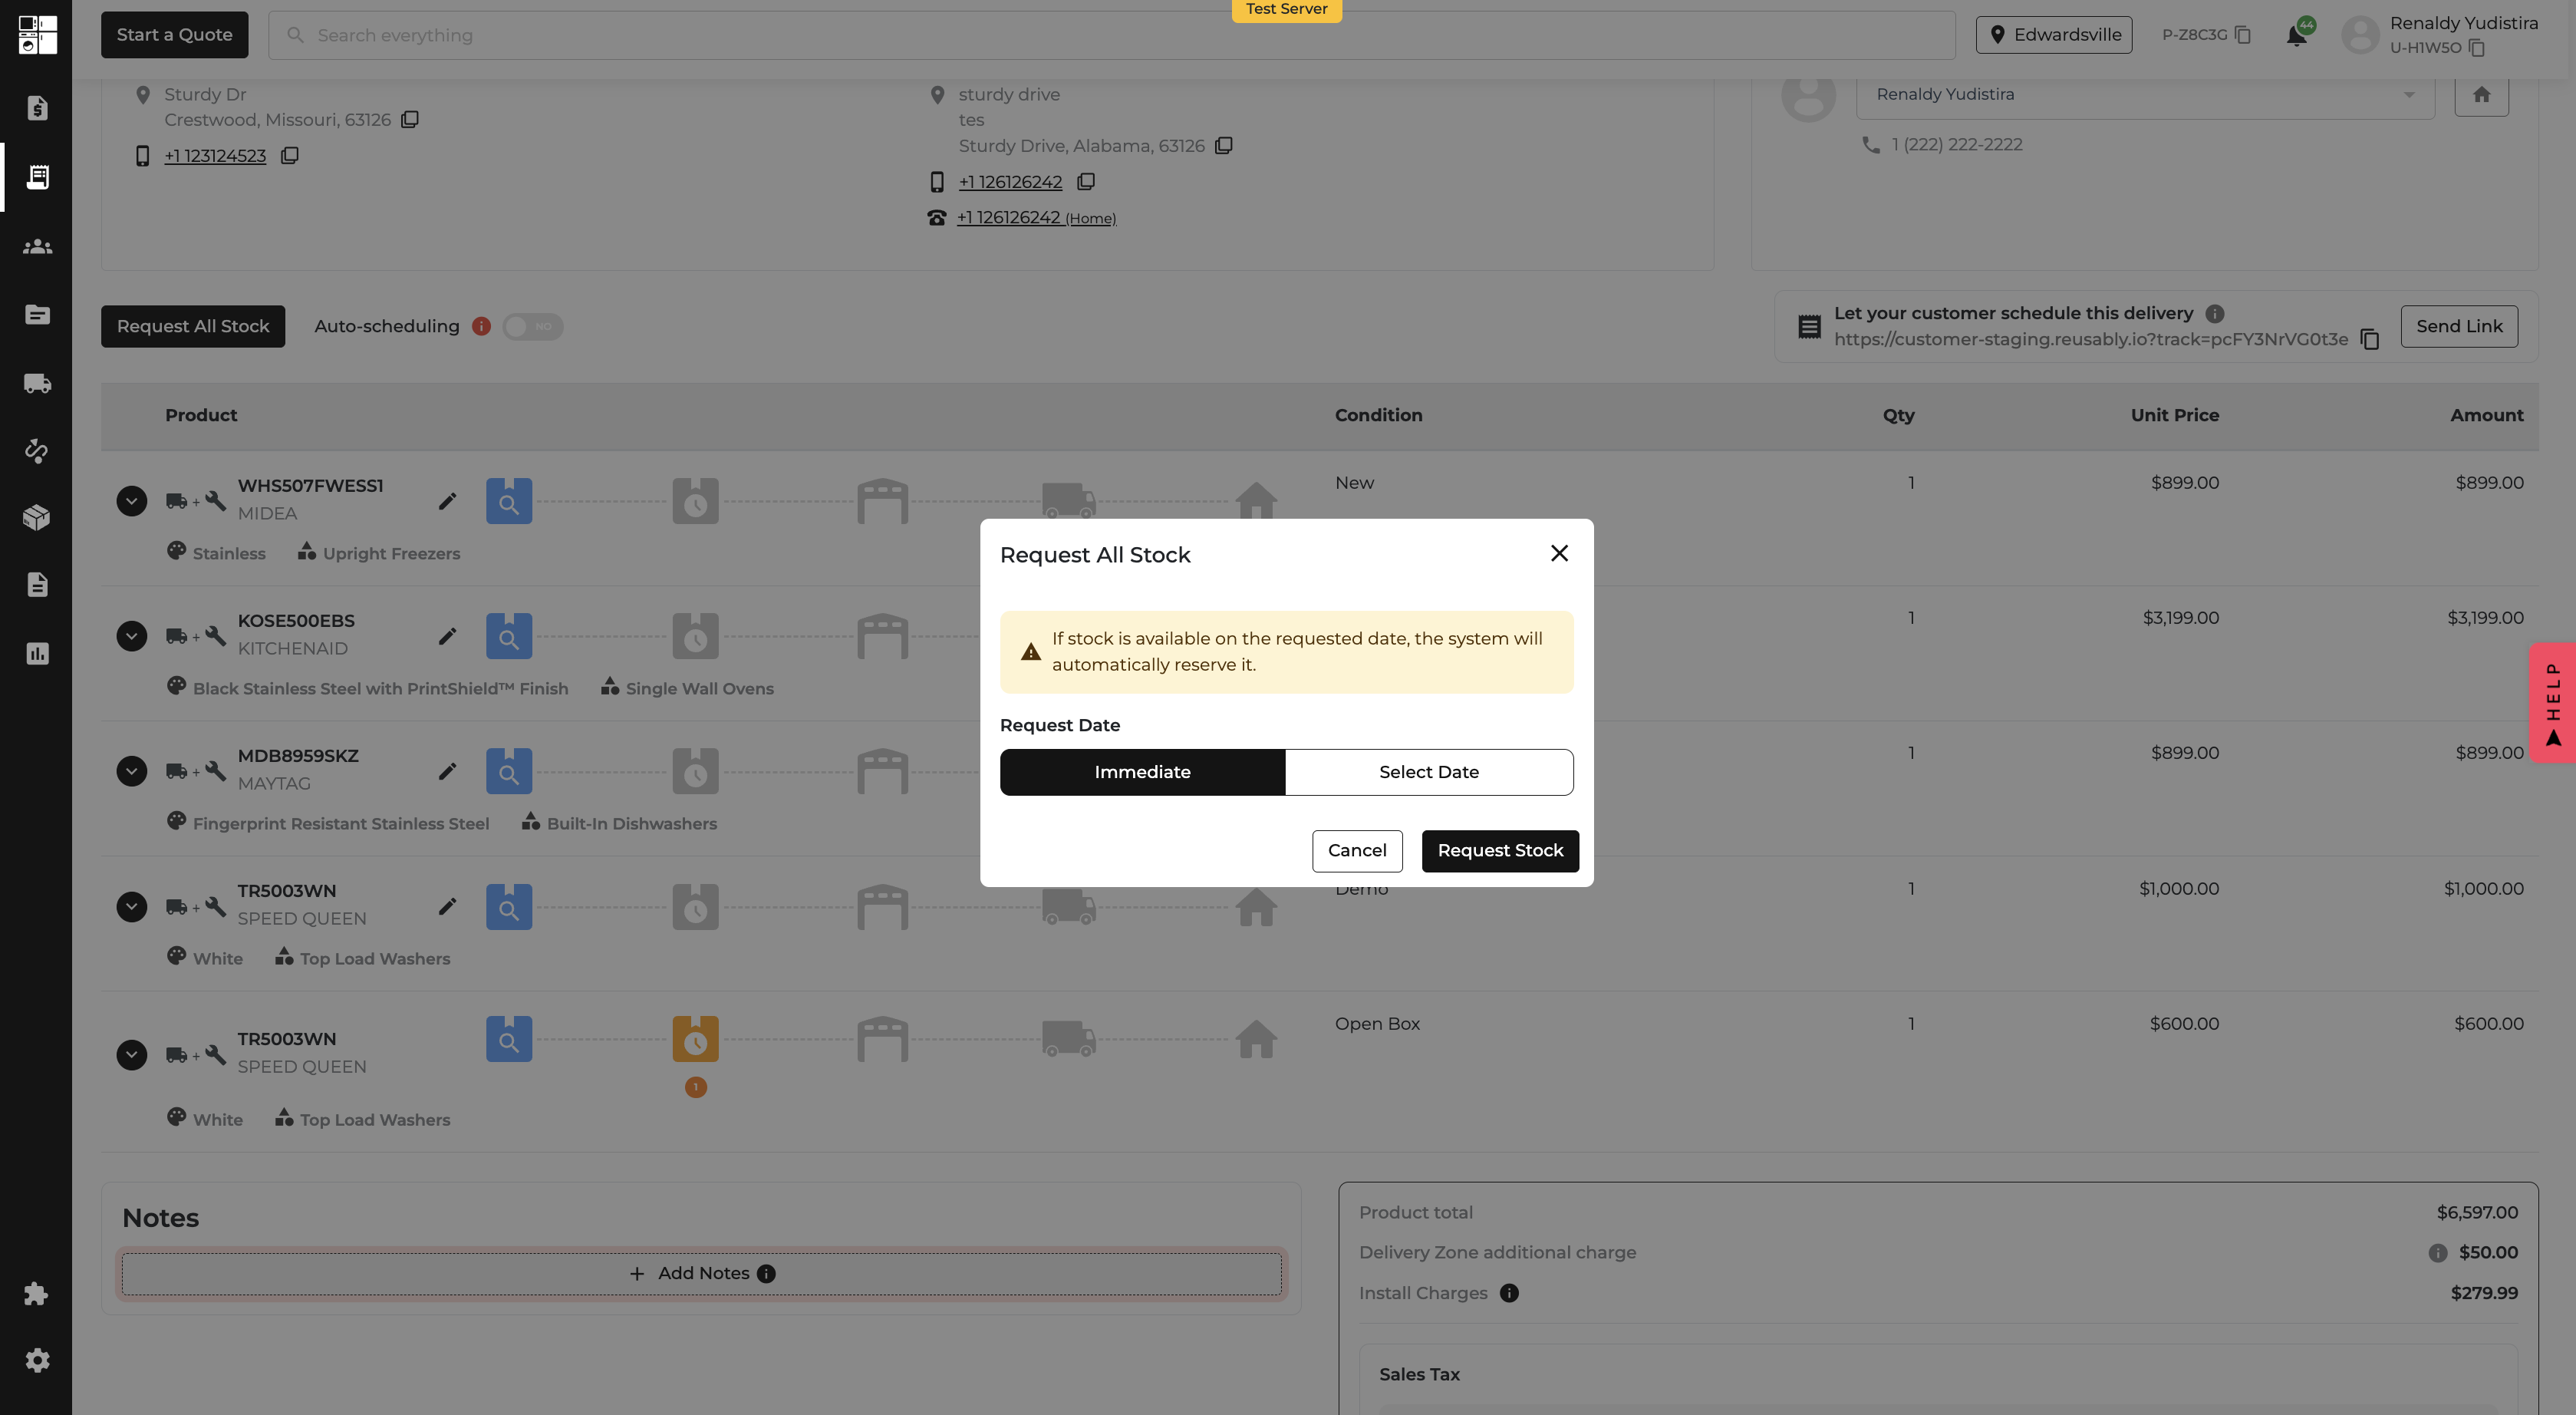
Requesting stock for large orders just got way easier. Instead of tediously requesting stock one item at a time, you can now request stock for the entire order in one smooth action. Whether you need it now or later, the choice is yours — and it's all inline.

🎯 Why This Matters

Bulk orders were a pain. Too many clicks. Too much room for error. This update keeps things fast, tidy, and way more user-friendly.

💡 Here’s How It Works

On the Order Page:

  • ✨ New “Request All Stock” Button
    • Found in the order page.
    • Automatically finds all unrequested line items.
    • Triggers a modal to:
      • Pick “Immediate” or a Select Date.
      • Apply the same date to all eligible items in one go. ✅

📸 Where You’ll See It

  • “Request All Stock” button near the stock section of the Order page.
  • Pop-up modal for bulk date selection.

🏷️ New: Add Locations & Storage Locations to POs & Receiving Workflow

What’s New?

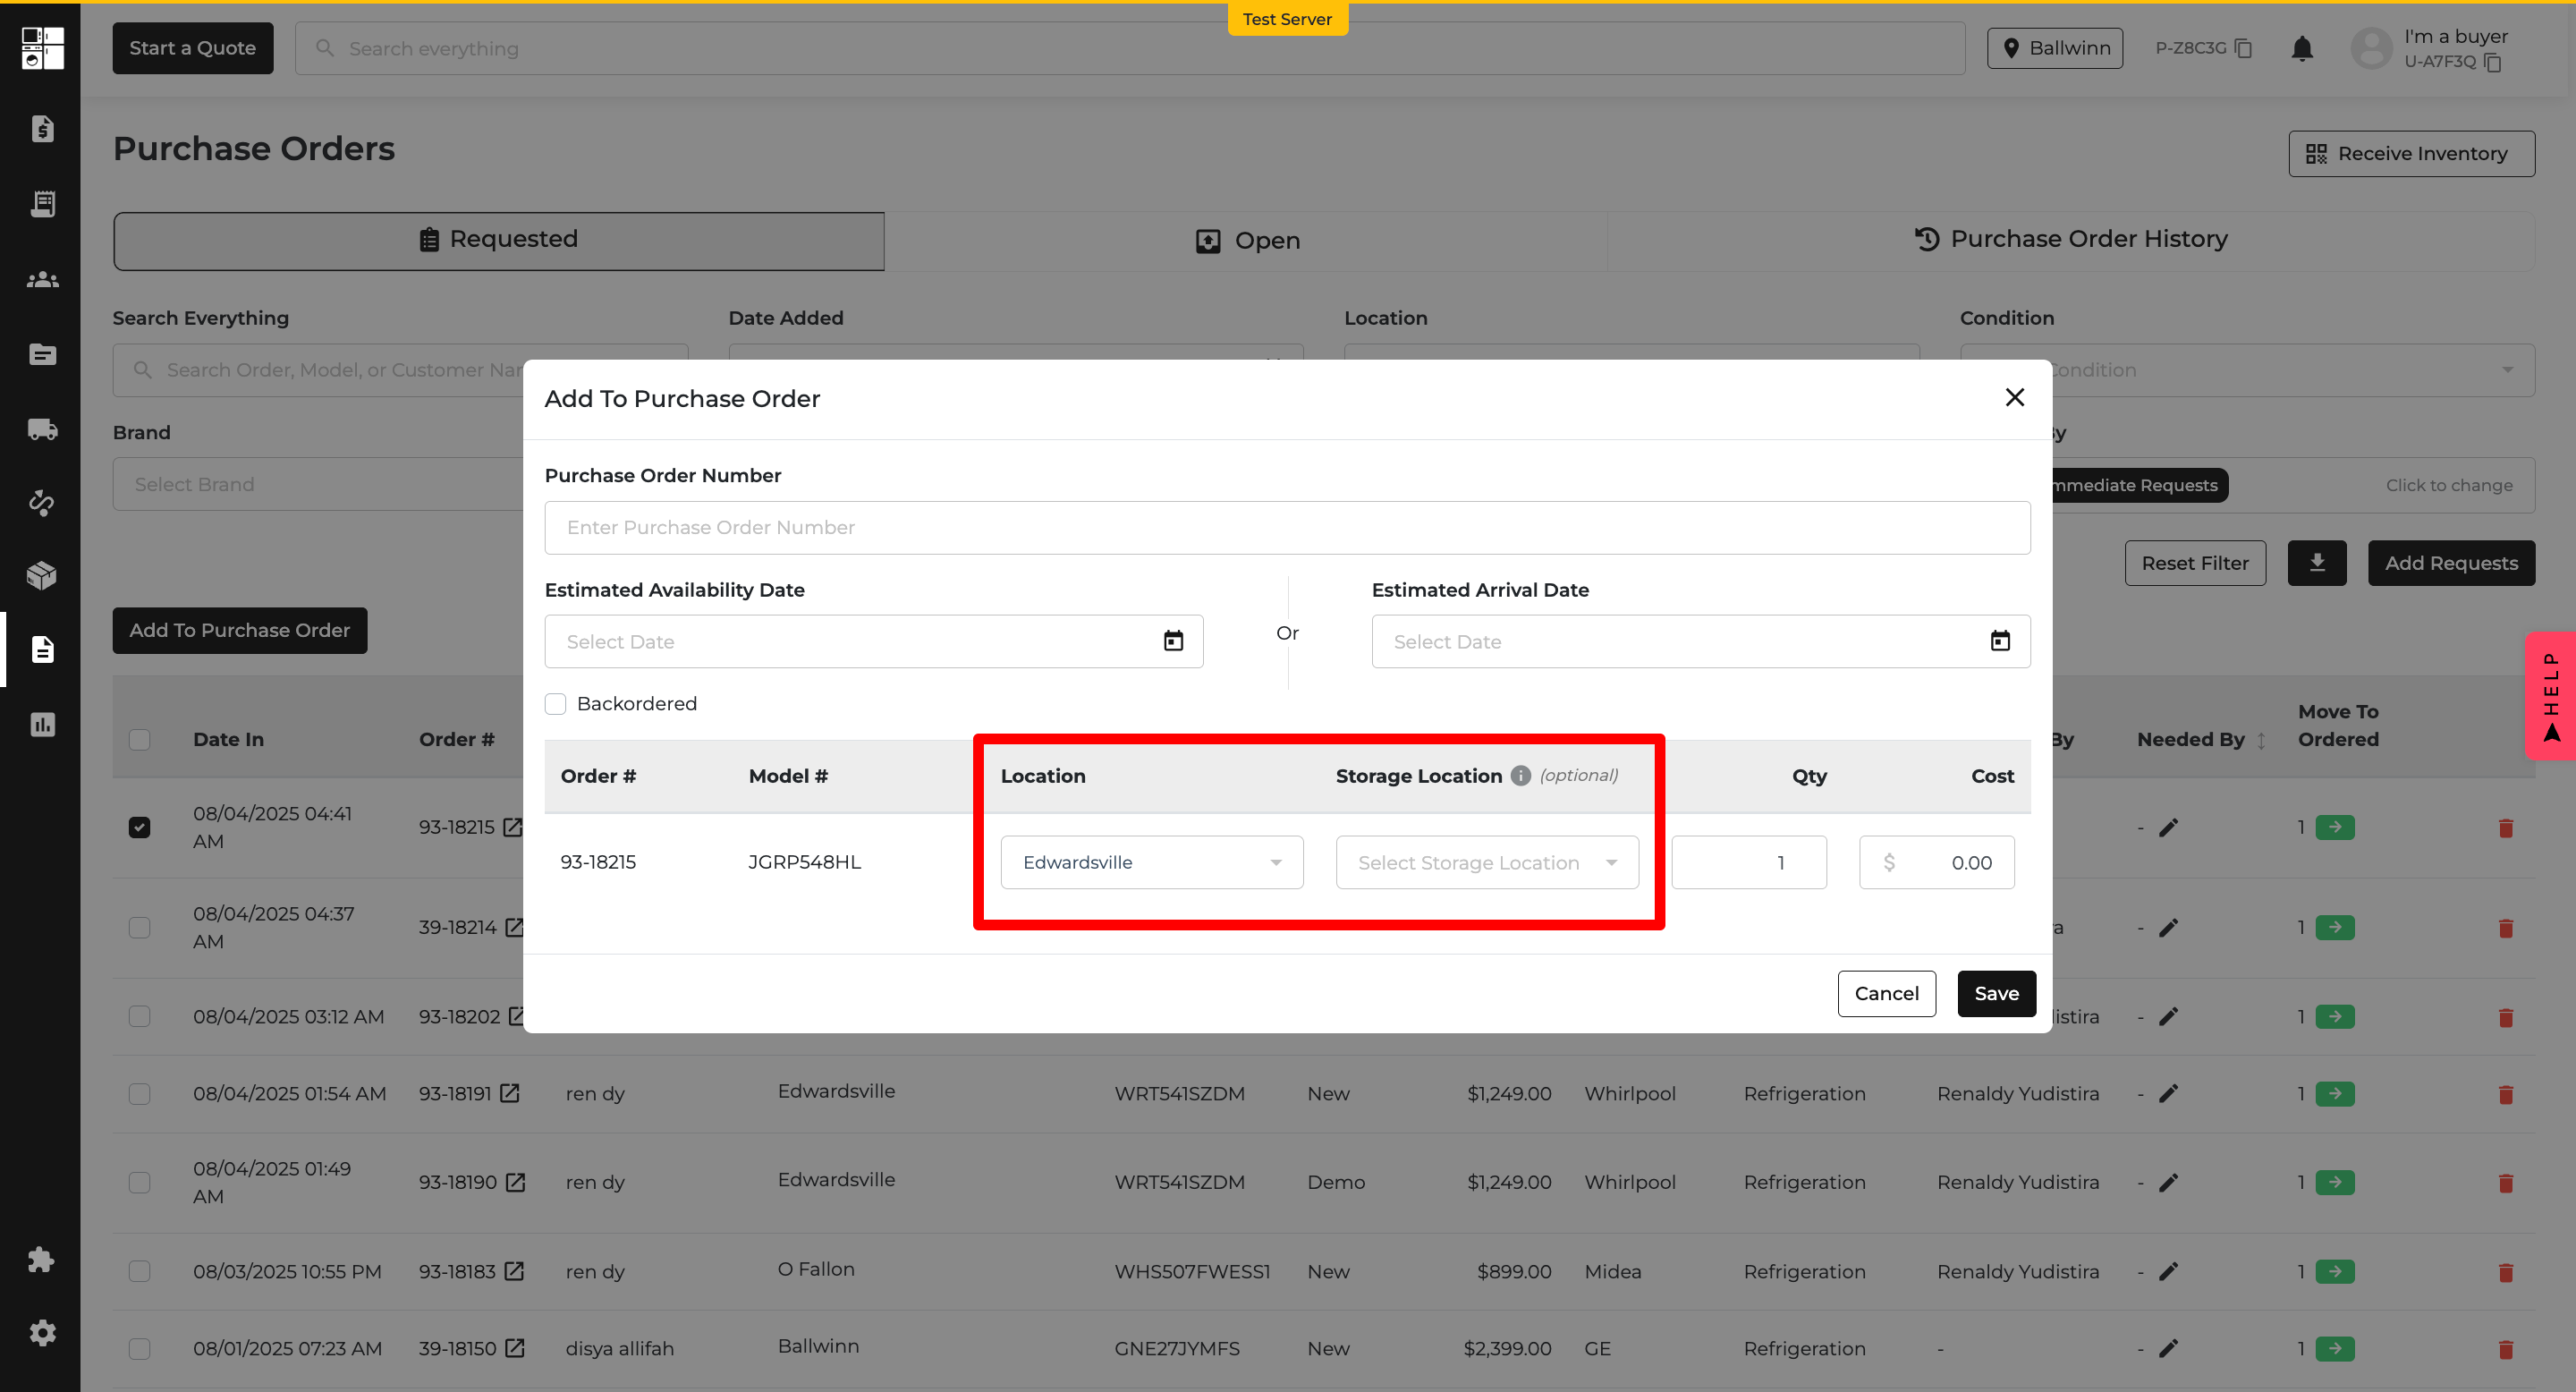
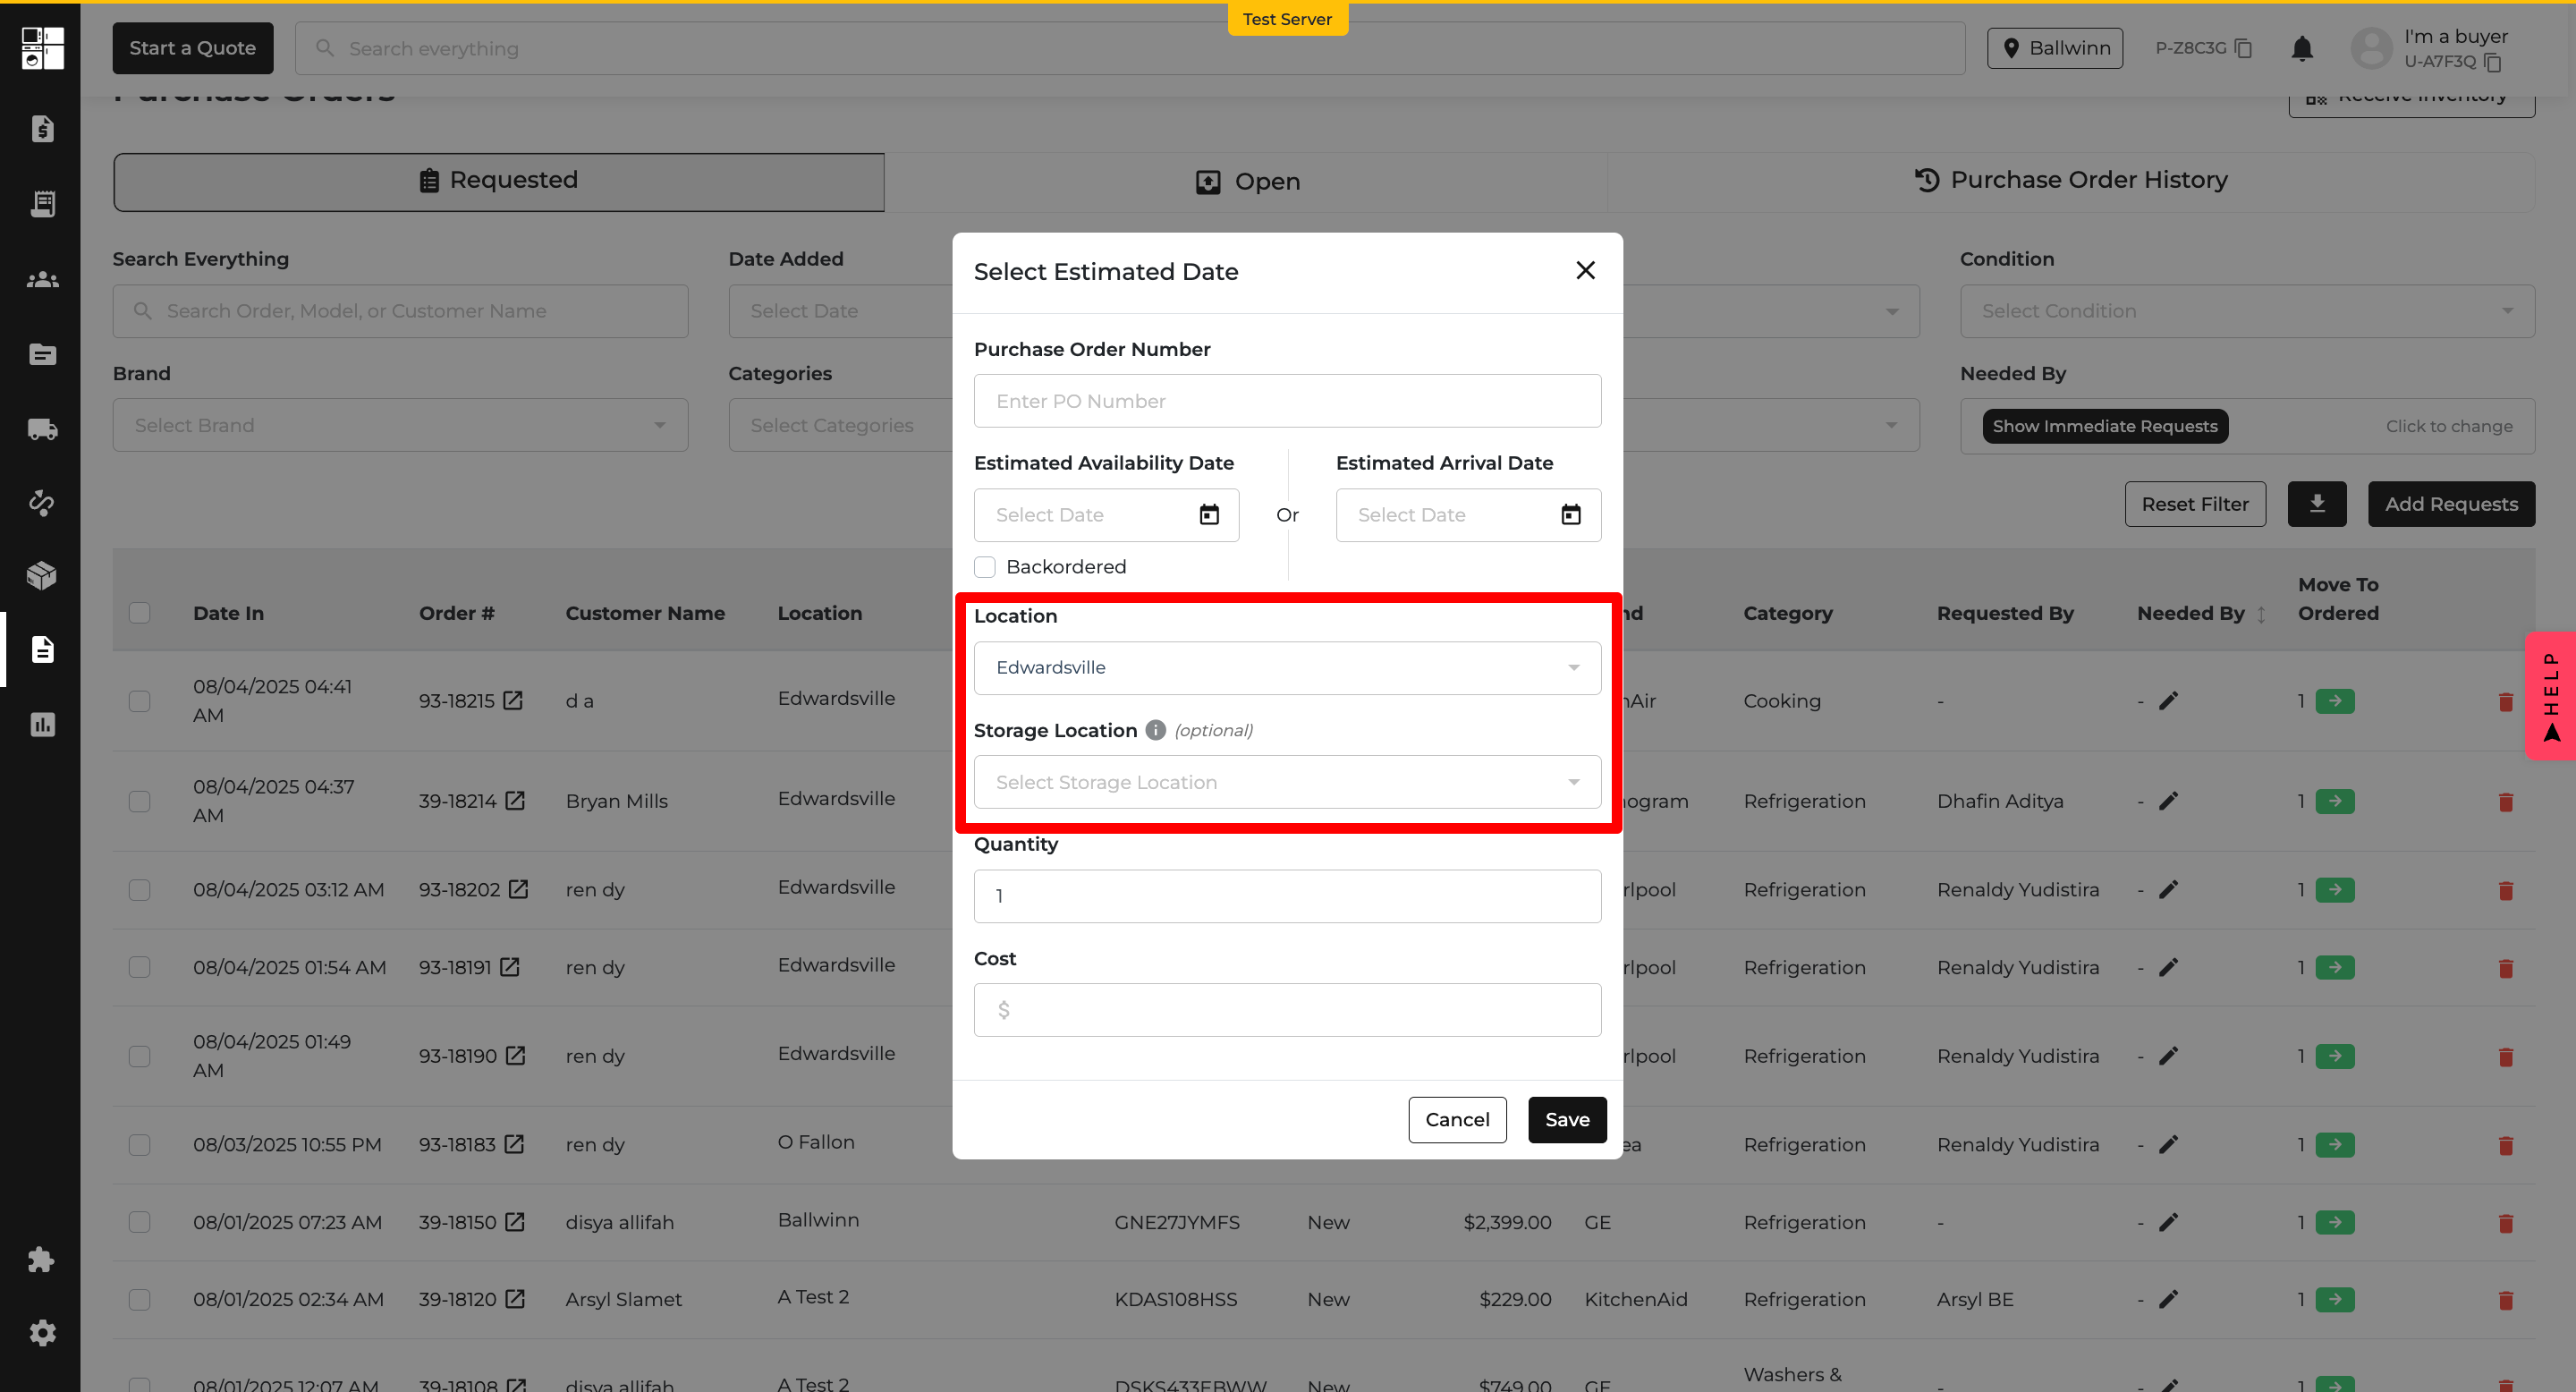
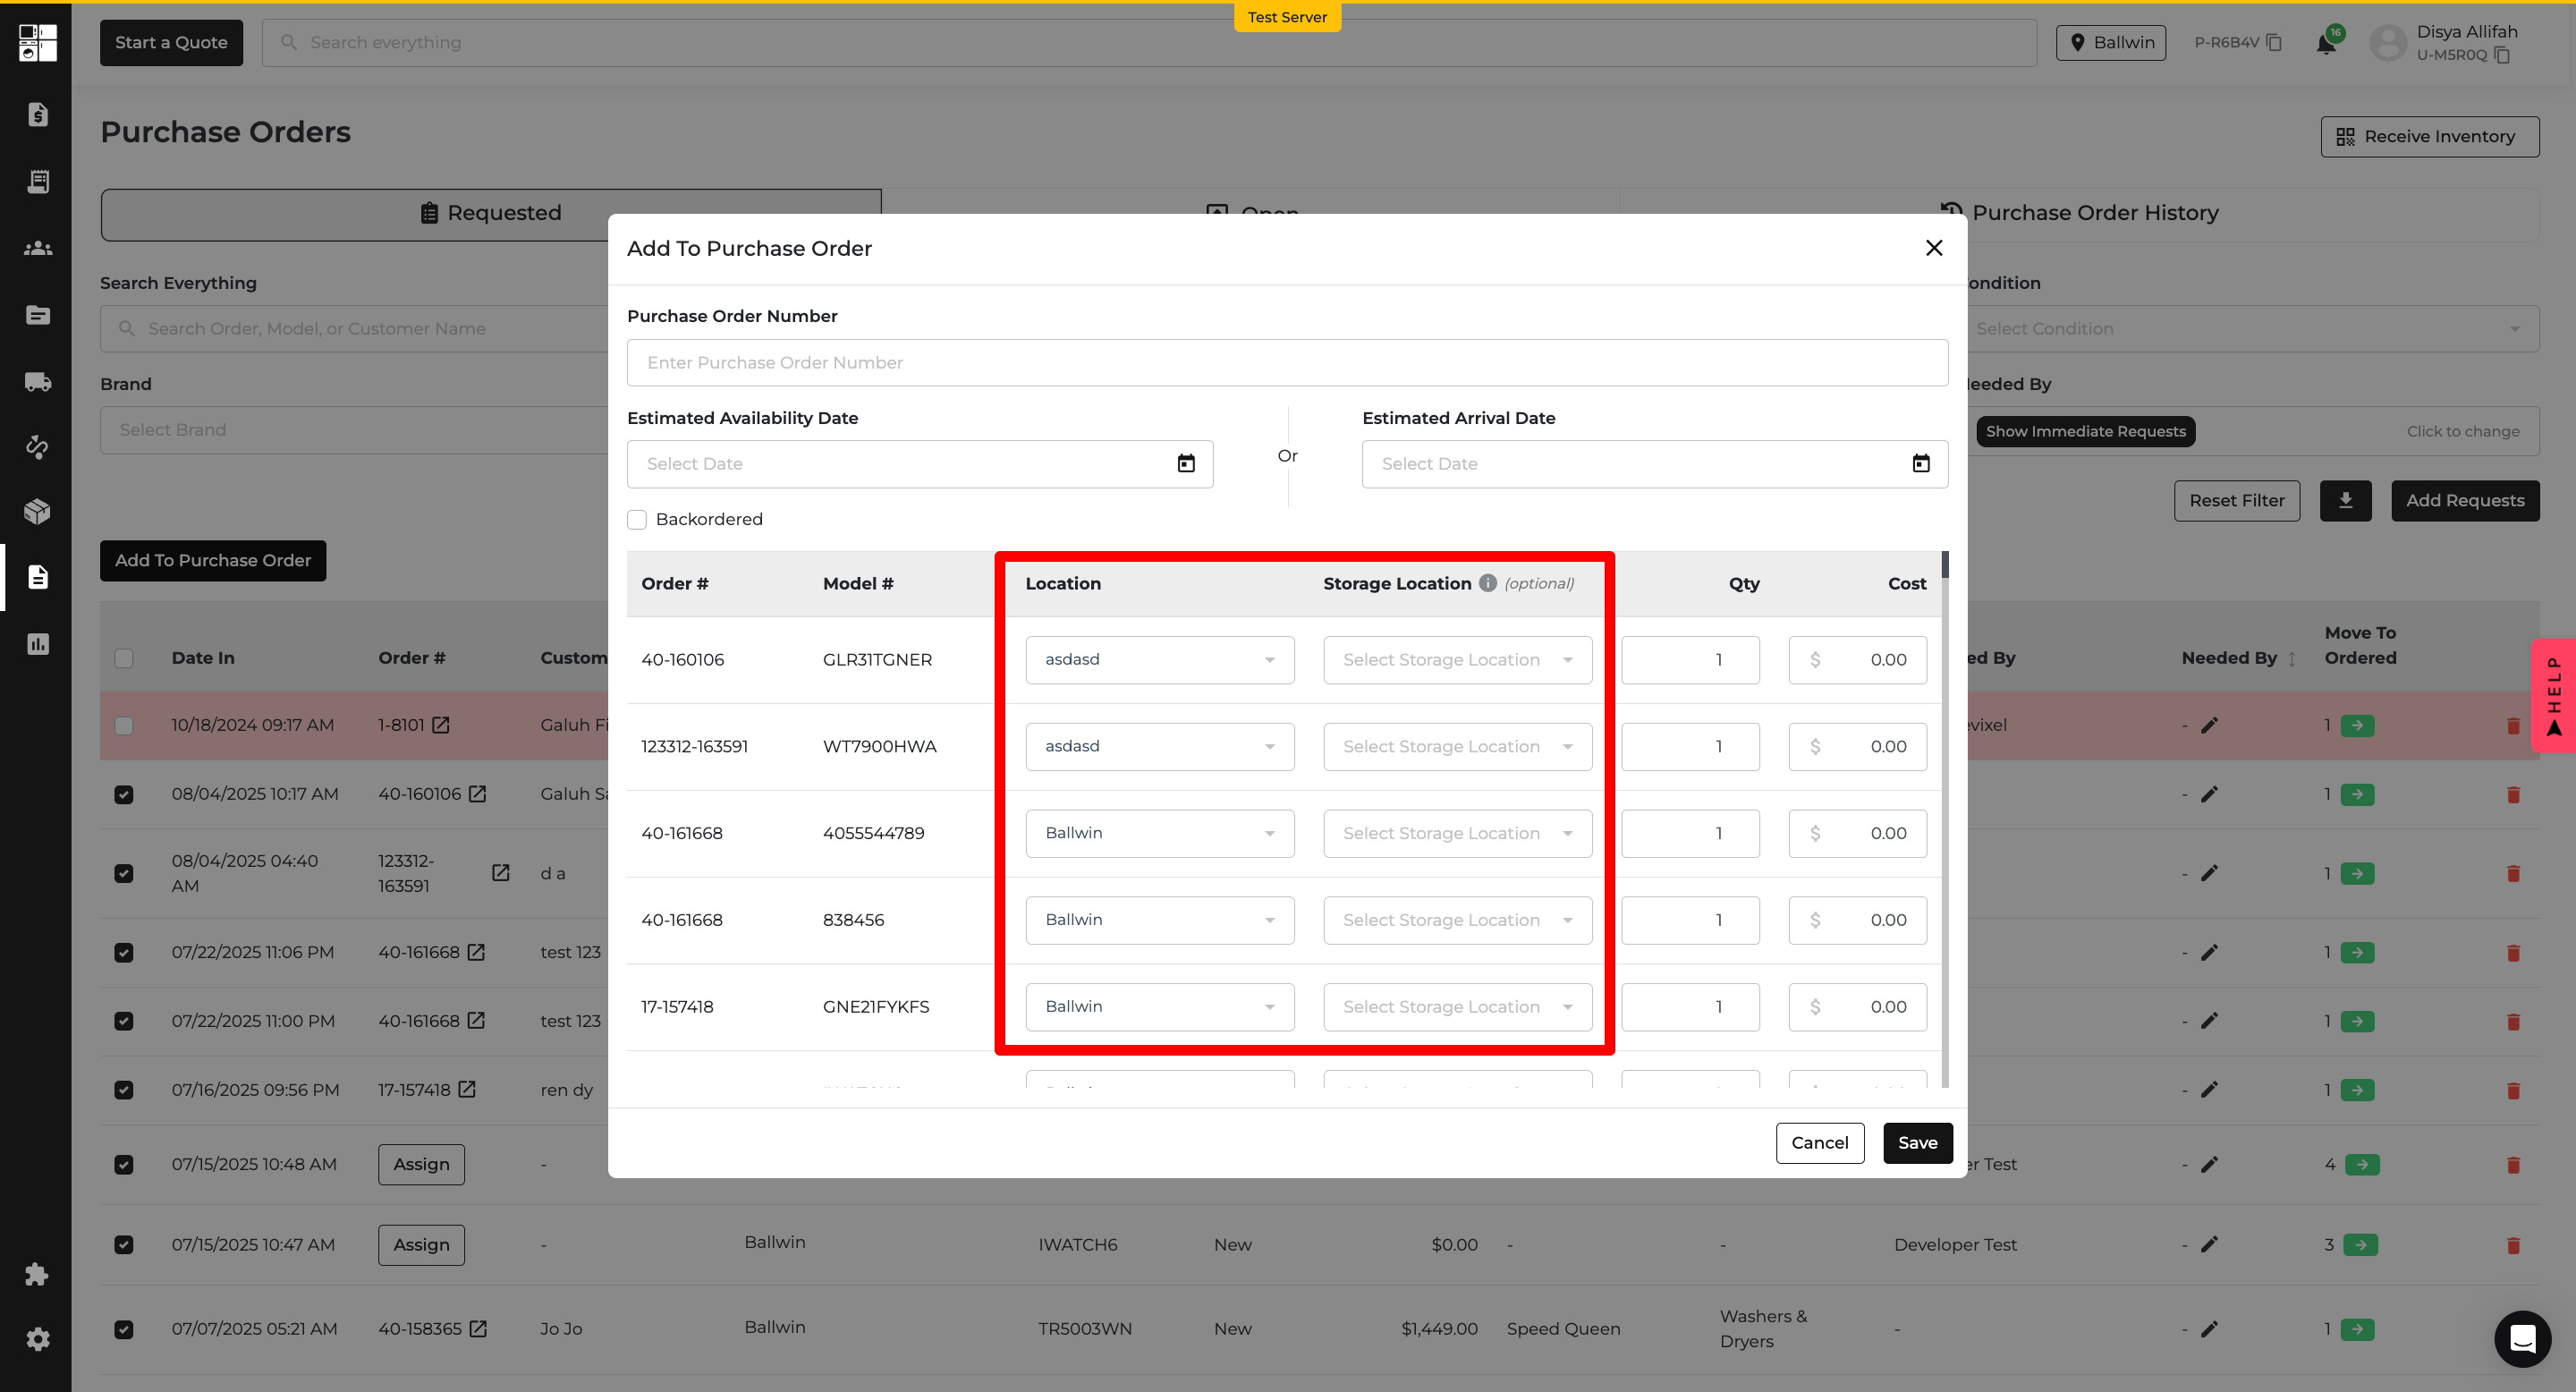
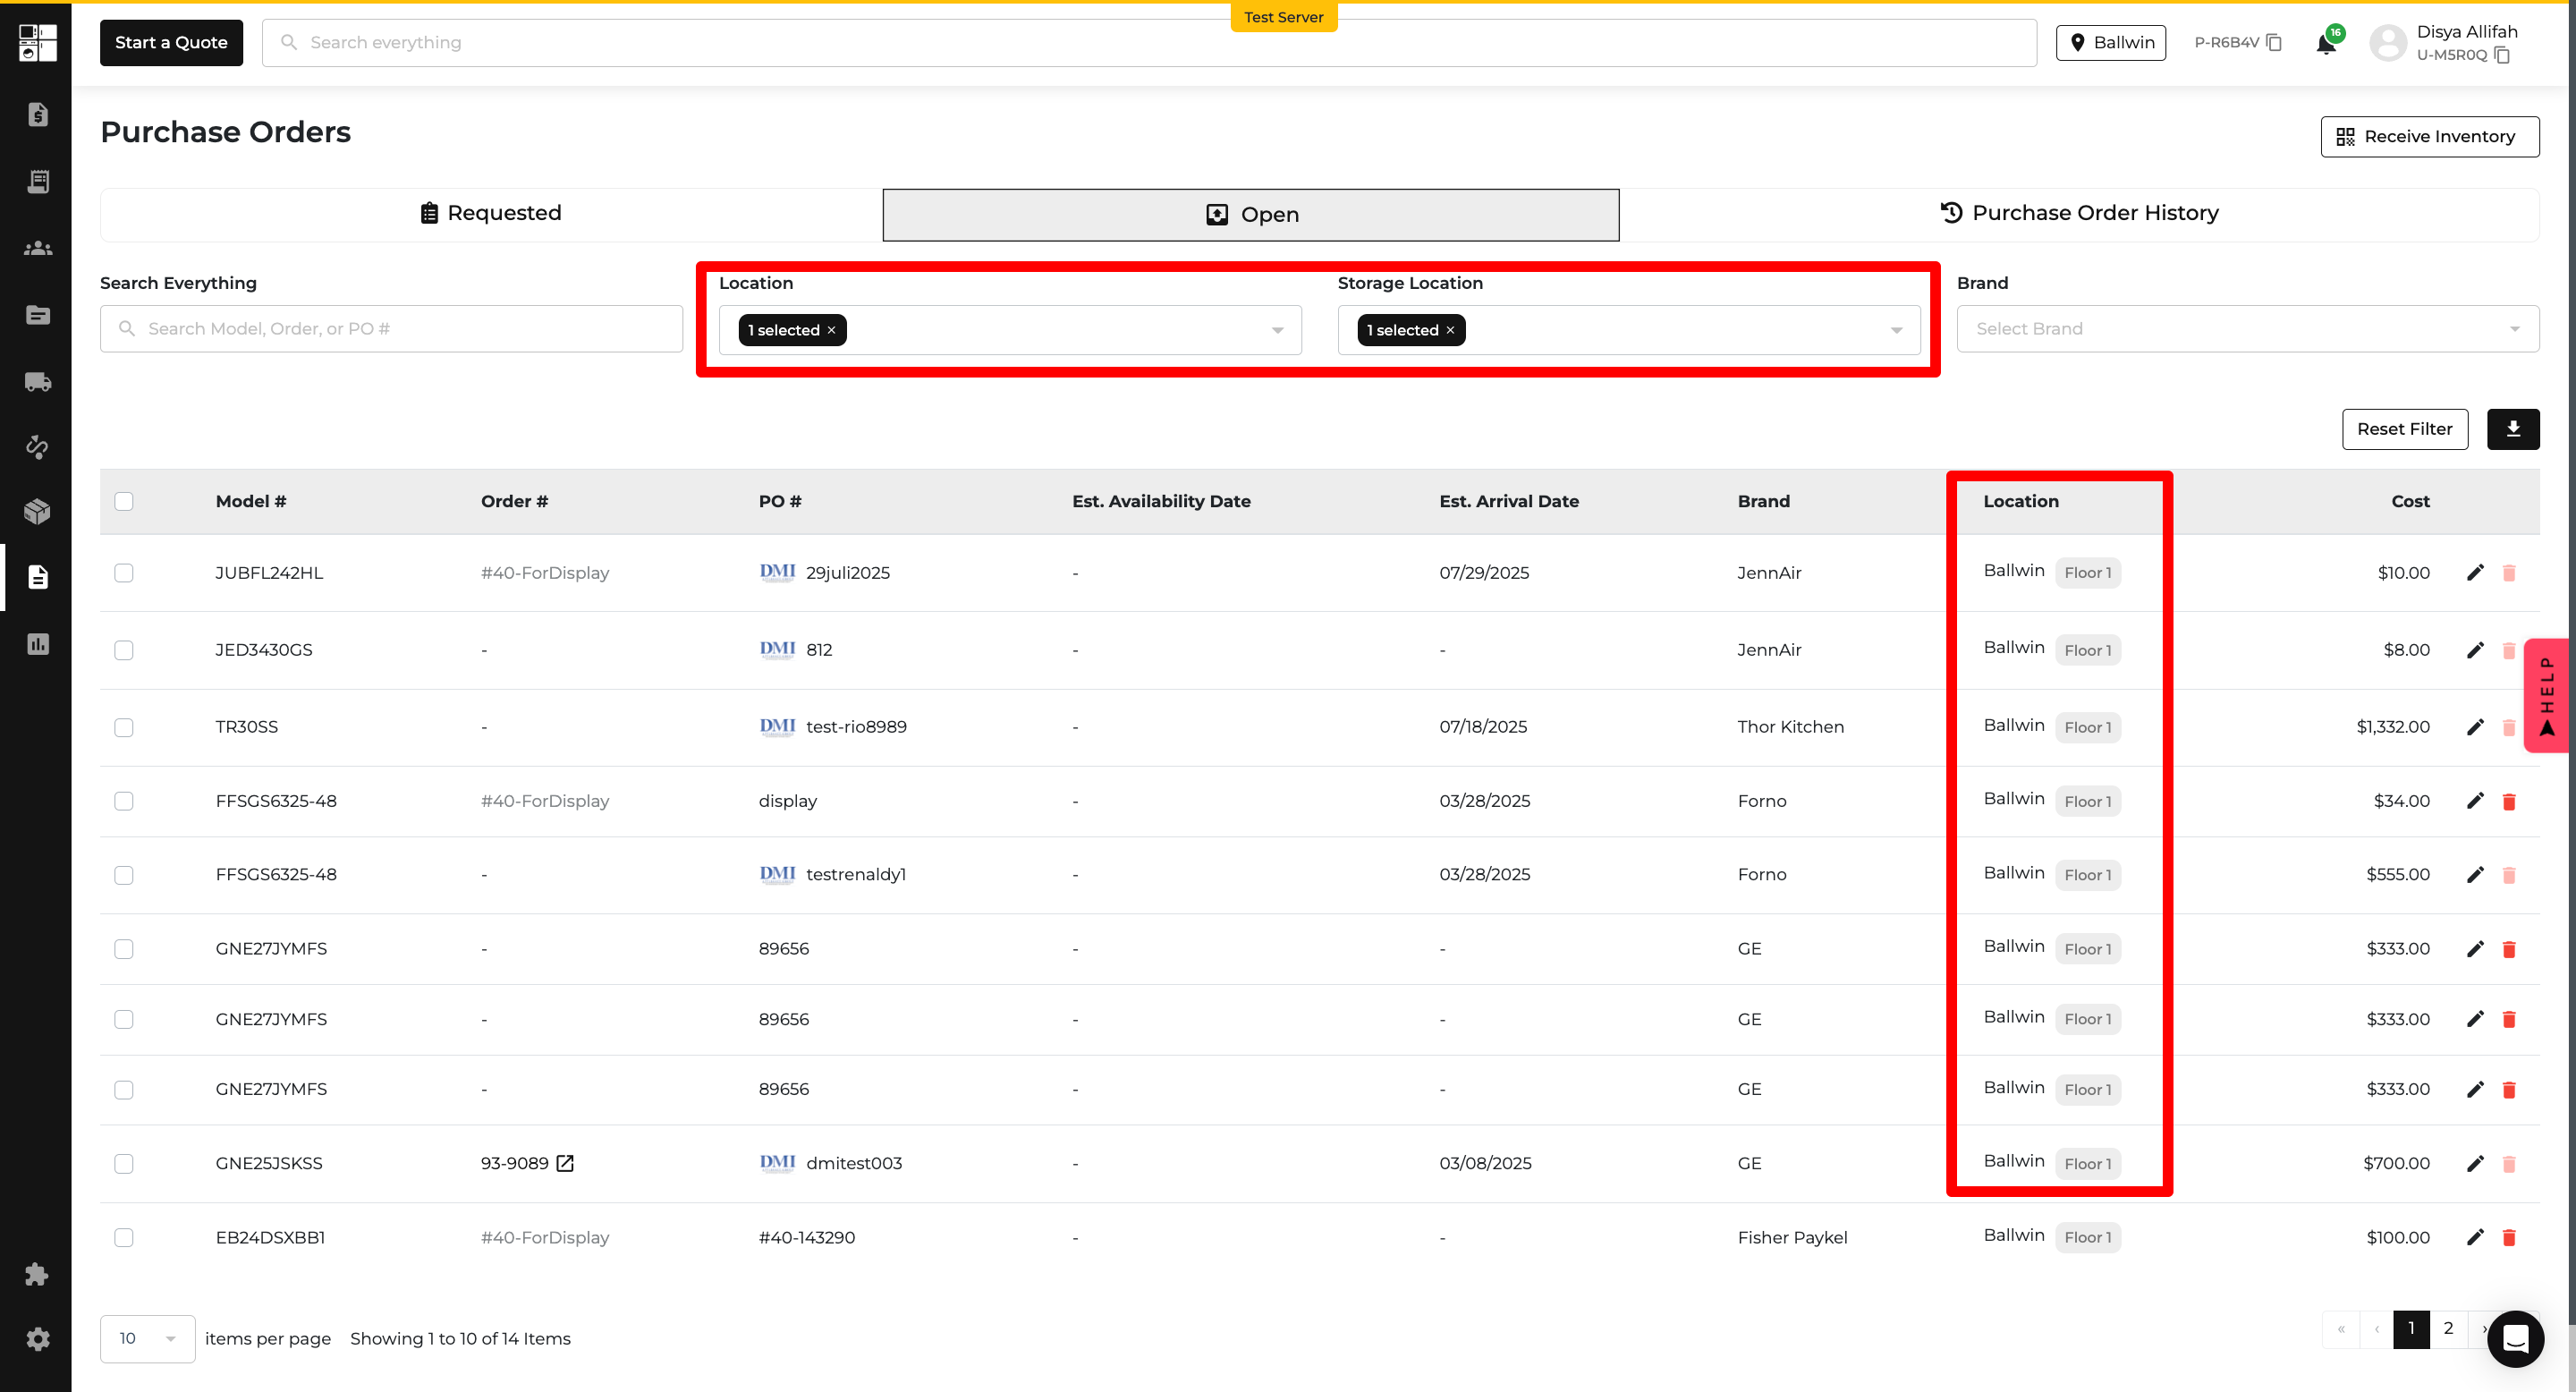
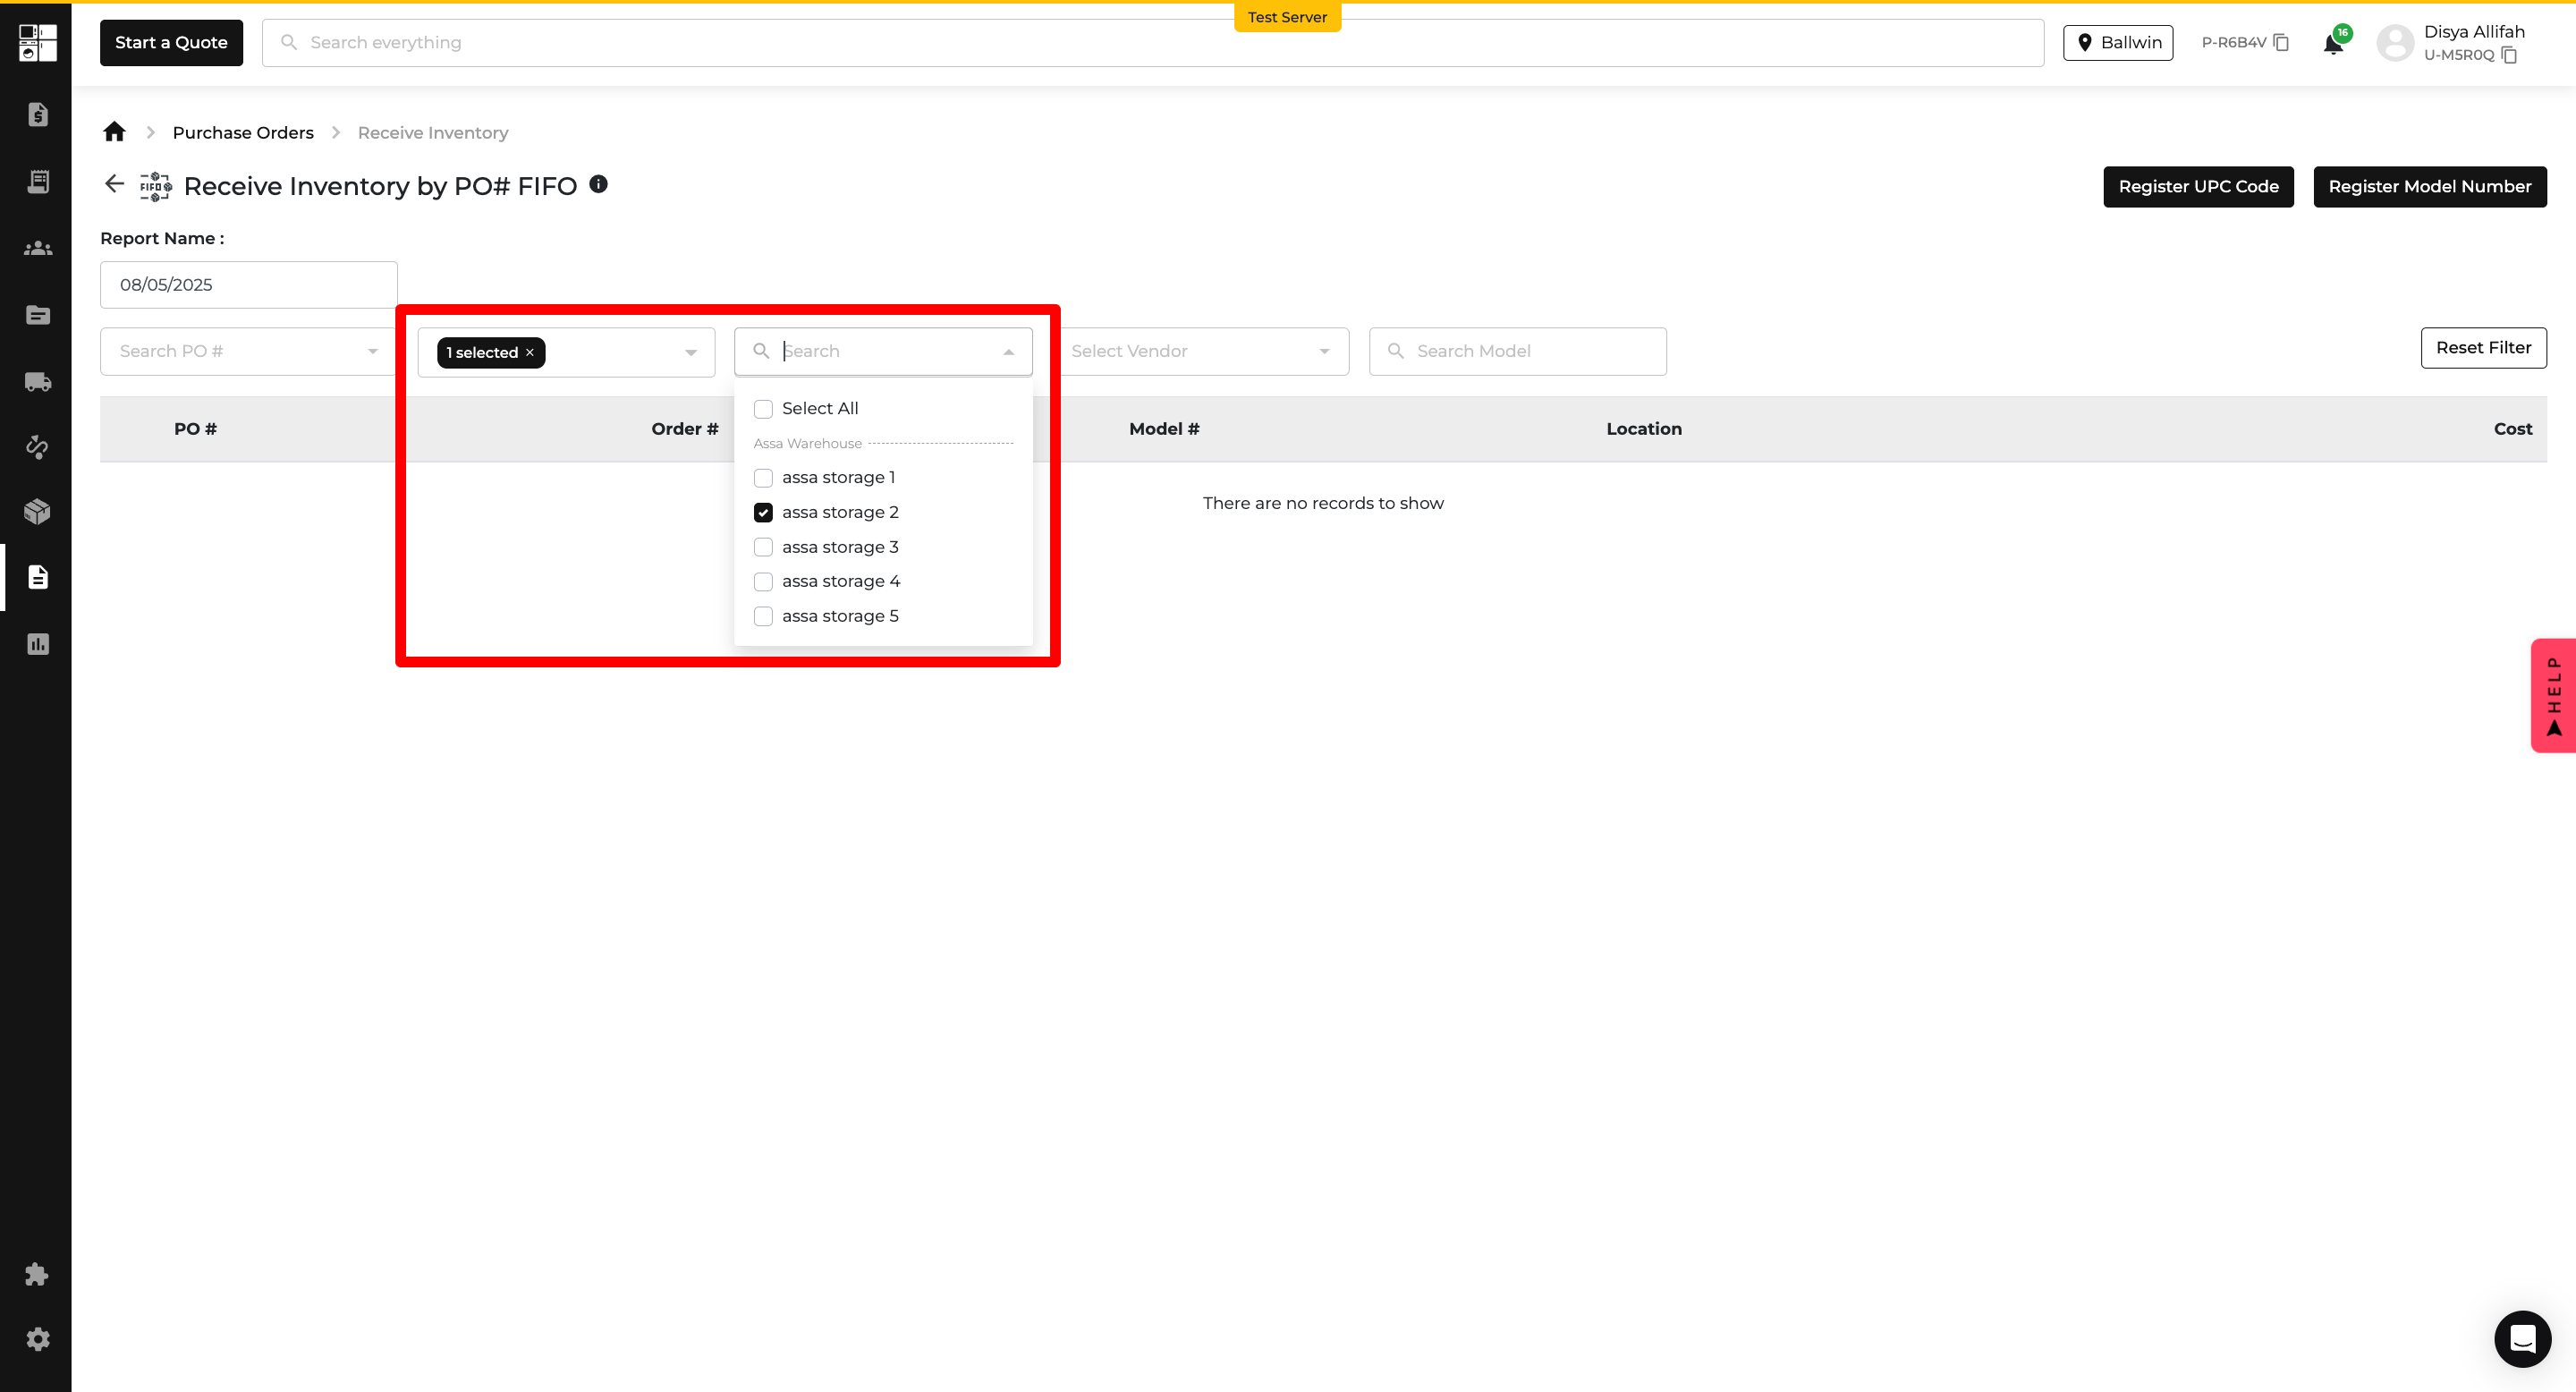
You can now specify Location and Storage Location throughout the Purchase Order and Receiving workflows! These optional fields make it easier to track where inventory is going, both at a high level (Location) and a detailed level (Storage Location) 🔍📦

💡 Here’s How It Works:

1️⃣ Set the Location First:

When creating or updating a PO, you’ll now see a Location field — this indicates which location the item is going to

2️⃣ Then Add Storage Locations (Optional):

Add a Storage Location to set Storage Locations per line item, under the specified Location

📋 The Open PO Table now includes:

  • Location and Storage Location column & filters for more detailed tracking

On Receiving Inventory:

📥 Both Location and Storage Location now appear as columns and filters, so you can receive smarter and more accurate

🧠 Good to Know:

  • Location comes first — it determines where the inventory is going
  • Storage Location is optional — great for internal stockroom organization
  • Both are tracked per line item, giving you precise control

📸 Where You’ll See It:

  • PO Creation & Edit Modals → Select Location first, then Storage Location (pic1)
  • Move to Ordered Modal → Add Storage Location per item (pic2)
  • Bulk Edit Modal → Set both Location and Storage Location in one go (pic3)
  • PO Table → New columns for Location + Storage Location (pic4)
  • Receive Inventory → Filter + columns for both fields (pic5)

Stay organized. Stay efficient. Know exactly where your inventory is going — from warehouse to shelf. 🧹📦

pic1

pic2

pic3

pic4

pic5

🏷️ New: Track Customer Class at the Order & Quote Level

What’s New?

Say hello to smarter order tracking! 🎉

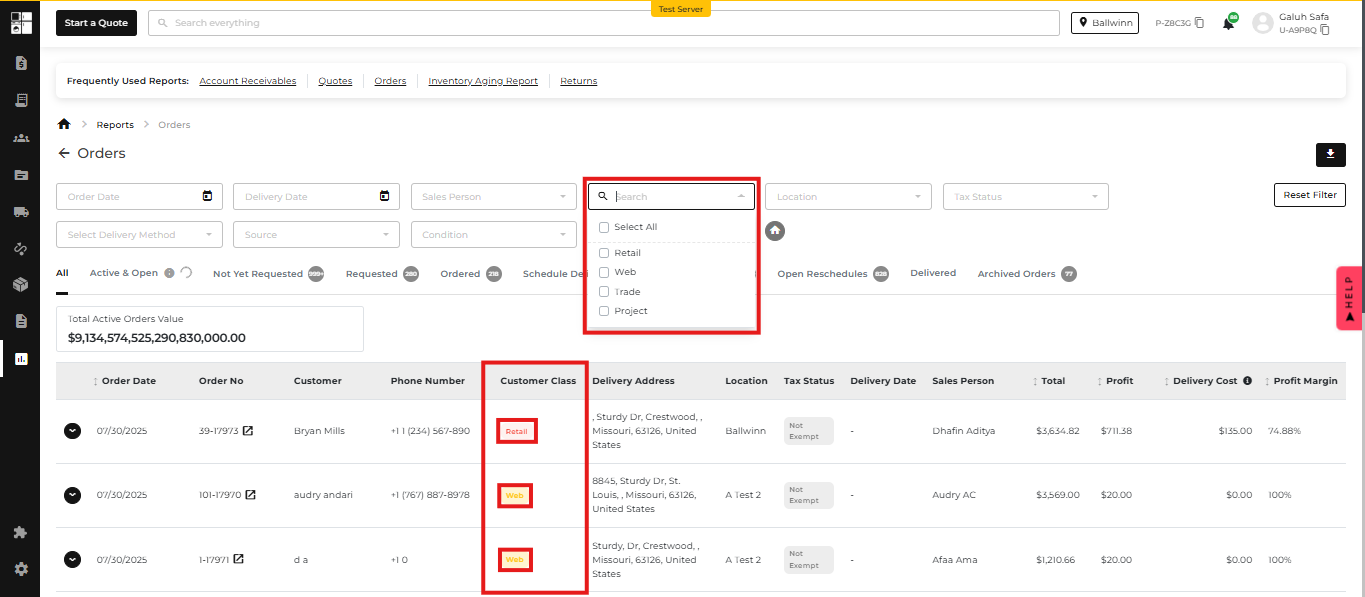
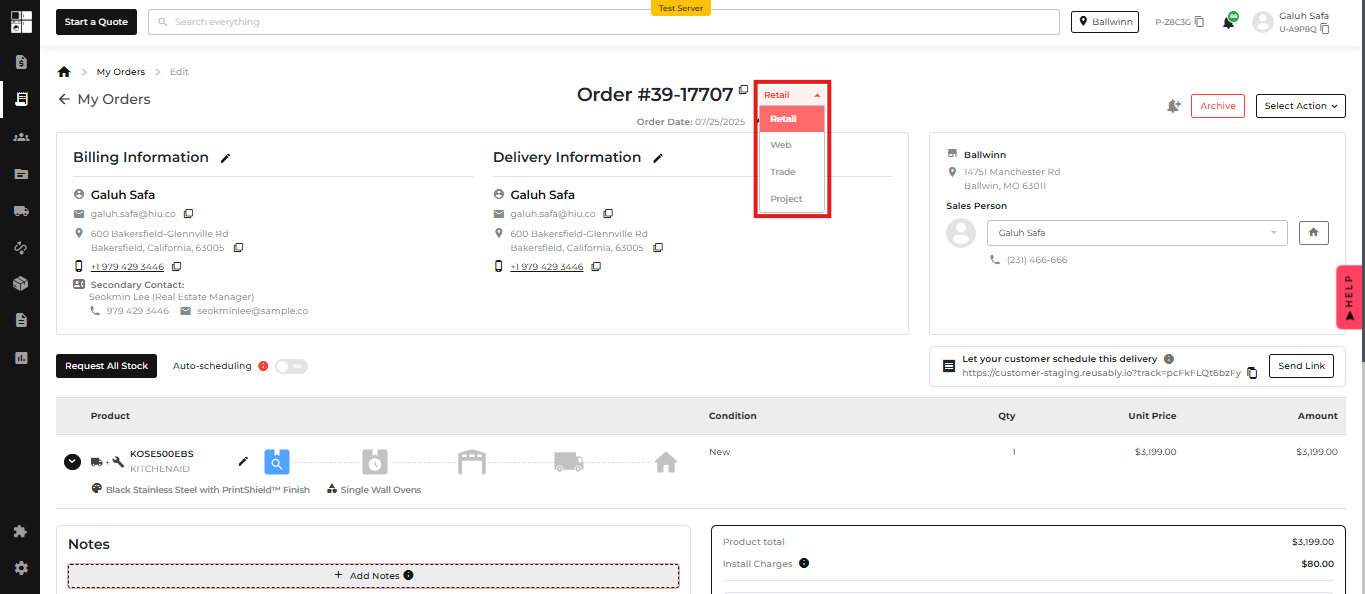
You can now assign, view, filter, and edit Customer Class (Retail, Web, Trade, Project) directly within quotes and orders — helping teams run cleaner reports and streamline fulfillment.

💡 Here’s How It Works:

Quotes & Orders:

  • 🏷️ New dropdown to set Customer Class (Retail, Web, Trade, Project)
  • 🔄 You can change it anytime
  • 🛒 POS and Web orders are auto-tagged

Reports:

  • 📁Customer Class added as a column and filter in:
    • My Quotes
    • My Orders
    • Quote & Order Reports
    • Customer → Order/Quote History
  • 🔍Also added as a filter in:
    • Deliveries
    • Account Receivables Reports
    • Income Statement Reports

Customer Details Page

  • ✏️ Inline editing now available in Order and Quote History — works just like editing Job Name

📸 Where You’ll See It:

  • Dropdown selector on Quotes and Orders
  • Filter and column on the My Orders and Reports pages
  • Editable class in Customer History
  • Colored "Customer Class" chips instead of the yellow cart icon

🧠 Why It Matters:

Now it’s easier to see what type of order you’re working with — making reporting and fulfillment smoother for everyone.😎

💳 New: Flexible Credit Line Payments + Smarter Refunds

What’s New?

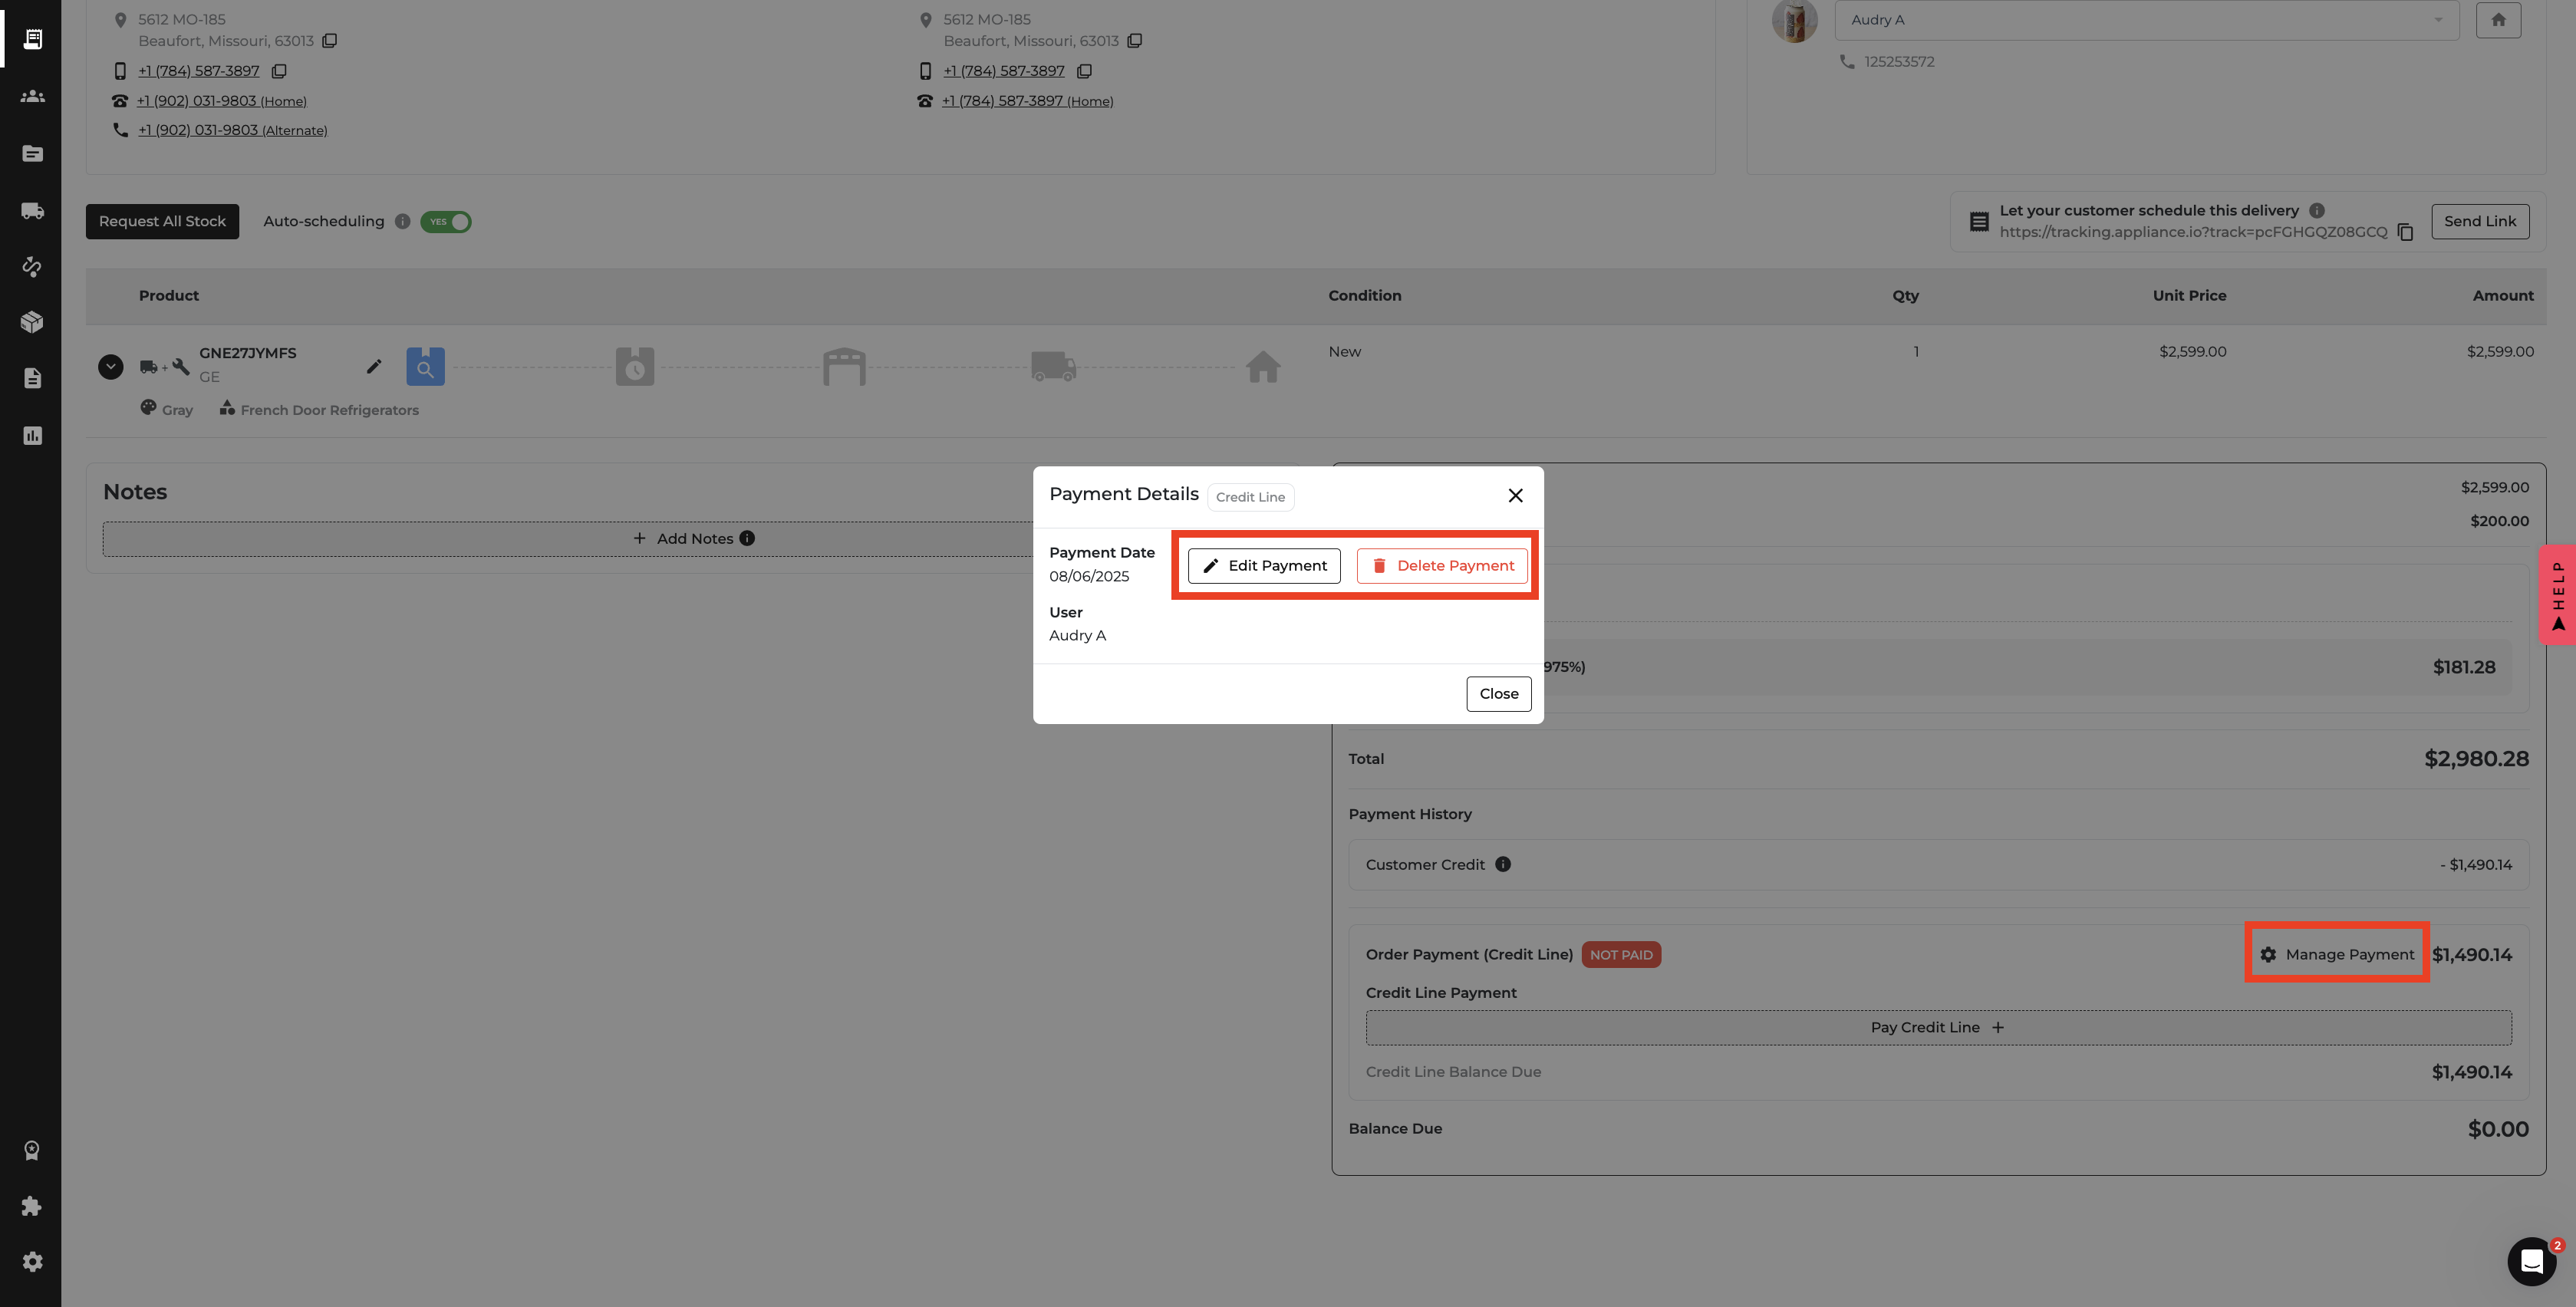
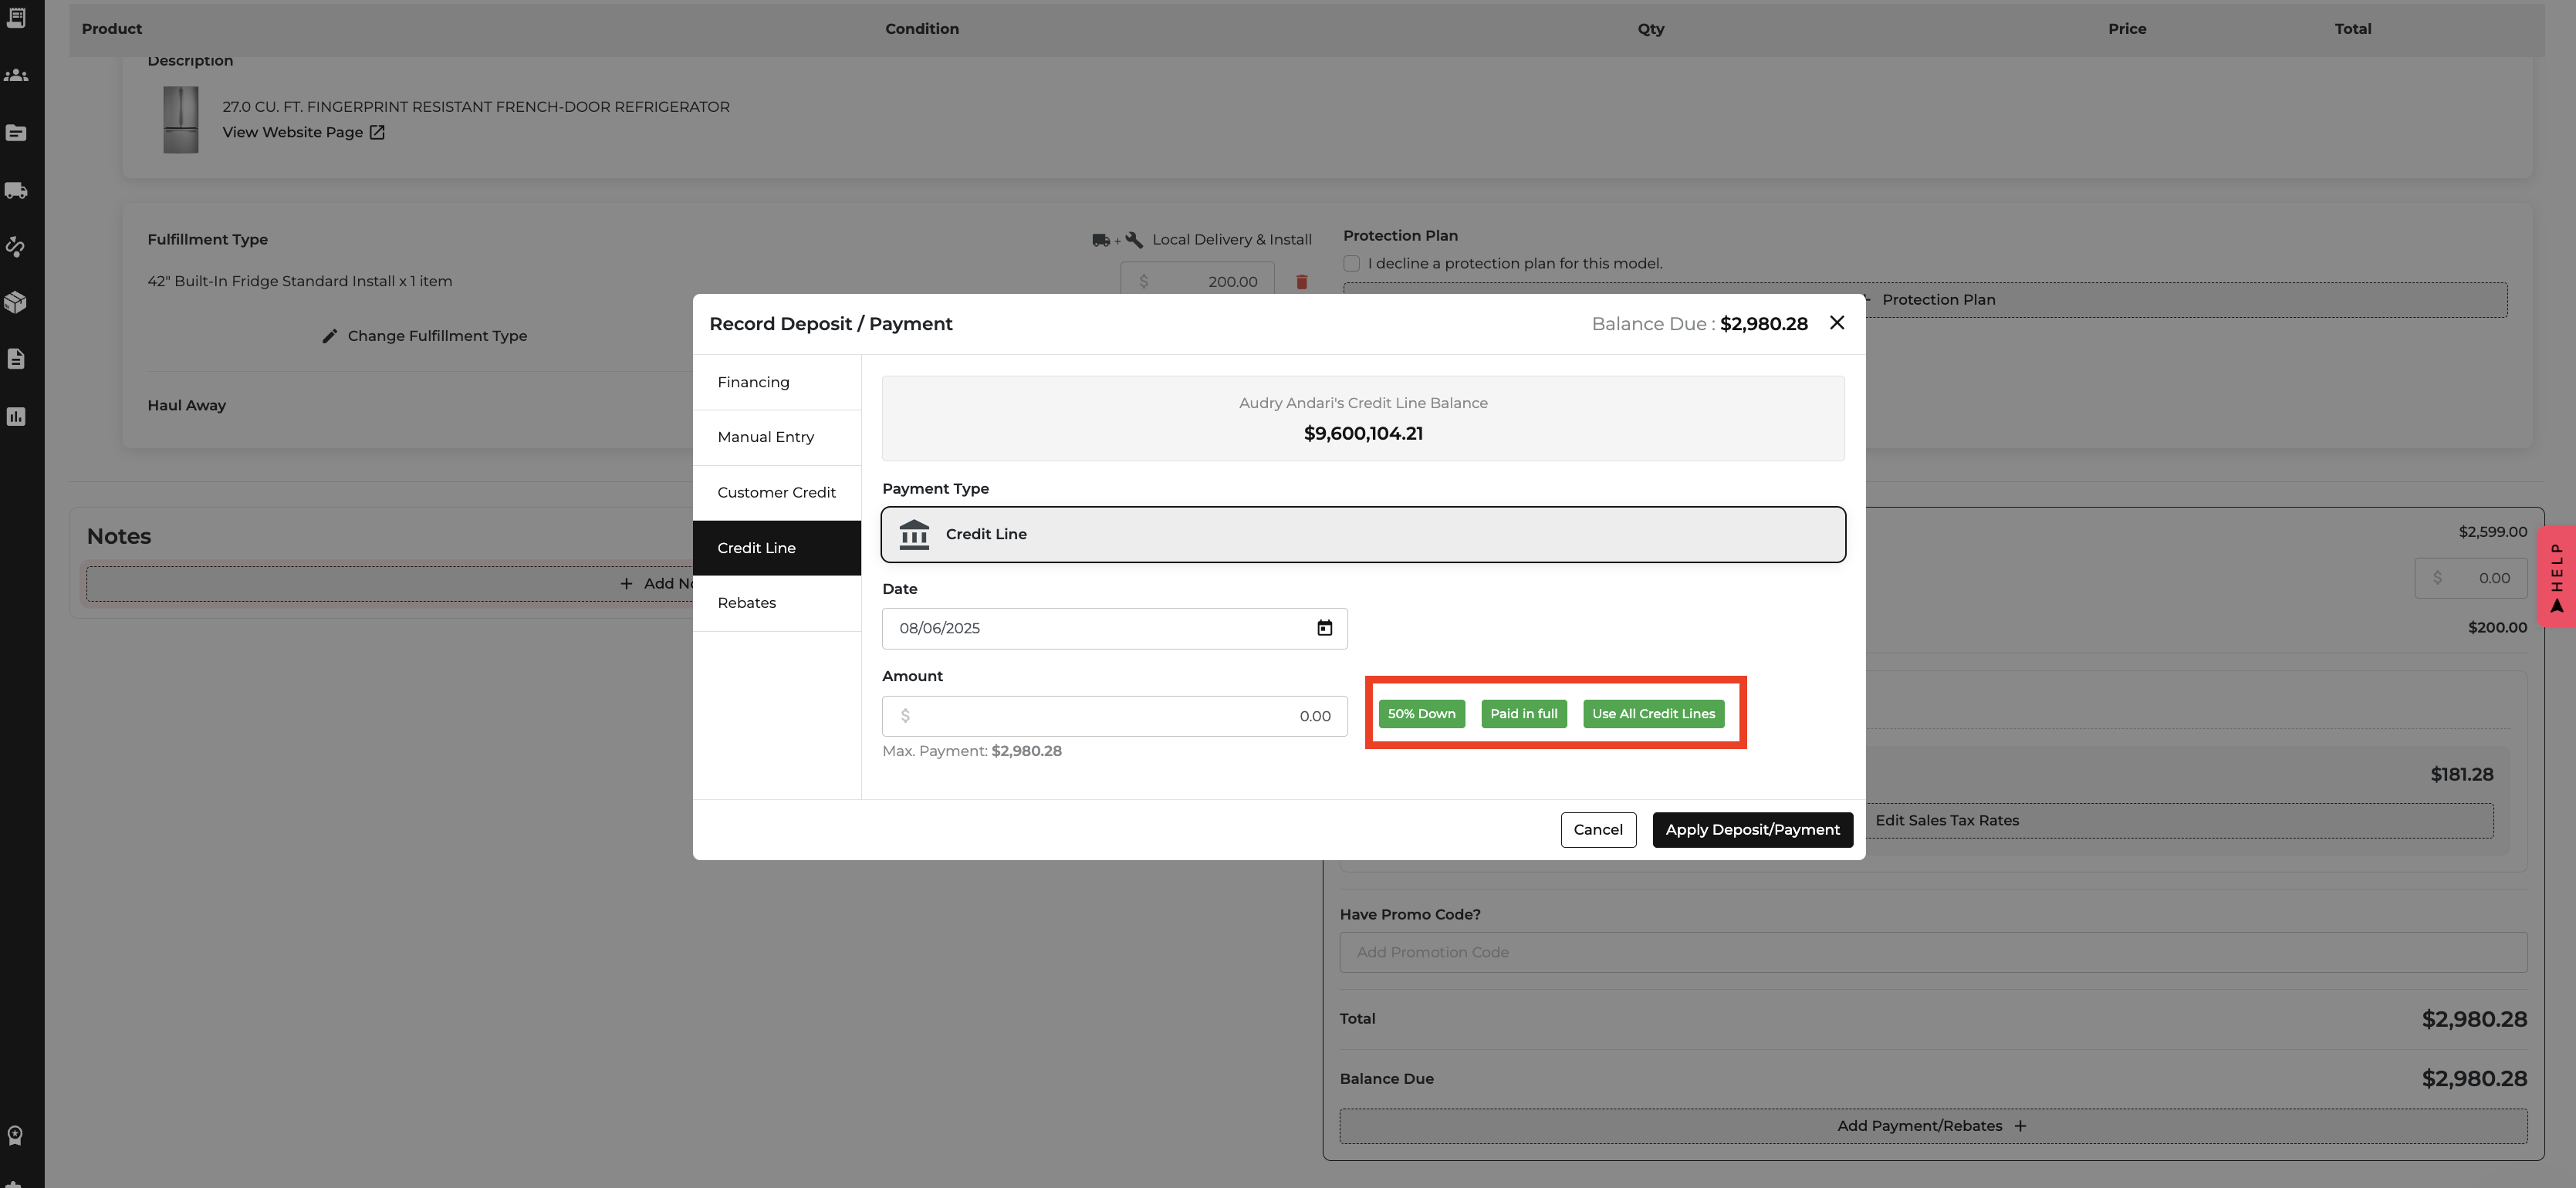
We’ve reimagined how credit line payments work — making it easier to apply, edit, split, and refund them at any stage of the buying journey. Whether you're quoting, ordering, or returning, your finance flow is now smoother than ever. ✨

💡 Here’s How It Works:

On the Quote Page:

  • You’ll now see a shiny new option: “50% Down, Use Credit Line”.
  • Apply partial credit line payments from the start — no more full-or-nothing rules.
  • Change your mind? No problem — you can now edit or delete the credit line amount at quote stage.

On the Order Page:

  • Want to adjust credit line usage after placing the order? You can!
  • Just hit edit or delete next to the credit line payment — and your credit limit updates automatically.

Refunds Made Smarter:

  • If the return amount is less than or equal to the remaining credit line balance due, you can:
    • Refund entirely to the credit line 💳
    • Or split it across other payment methods — the system will validate the min & max limits.
  • If the return amount is more than the balance due, it smartly splits between credit line + other payment types, with flexibility.

Reporting Updates (No More Headaches!):

  • Income Statement & Sales Tax: Now show only real payments (cash/card), excluding credit line parts.
  • Accounts Receivable: Reflects only the credit line portion, not the entire order value — giving your accounting team a break.
  • Delivered Sales: No changes here, just good old reliable reporting.

📸 Where You’ll See It:

  • “50% Down + Use Credit Line” button on Quote Page
  • Edit/Delete icons next to applied credit line on both Quote & Order Pages
  • Updated Payment Breakdown section
  • Income Statement, Sales Tax, and Accounts Receivable Reports

🧠 Why This Matters:

  • No more strict payment sequencing.
  • No more awkward refund hacks.
  • Just flexible, user-controlled financial workflows.
  • Perfect for teams who want control, clarity, and less manual work. 🎯

🔧 New: Track Install Costs for Accurate Profit Reporting

What’s New?

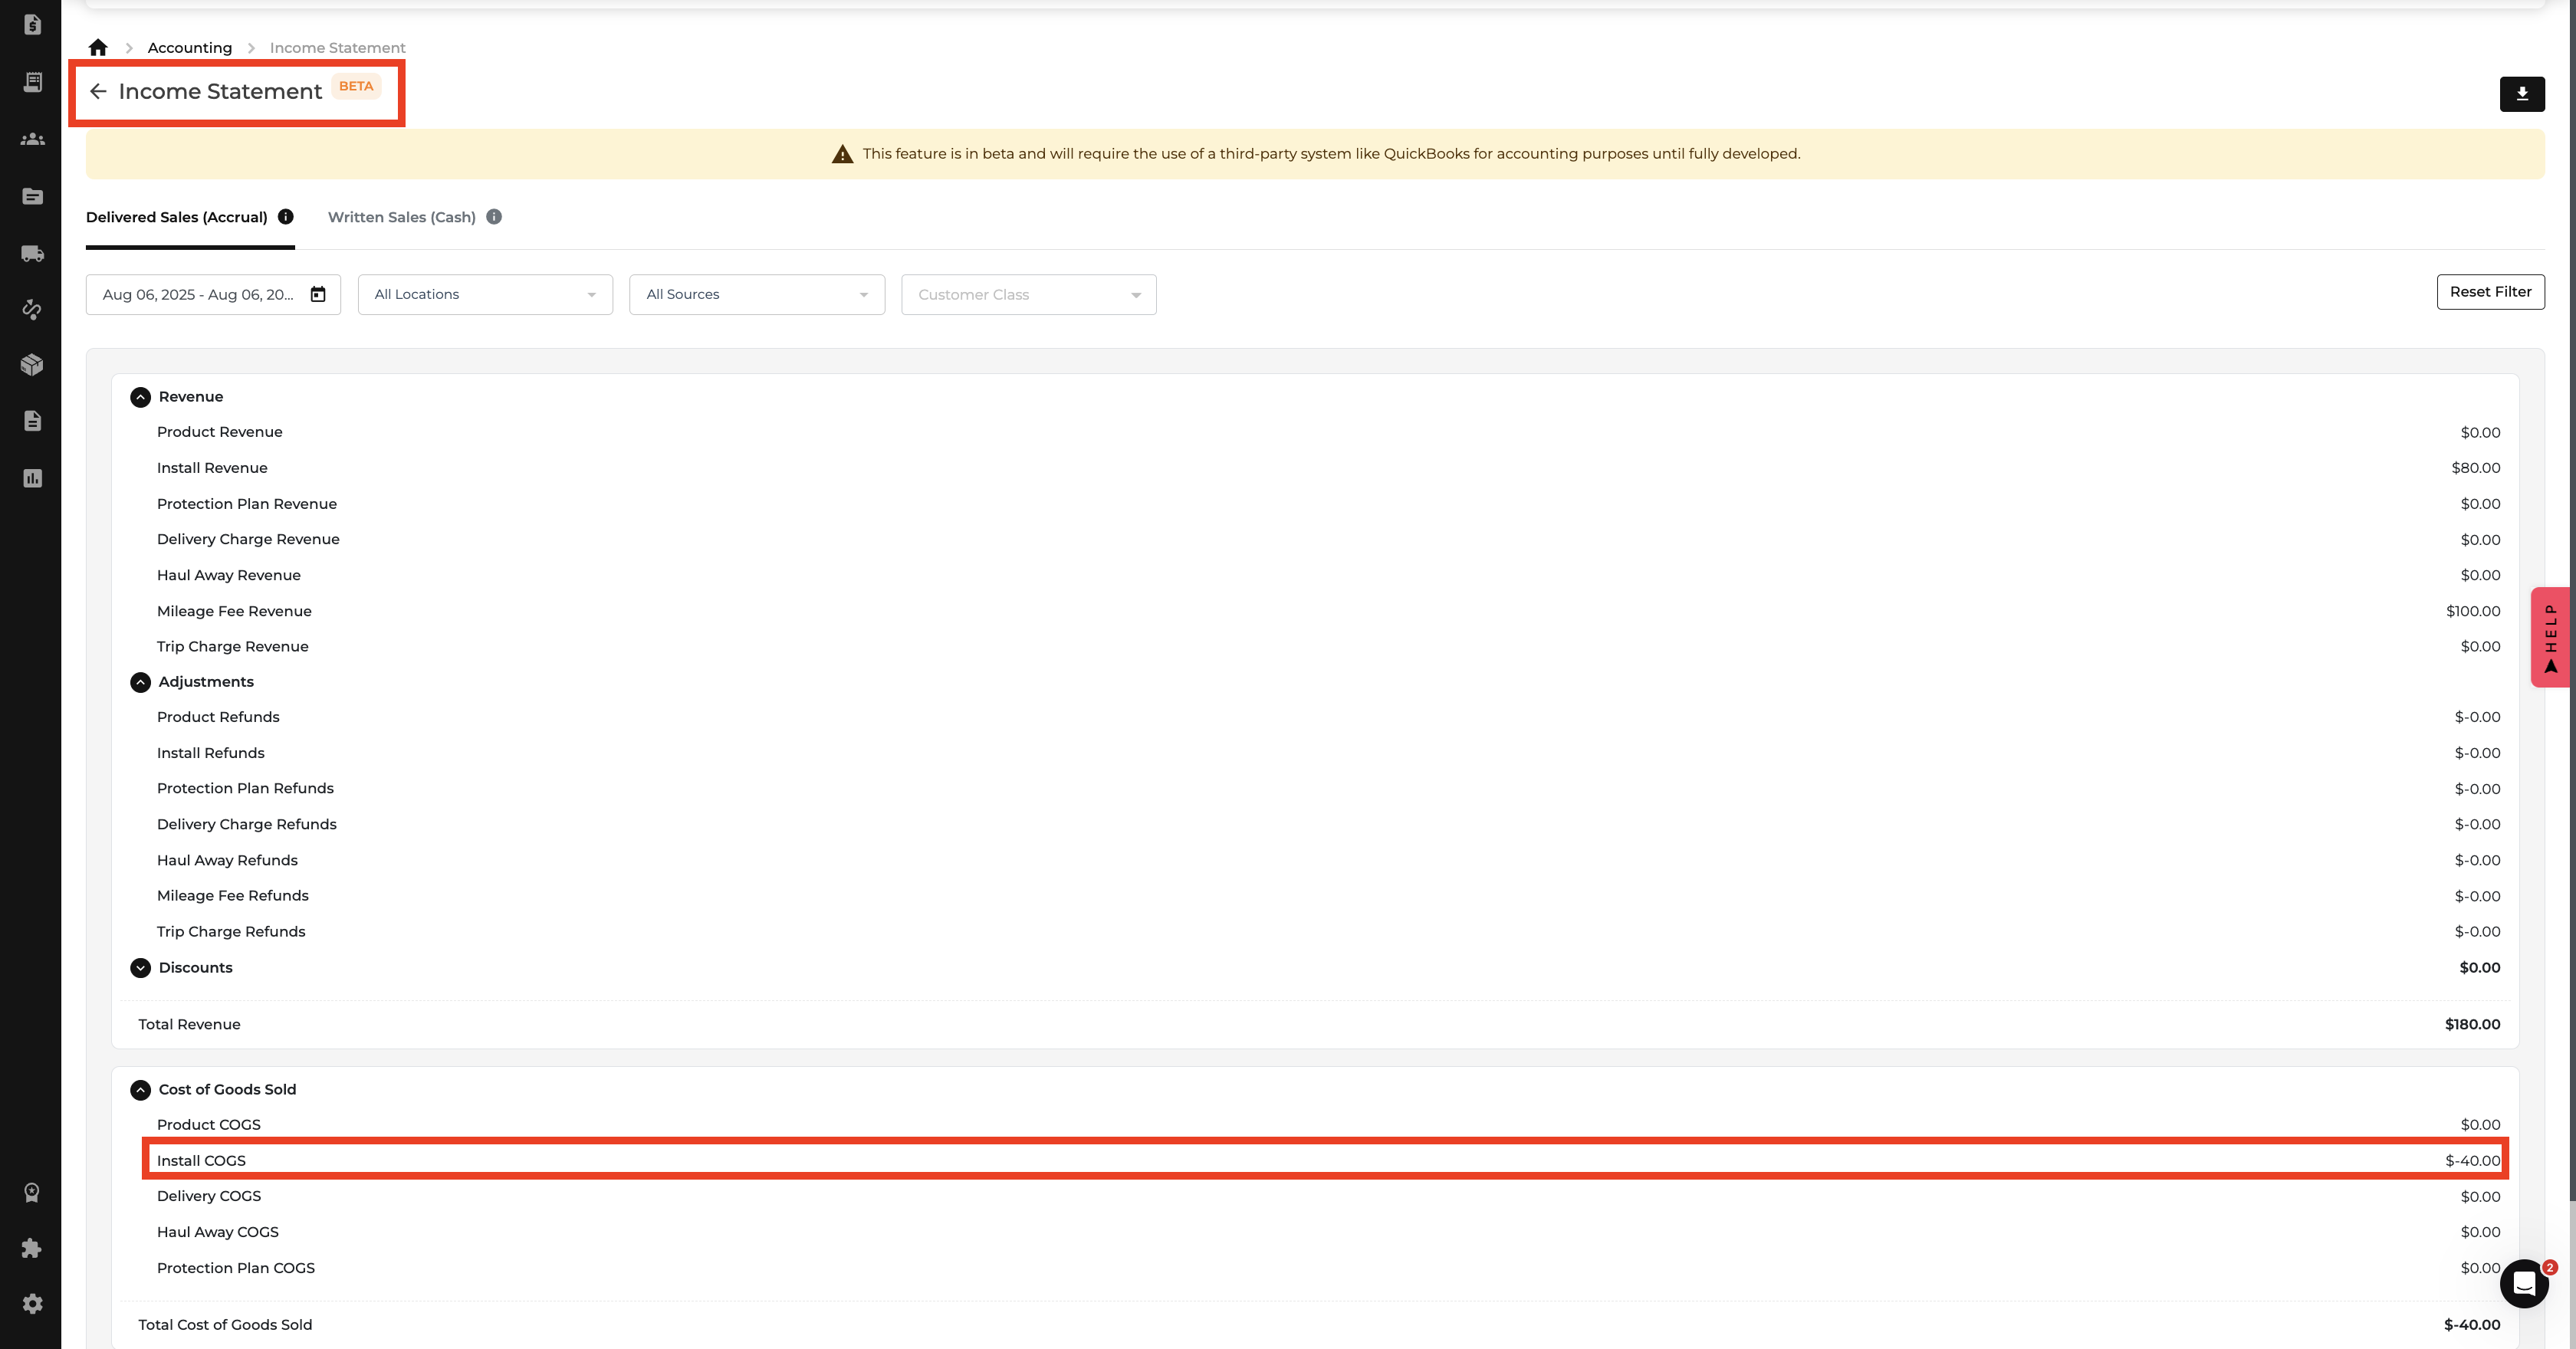
Installations just got a financial upgrade. 🛠️

You can now assign costs to each install type — and those costs will show up in your Income Statement, Fulfillment Report, and Order Profitability. No more guessing or spreadsheets — just clean, clear COGS tracking. 📊

💡 Here’s How It Works:

In Install Settings:

  • A new “Cost” field appears next to each install type.
  • Enter the cost (e.g., $50 for Standard Install).
  • Edit anytime — and changes will update your financial reports automatically.

In the Income Statement:

  • A new line item: Install COGS 🧾
  • Shows the total install costs based on completed orders during the selected time period.
  • Automatically contributes to Total COGS and affects Net Income calculations.
  • Available on both Delivered and Written views.

In the Fulfillment Report:

  • New column: Install Cost
  • Displays the cost per install type used in the order (read-only for accuracy).

On the Order Page:

  • Install costs now roll into the Order Profitability metrics.
  • If you update the cost in settings, the order’s profitability recalculates — no manual work needed.

📸 Where You’ll See It:

  • “Cost” field in Settings > Install Types
  • “Install COGS” line on Income Statement
  • “Install Cost” column in Fulfillment Report
  • Updated Profitability Section in Orders

🧠 Why This Matters:

  • No more underreported install expenses.
  • See the full picture of your costs and profits.
  • Helps finance, ops, and leadership stay aligned on real margins.

✨ Bonus: This also lays the groundwork for future improvements like profit-by-service-type, install-team performance, and more. So yeah — it’s kind of a big deal. 😎

🚚 New: Track Delivery & Haul Away Costs for Real Profitability

What’s New?

Delivery and haul away services used to be invisible in your cost tracking — but not anymore. You can now assign costs to each delivery and haul away type. These costs will flow through your Income Statement and Fulfillment Reports, giving you accurate COGS and profitability reporting. 💸📦

💡 Here’s How It Works:

In Delivery & Install Automation Settings:

  • You’ll now see a new “Cost” field next to each delivery and haul away type.
  • Add actual service costs (e.g., $15.50 for "Full Service" delivery, $20.00 for "Standard Haul Away").
  • Values are saved and used across reports and orders.
  • Editable anytime, with validation to ensure they’re positive and formatted correctly.

On the Delivery Schedule Page:

  • When viewing delivery options, you’ll now see the cost displayed alongside each option.
  • No surprises — just consistent, up-to-date values synced from settings.

In the Income Statement:

  • Two new COGS lines:
    • Delivery COGS
    • Haul Away COGS
  • These lines reflect the actual cost incurred based on services used in orders during the reporting period.
  • Contribute directly to total COGS and net income calculations — just like Product and Install COGS.

In the Fulfillment Report:

  • Two new columns:
    • Delivery Cost
    • Haul Away Cost
  • Shows the exact cost used for each order line, giving you clean operational + financial visibility.

📸 Where You’ll See It:

  • Cost fields in Settings > Delivery Options & Haul Away Types
  • Cost display on Delivery Schedule
  • New COGS lines in Income Statement
  • New columns in Fulfillment Report

🧠 Why This Matters:

  • No more “hidden” fulfillment costs
  • Accurate profitability insights across every order
  • Better decisions for pricing, logistics, and vendor negotiations

🚀 Pro Tip:

Change a delivery or haul away cost in settings? All reports update immediately — no need to recalculate anything manually. 🙌

⚠️ New: Warning for Unpaid Credit Line Before Delivery Scheduling

What’s New?

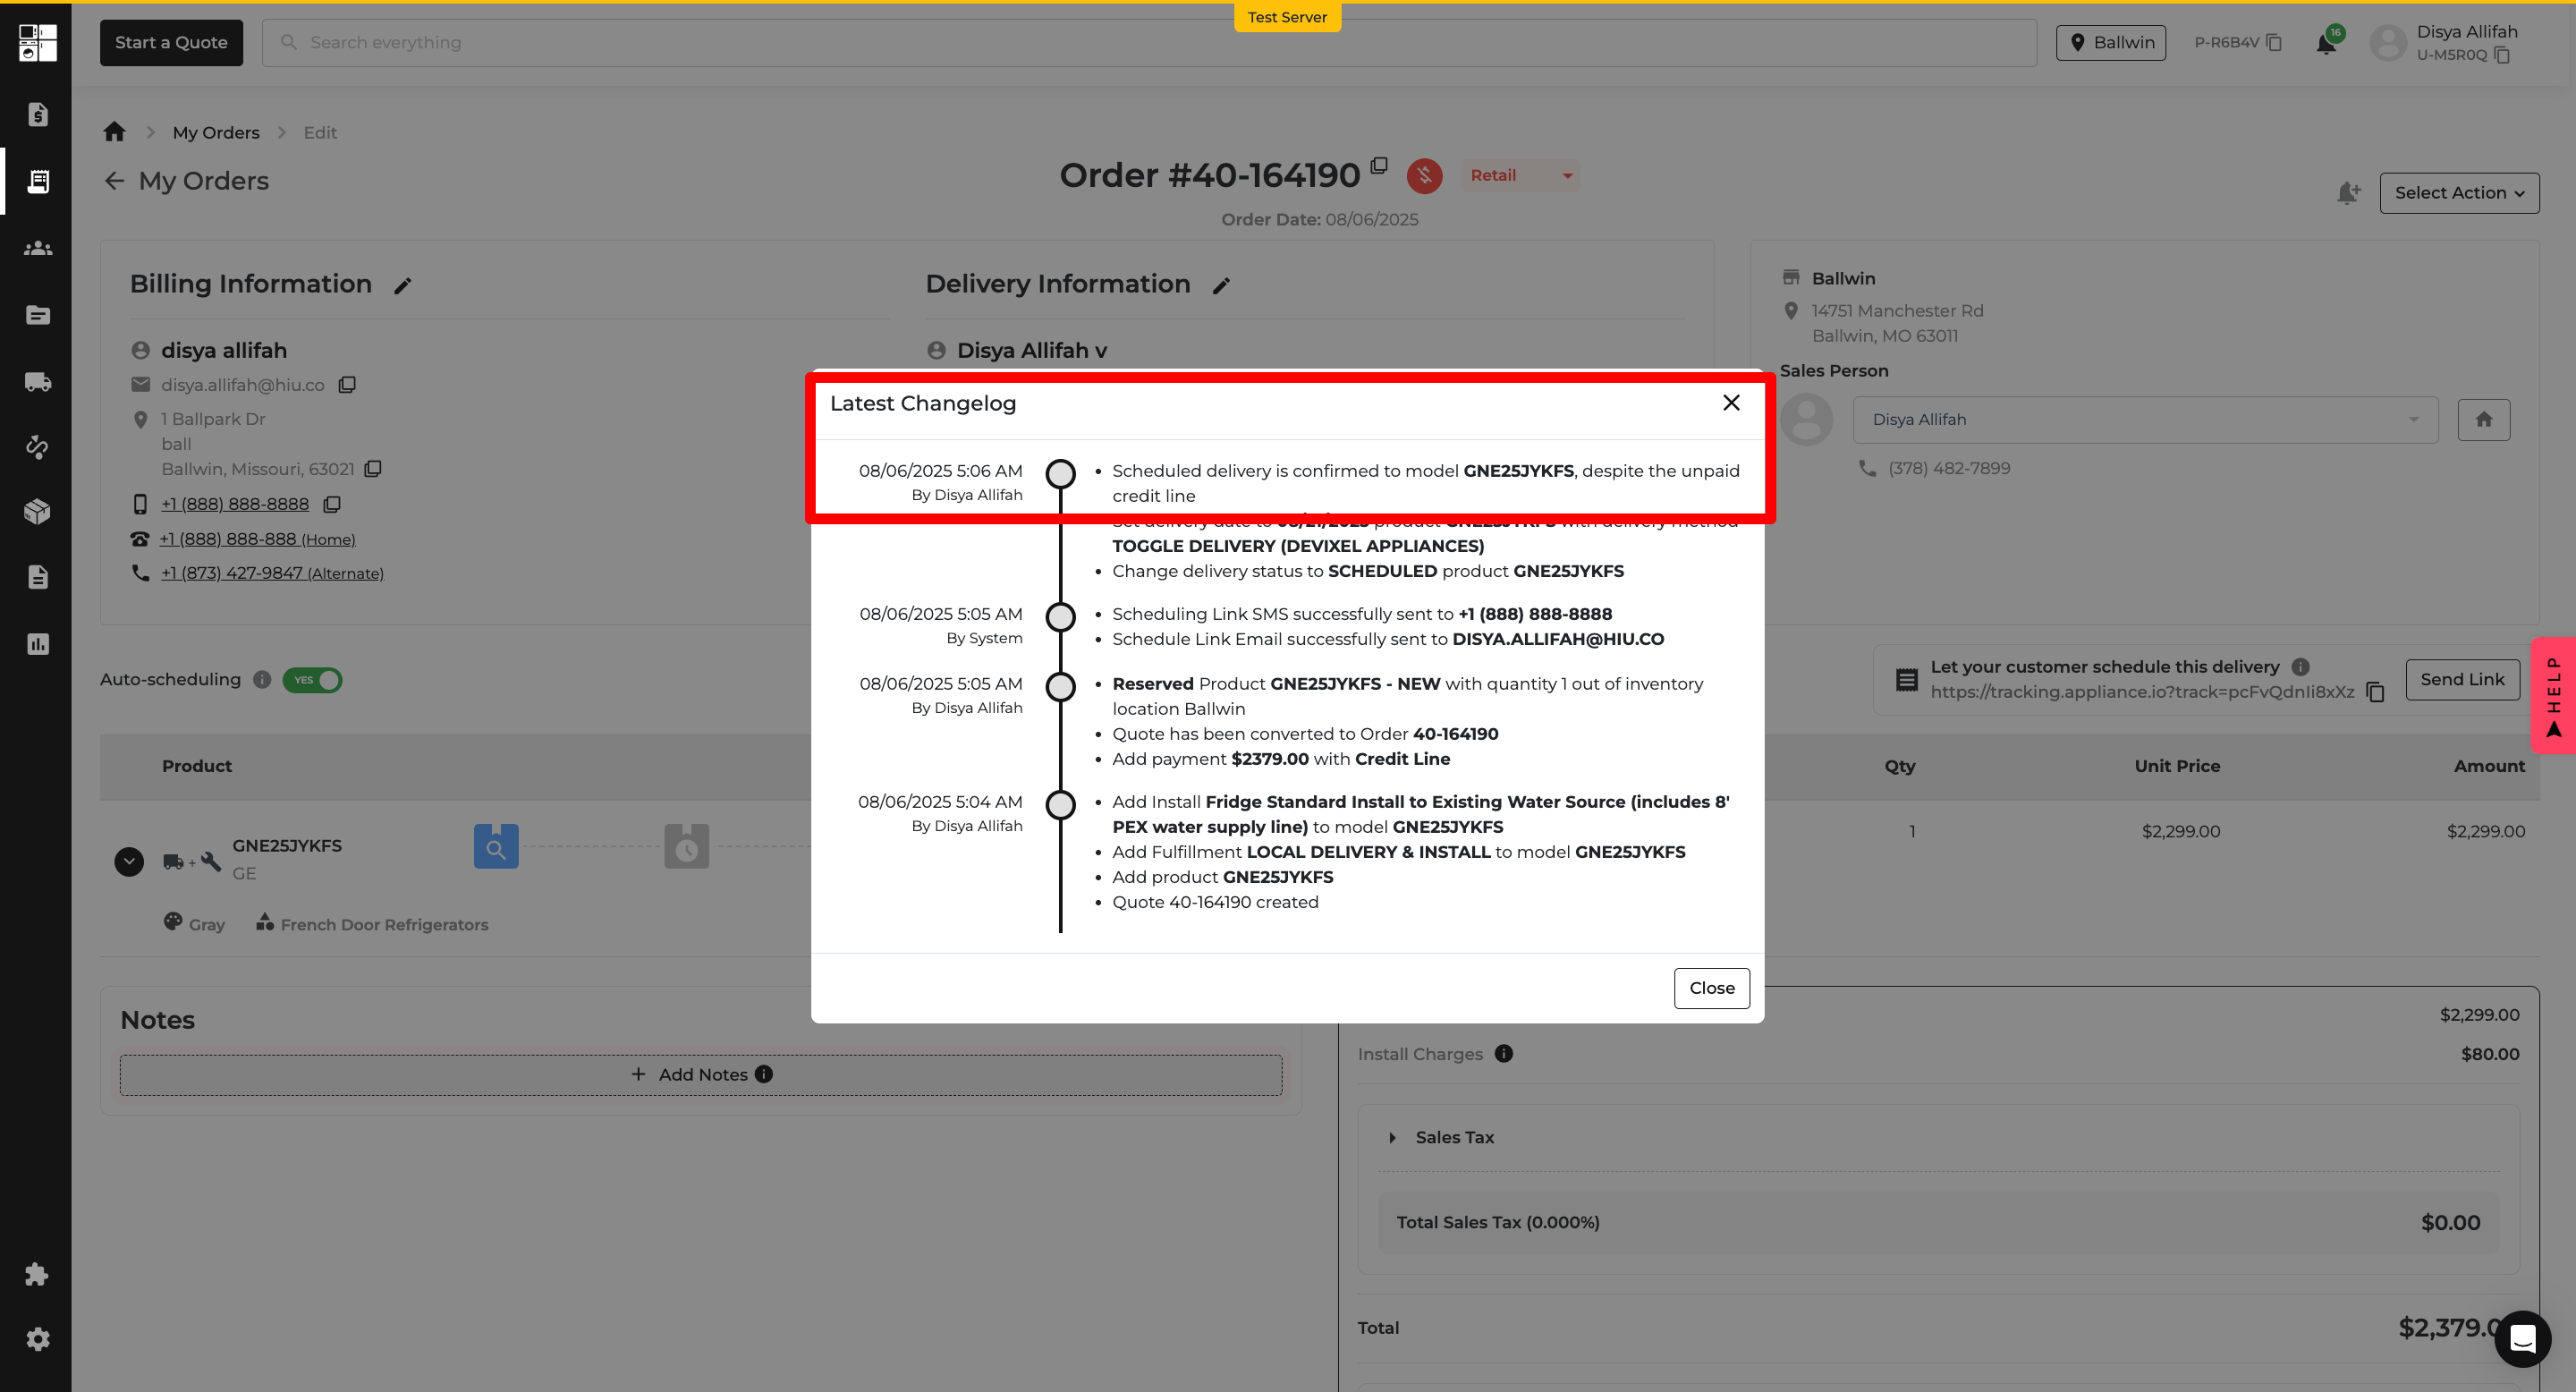
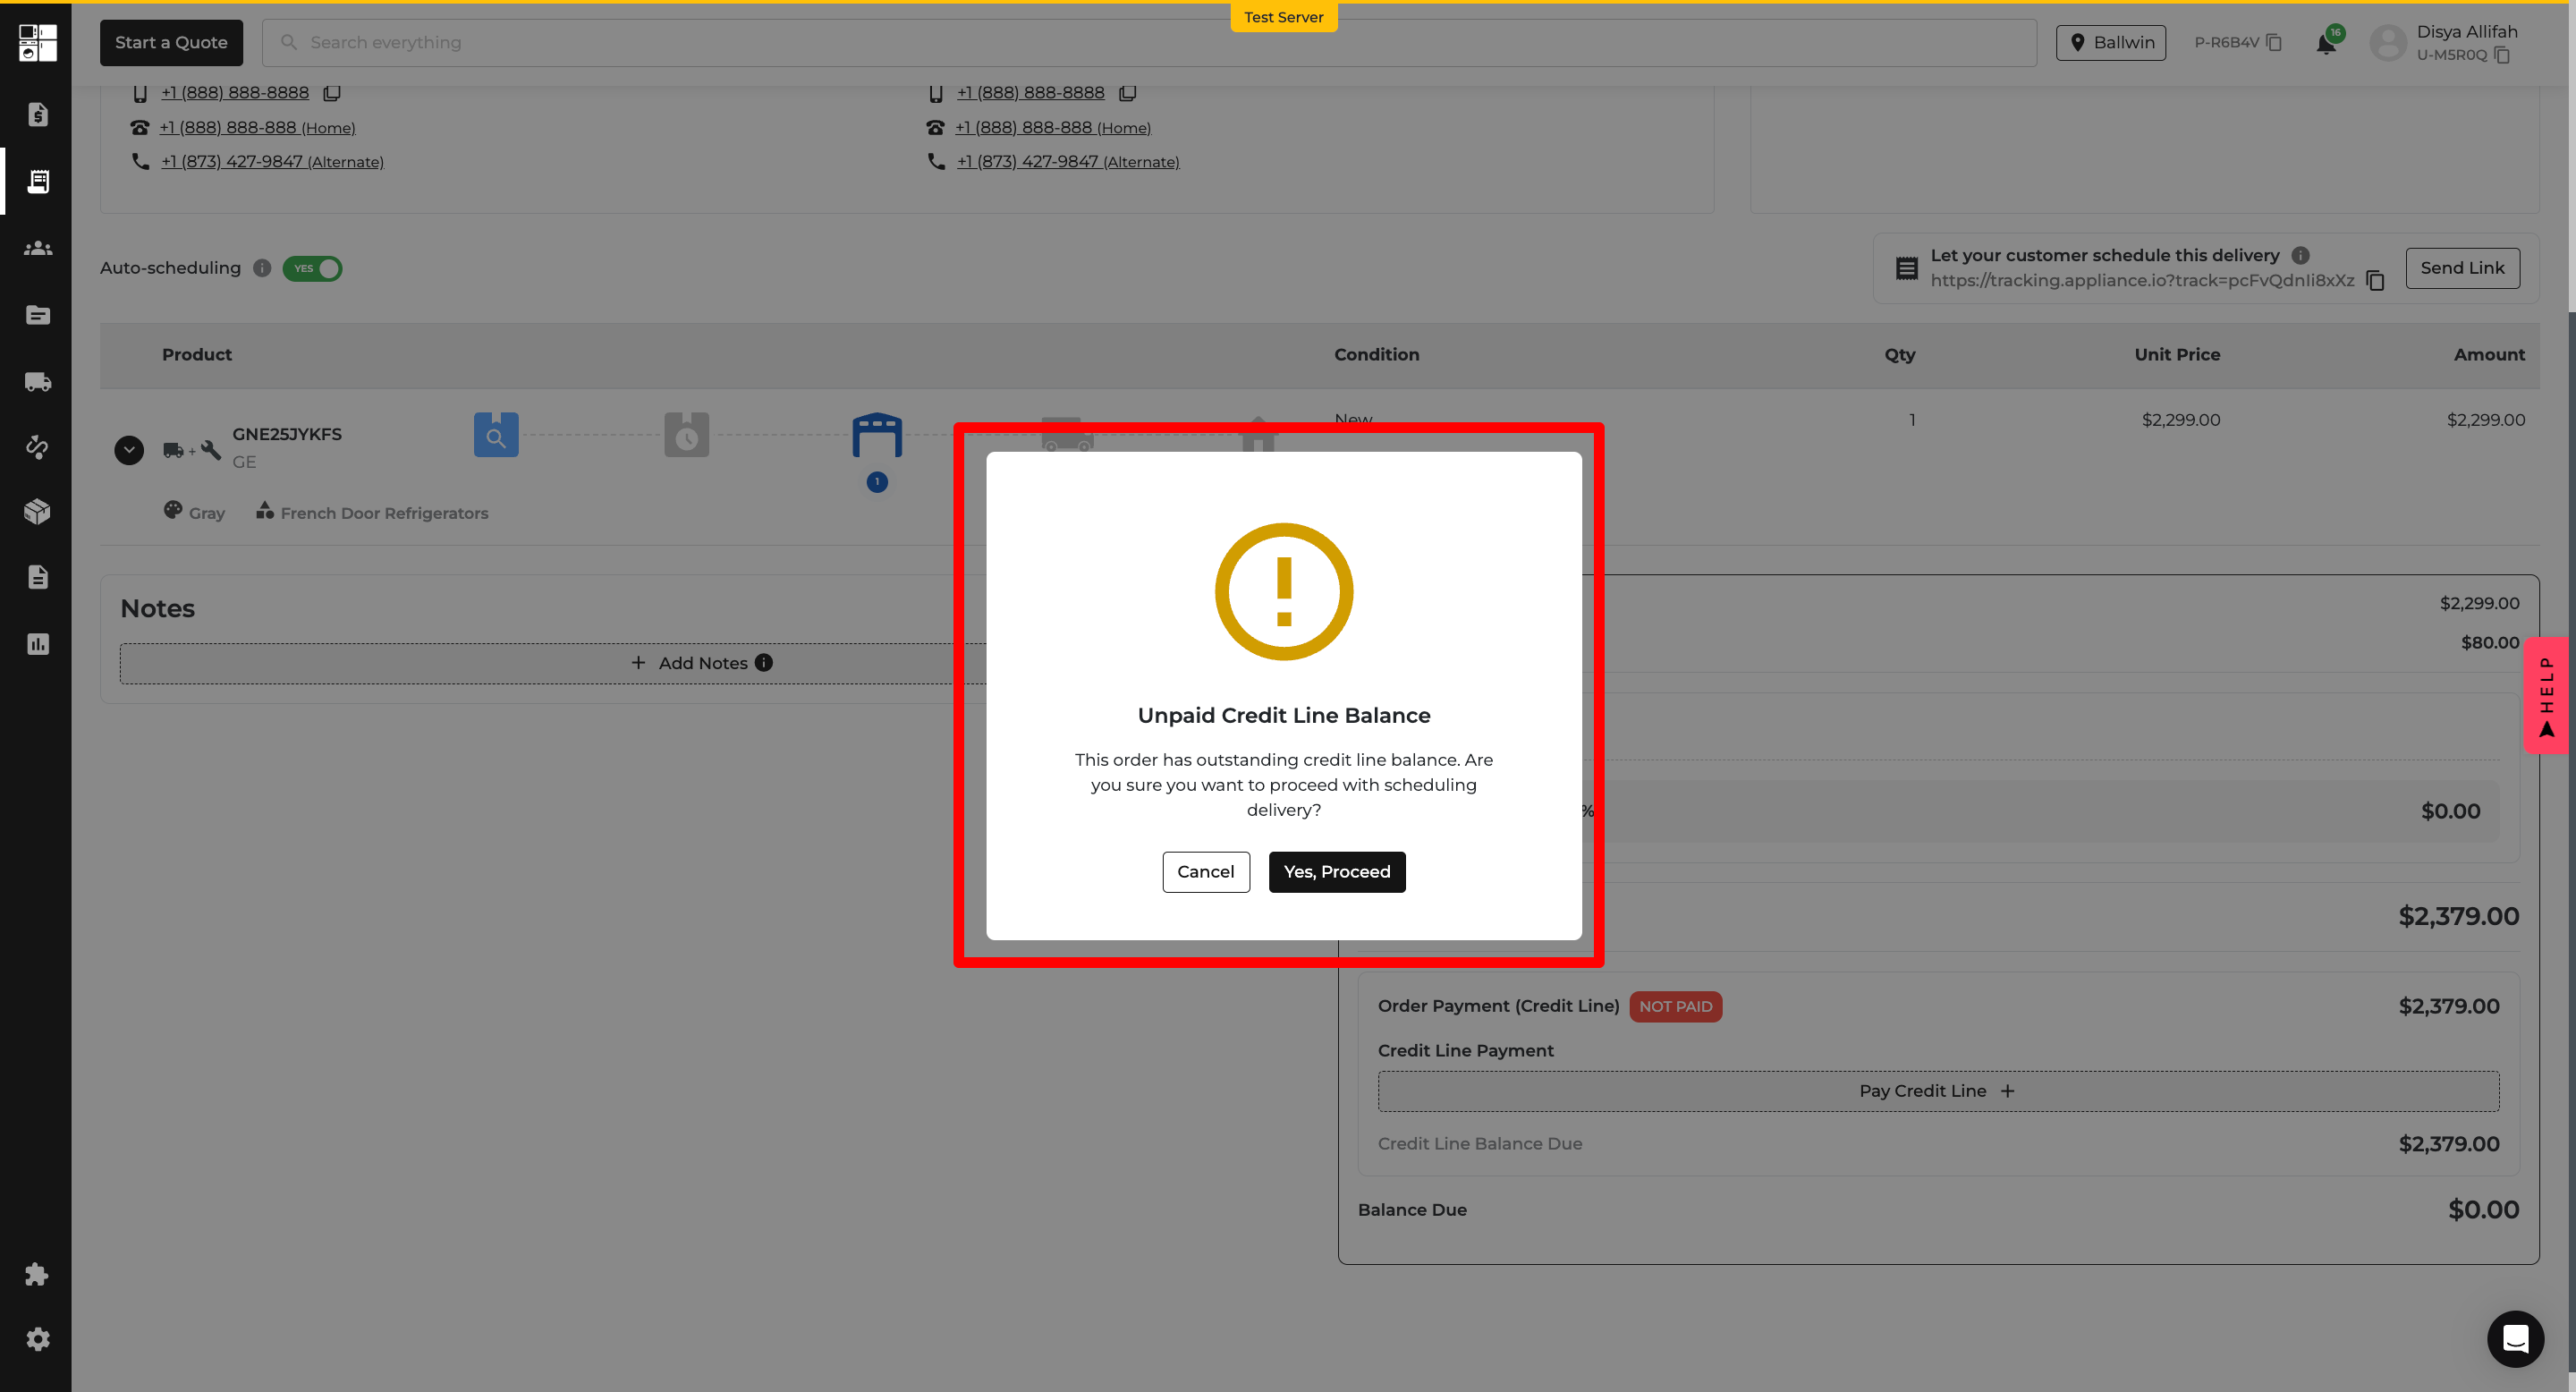
You can now get a heads-up when trying to schedule delivery on orders with unpaid credit line balances. No more silent risks — users are required to confirm before proceeding, and the system keeps a record. 🛑📦

💡 Here’s How It Works:

On the Orders Page – Delivery Scheduling Flow:

  • Trying to schedule delivery on an order with an unpaid credit line?
  • You’ll now see a warning popup with the message:
  • "This order has an outstanding credit line balance. Are you sure you want to proceed with scheduling delivery?"

  • Two buttons:
    • Cancel: Stops the scheduling process.
    • Proceed: Continues scheduling, with full awareness of the unpaid balance.

Behind the Scenes – Changelog Update:

  • If the user clicks Proceed, we’ll log it in the Changelog automatically:
    • Includes username and timestamp of the confirmation.
    • Keeps your audit trail clean and transparent.

📸 Where You’ll See It:

  • Orders Page → Delivery Scheduling (pic6)
  • Changelog → New entry for delivery confirmation on unpaid balances (pic7)

🧠 Why This Matters:

  • Prevents accidental deliveries for unpaid orders
  • Adds financial guardrails without blocking workflows
  • Keeps your team and records in sync

pic6

pic7

📦 New: Shipment Value Summary on Deliveries Page

What’s New?

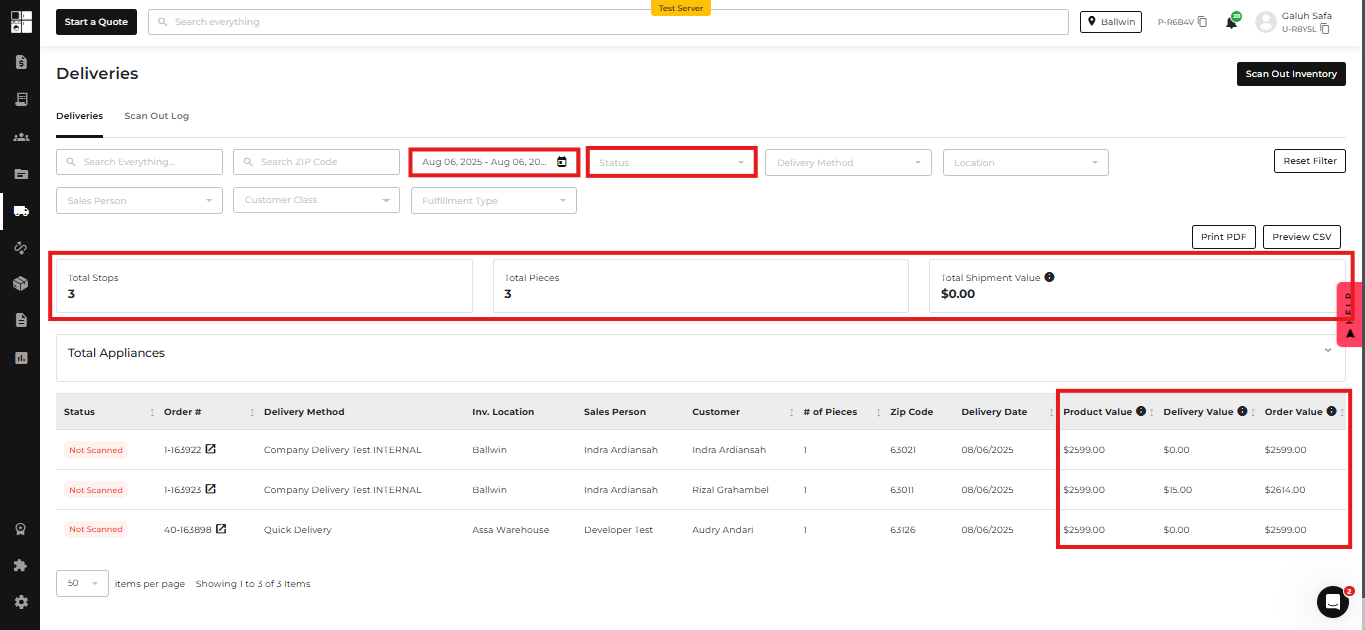
Your Deliveries page just leveled up! You’ll now see a shipment value summary, detailed financial breakdowns, and new filters to help your operational team stay sharp. No more guessing how much value each trip carries — it's all in clear view now. 💸

💡 Here’s How It Works:

On the Deliveries Page:

✅ New Filters:

  • Date Range Picker — choose any custom period
  • Status Filter — view All, Not Scanned, Partially Scanned, or Scan Completed deliveries

📊 New Summary Box:

  • Shows total Shipment Value for orders with Scan Completed status only
  • 🧠 Tooltip: “Shipment value is calculated based only on orders with Scan Completed status.

📋 New Table Columns:

  • Product Value – total product price
  • Delivery Value – includes delivery fees, options, and trip charges
  • Order Value – the full package

📤 Updated Exports (PDF + CSV):

  • Exported files now reflect all the new filters and columns

📸 Where You’ll See It:

Deliveries page → Deliveries tab

🧠 Why This Matters:

  • Gives your team a clear view of delivery value and costs
  • Helps track revenue, efficiency, and delivery performance

Now Live: Multi-Warehouse Location Control!

🏢 New: Smarter Warehouse Settings for Locations

What’s New?

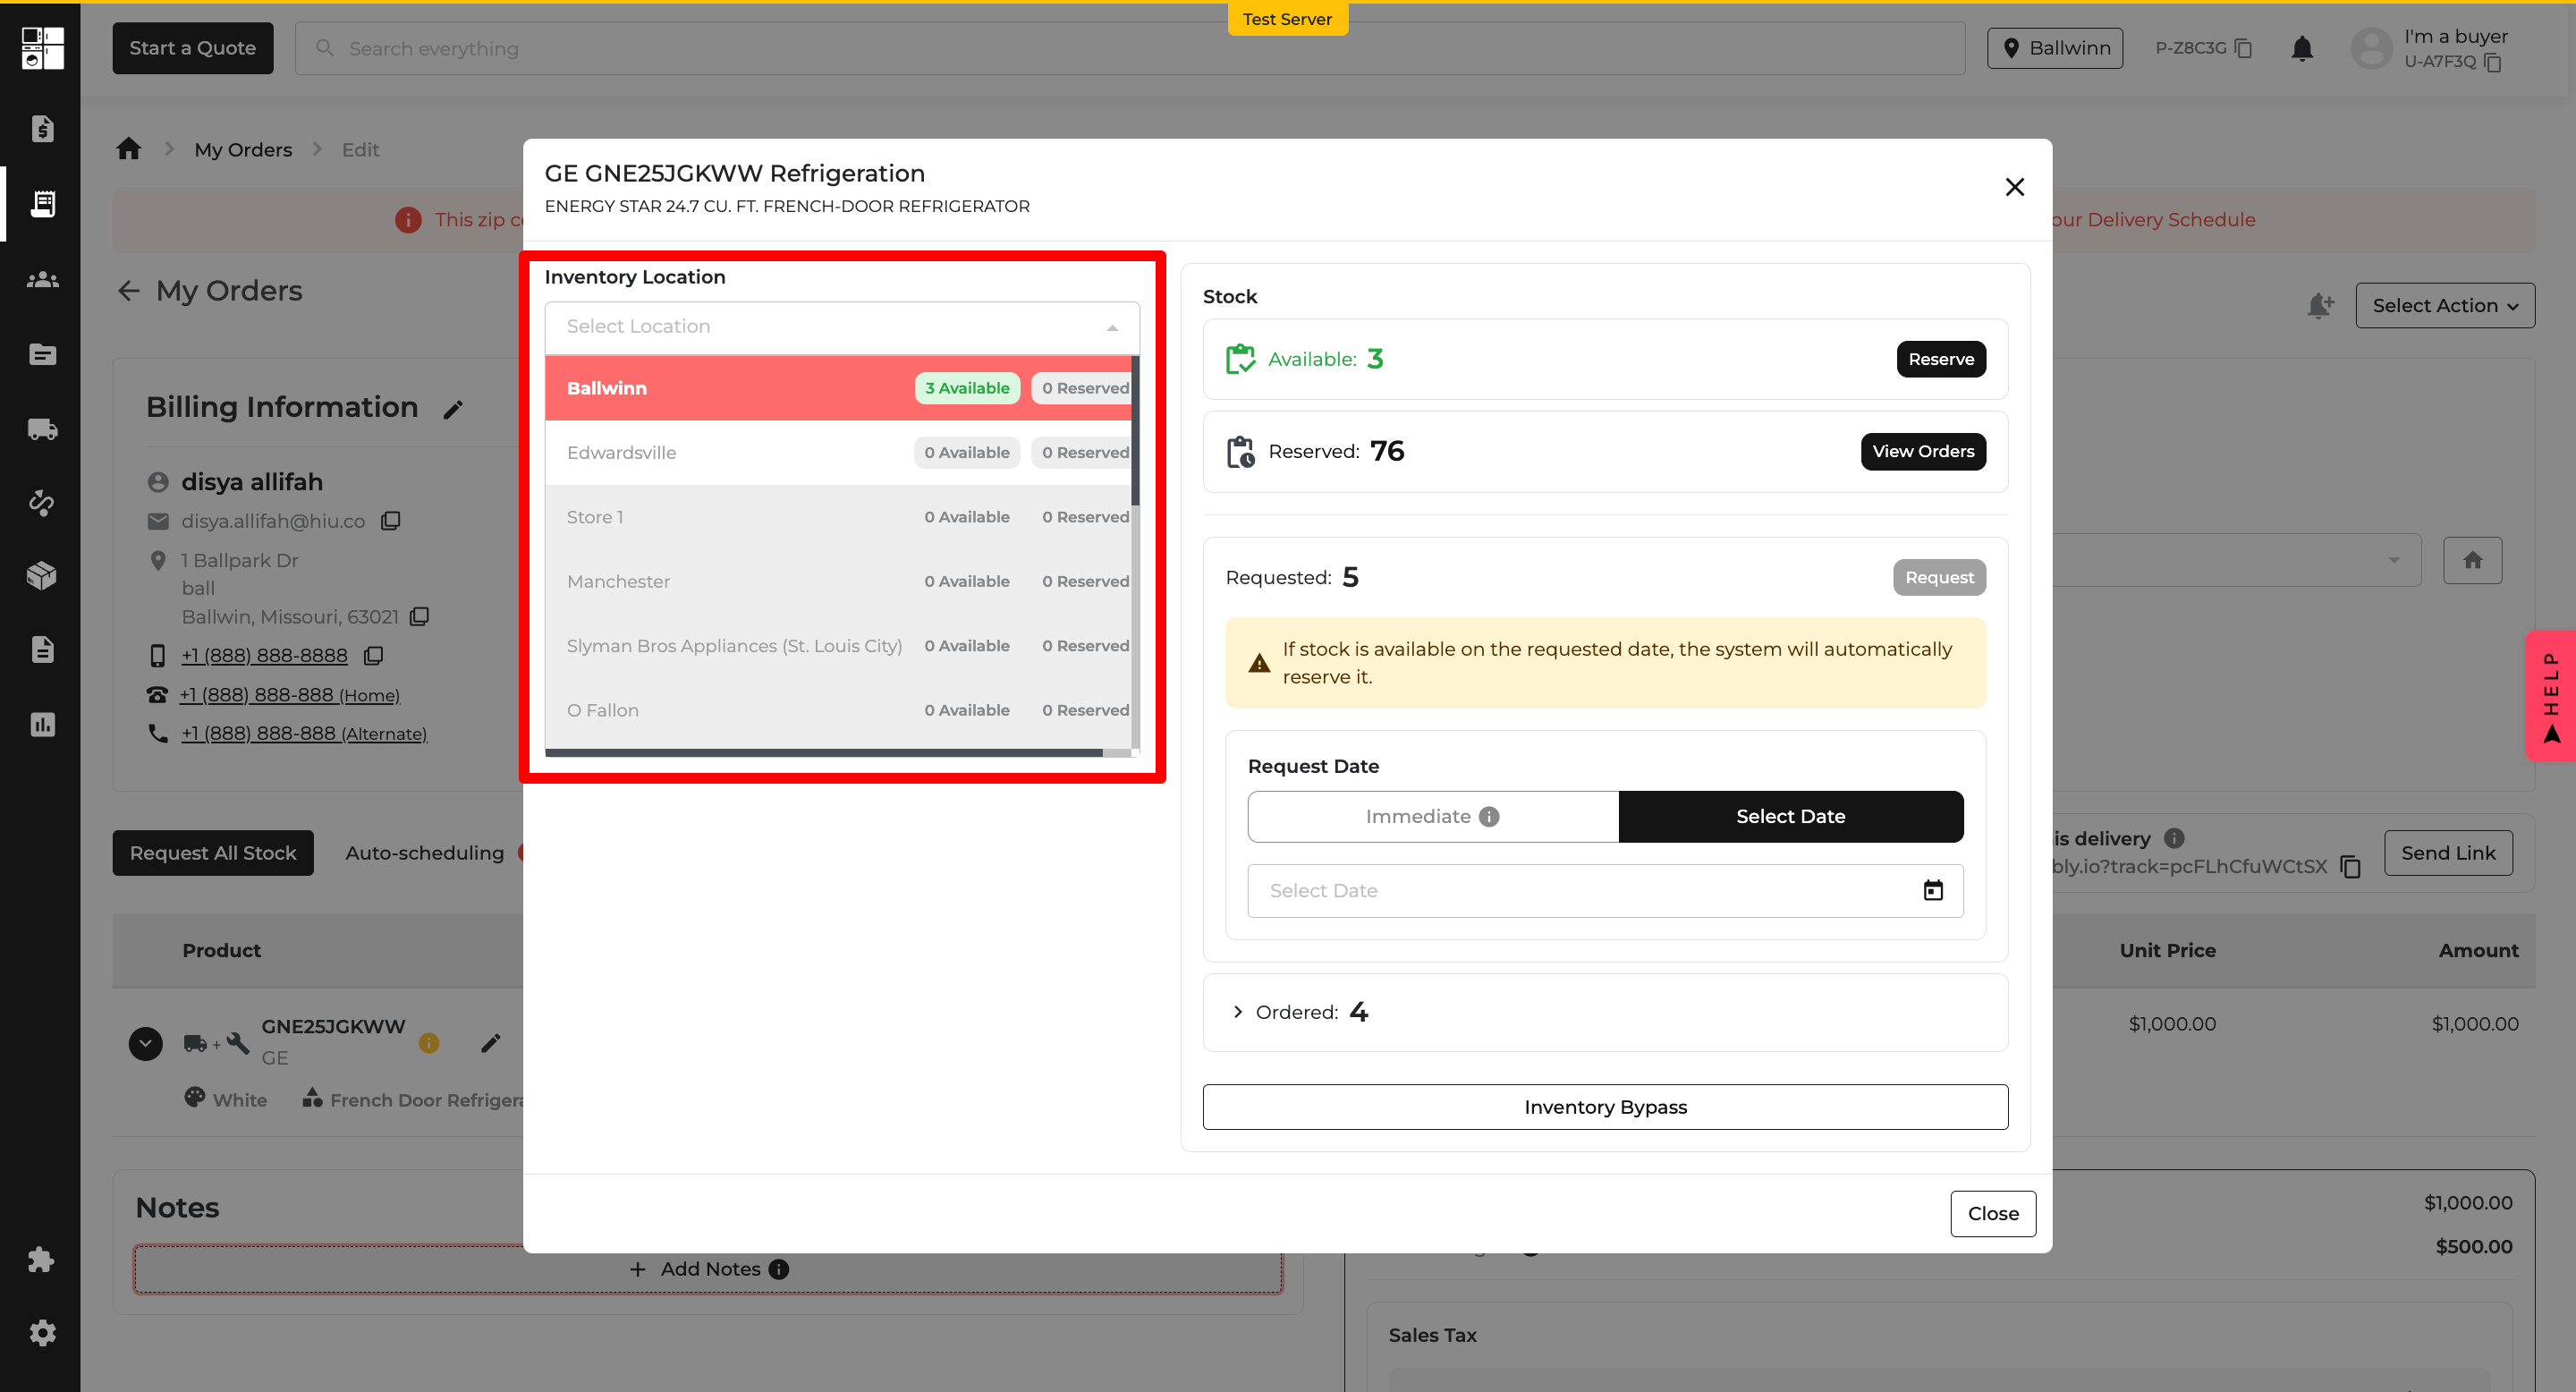
You can now set multiple locations as warehouses!

💡 Here’s How It Works:

  • On the Location Settings Page, there’s now a “Set as Warehouse” toggle.
  • You can enable multiple warehouses, but at least one warehouse must always stay active.
  • If only one warehouse exists, the toggle is disabled, with a tooltip to explain why.
  • Once multiple warehouses are active, you can set a default warehouse.
  • Bonus:

  • The default warehouse is automatically assigned to all delivery methods — no manual linking needed.

🔁 New: “Warehouse reassignment for delivery method” Toggle

  • This toggle appears only when multiple warehouses are active
  • It controls whether this warehouse can be used by the system when reserving stock during order/quote creation
  • If enabled: the warehouse is eligible for stock reassignment when the default warehouse is out of stock
  • If disabled: this warehouse will not be used in reassignment, even if it has stock

📍 Where You’ll See It:

  • Location Settings Page
    • “Set as Warehouse” toggle
    • “Set as Default Warehouse” option (if multiple warehouses exist)
    • Warehouse reassignment for delivery method” toggle (only visible when there are multiple warehouses)

🚚 Enhancement: Assign Delivery Methods by Warehouse

What’s New?

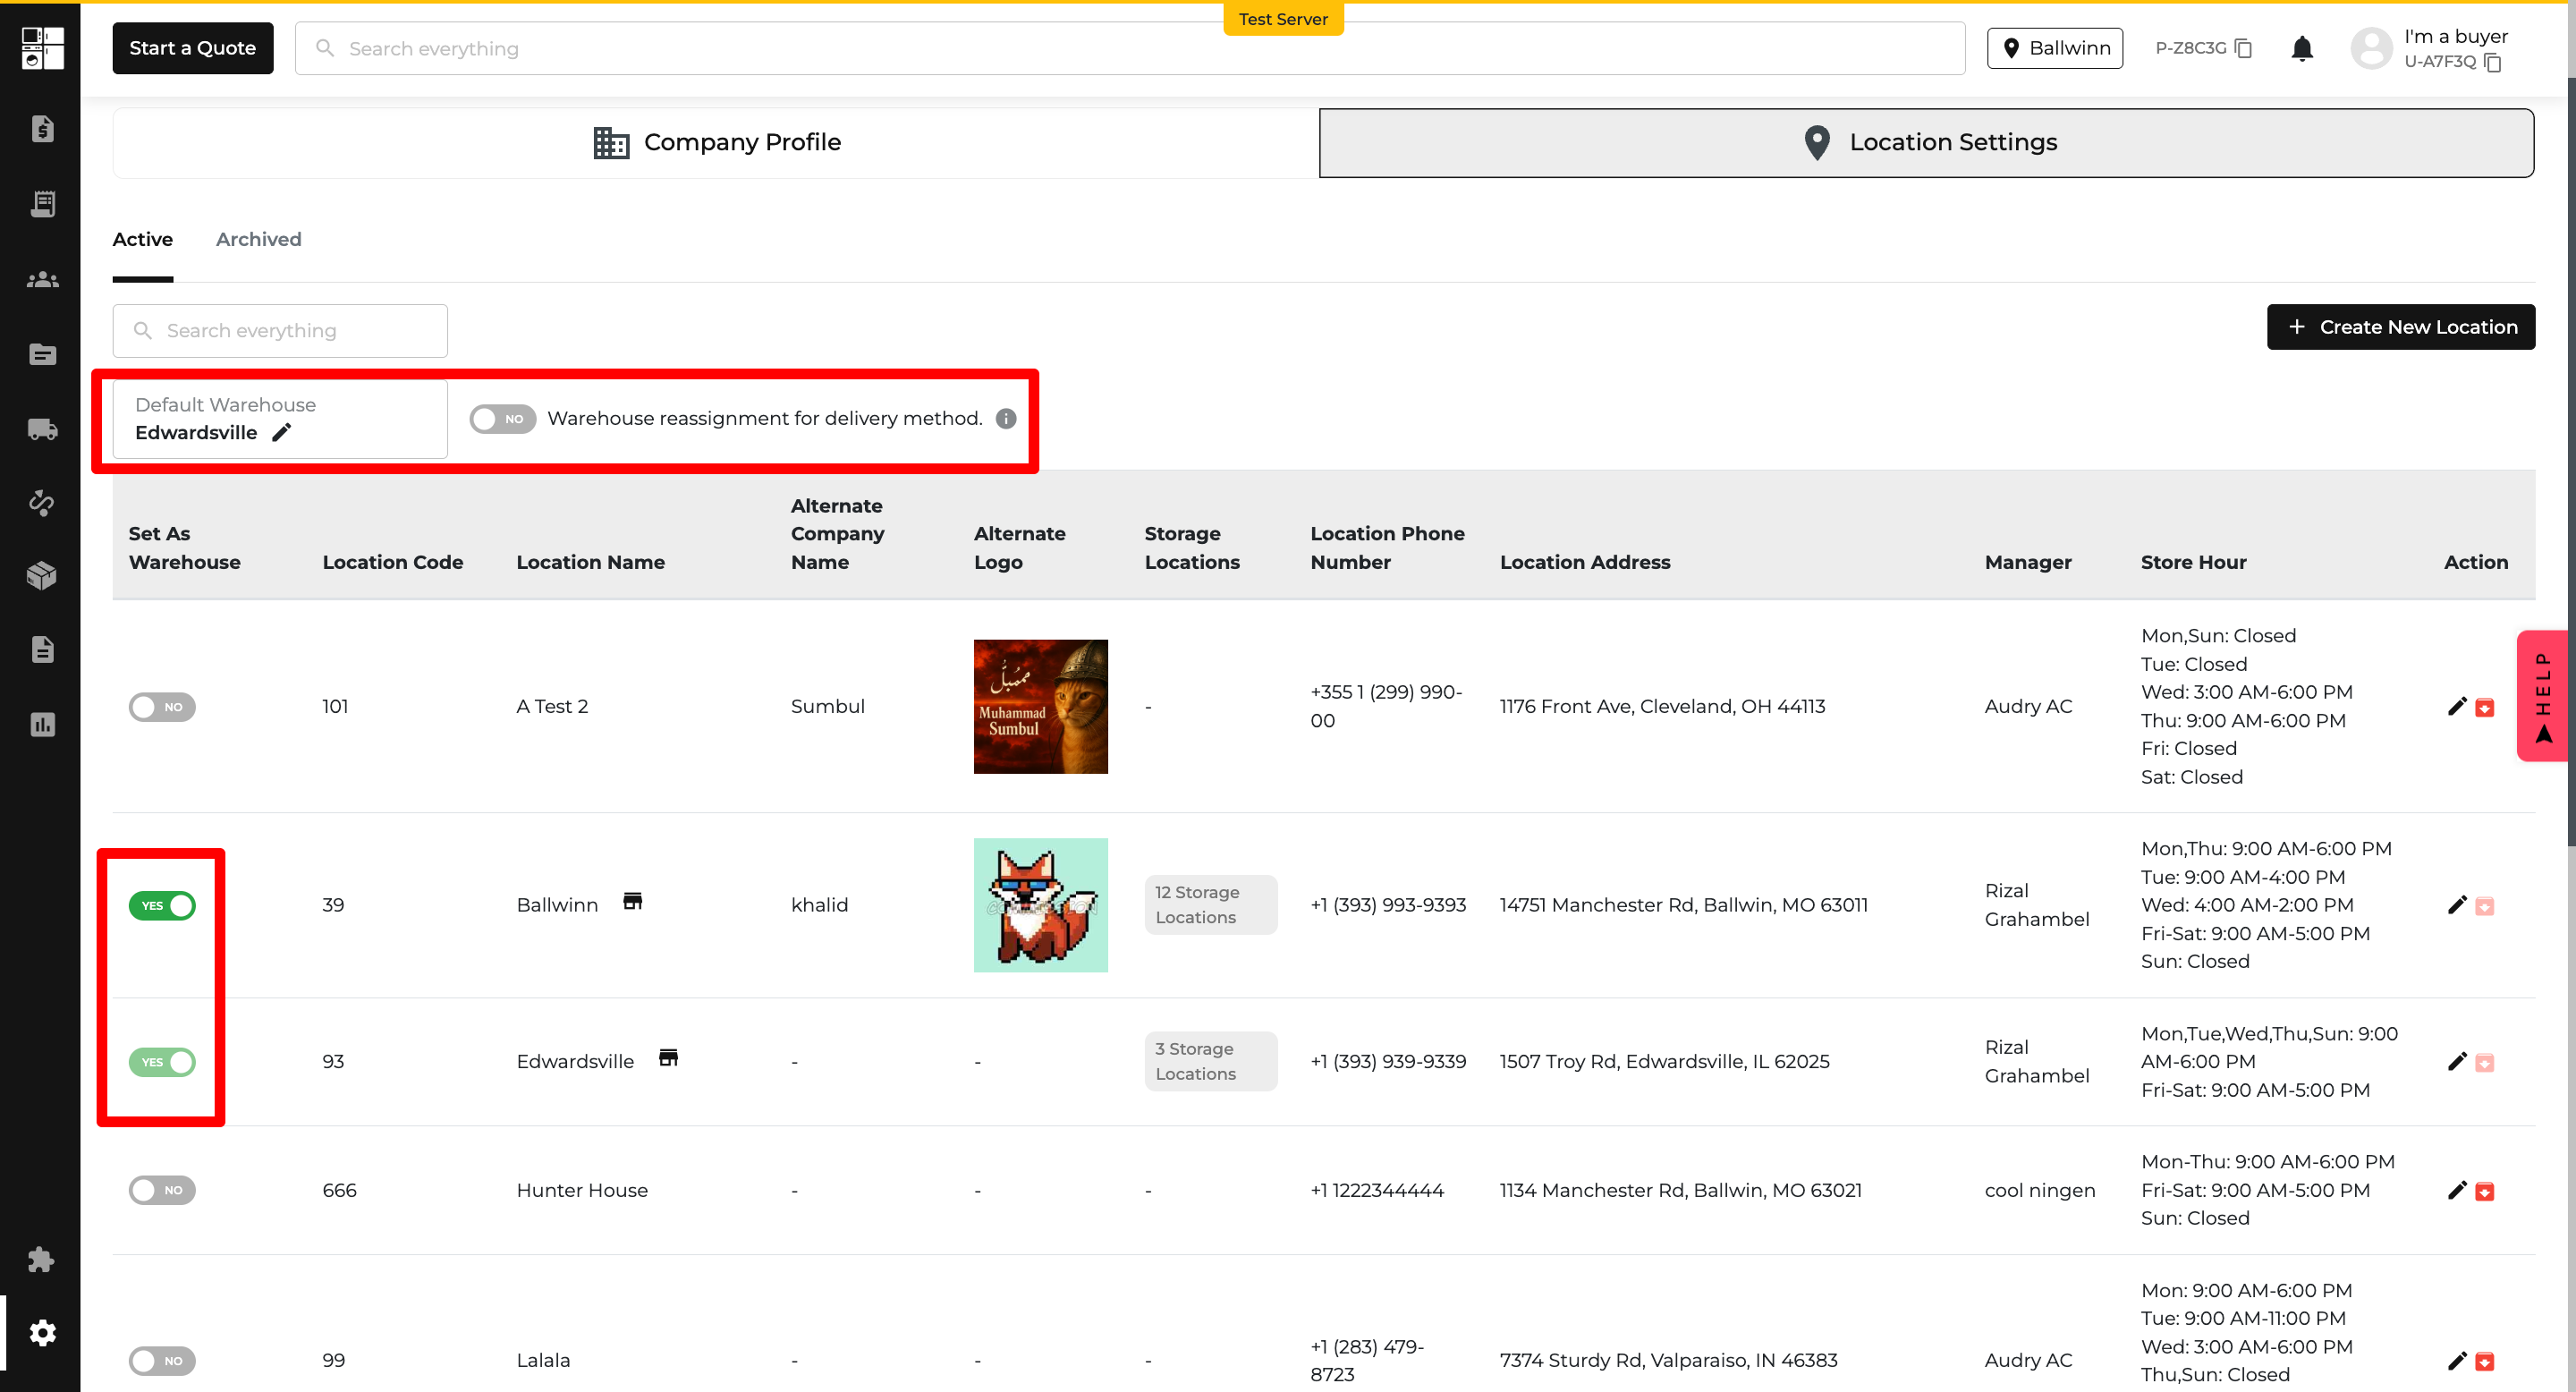
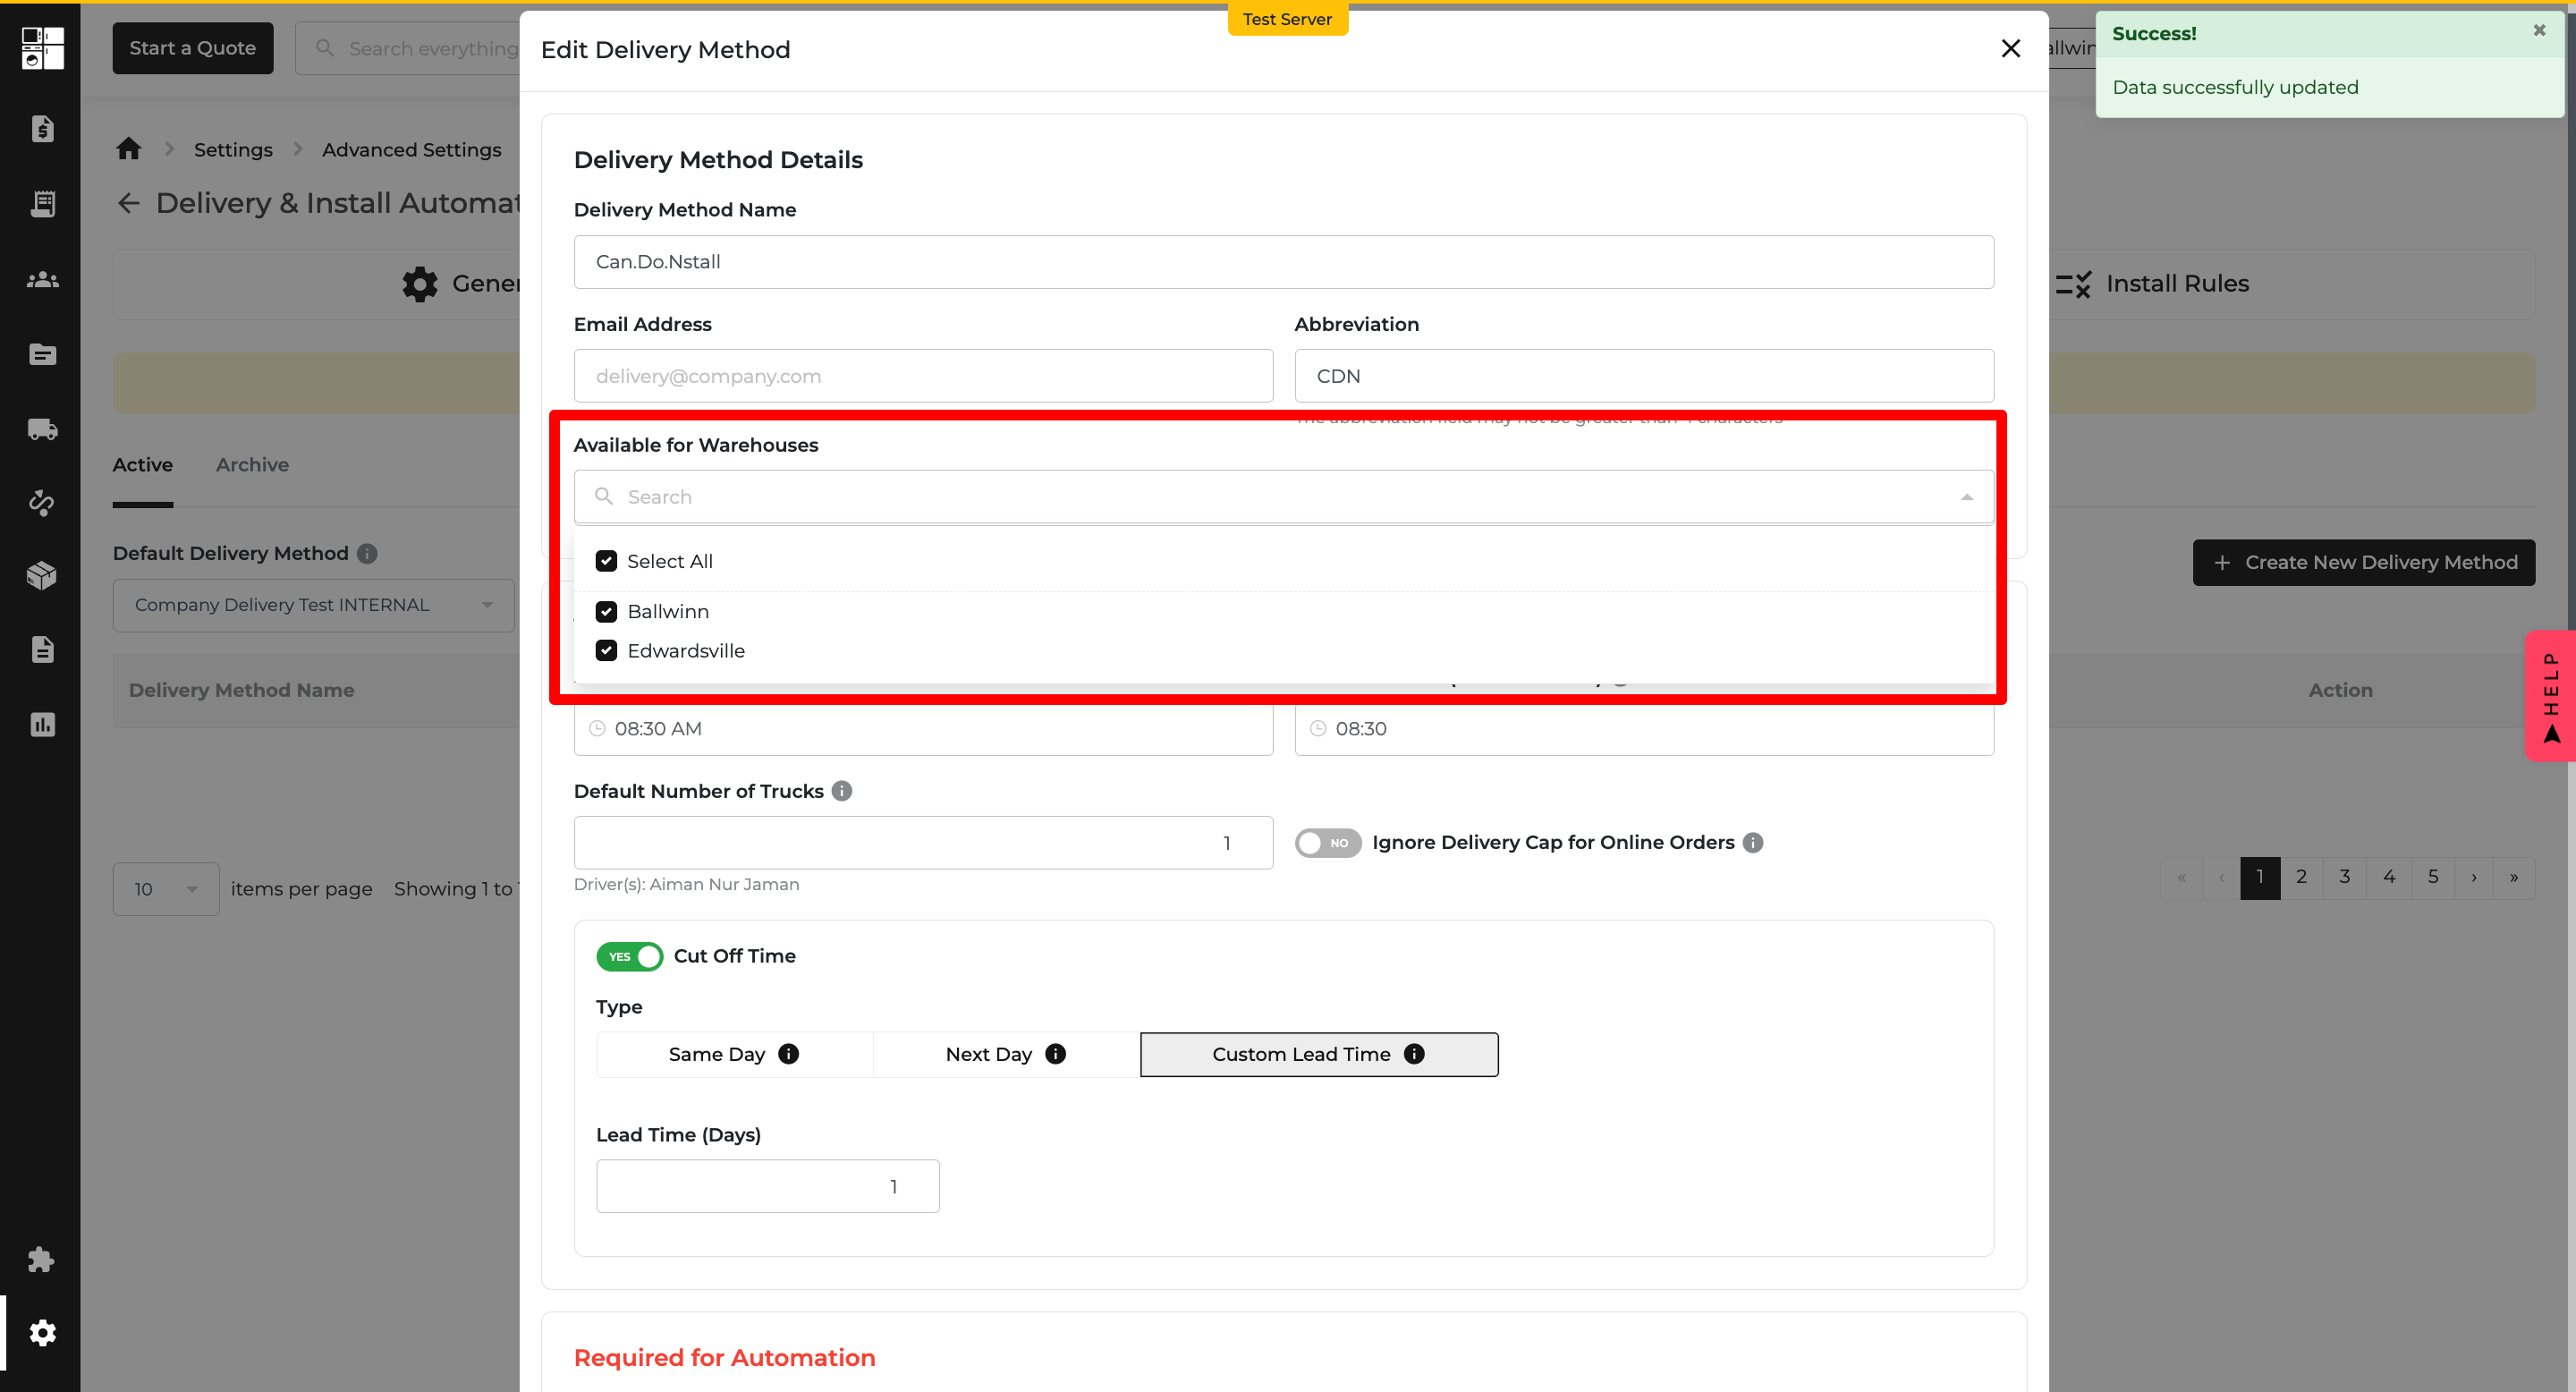
You can now link delivery methods to specific warehouses — for more accurate delivery selection and routing.

💡 Here’s How It Works:

  • One delivery method can be assigned to multiple warehouses.
  • This ensures that during checkout or quote creation, only relevant delivery options appear.
  • If a warehouse isn't linked to a delivery method, it won’t show up as an option.

📍 Where You’ll See It:

  • Delivery Method Settings → Assign warehouses to each method

🔁 Update: Smarter Order Routing Flow

What’s New?

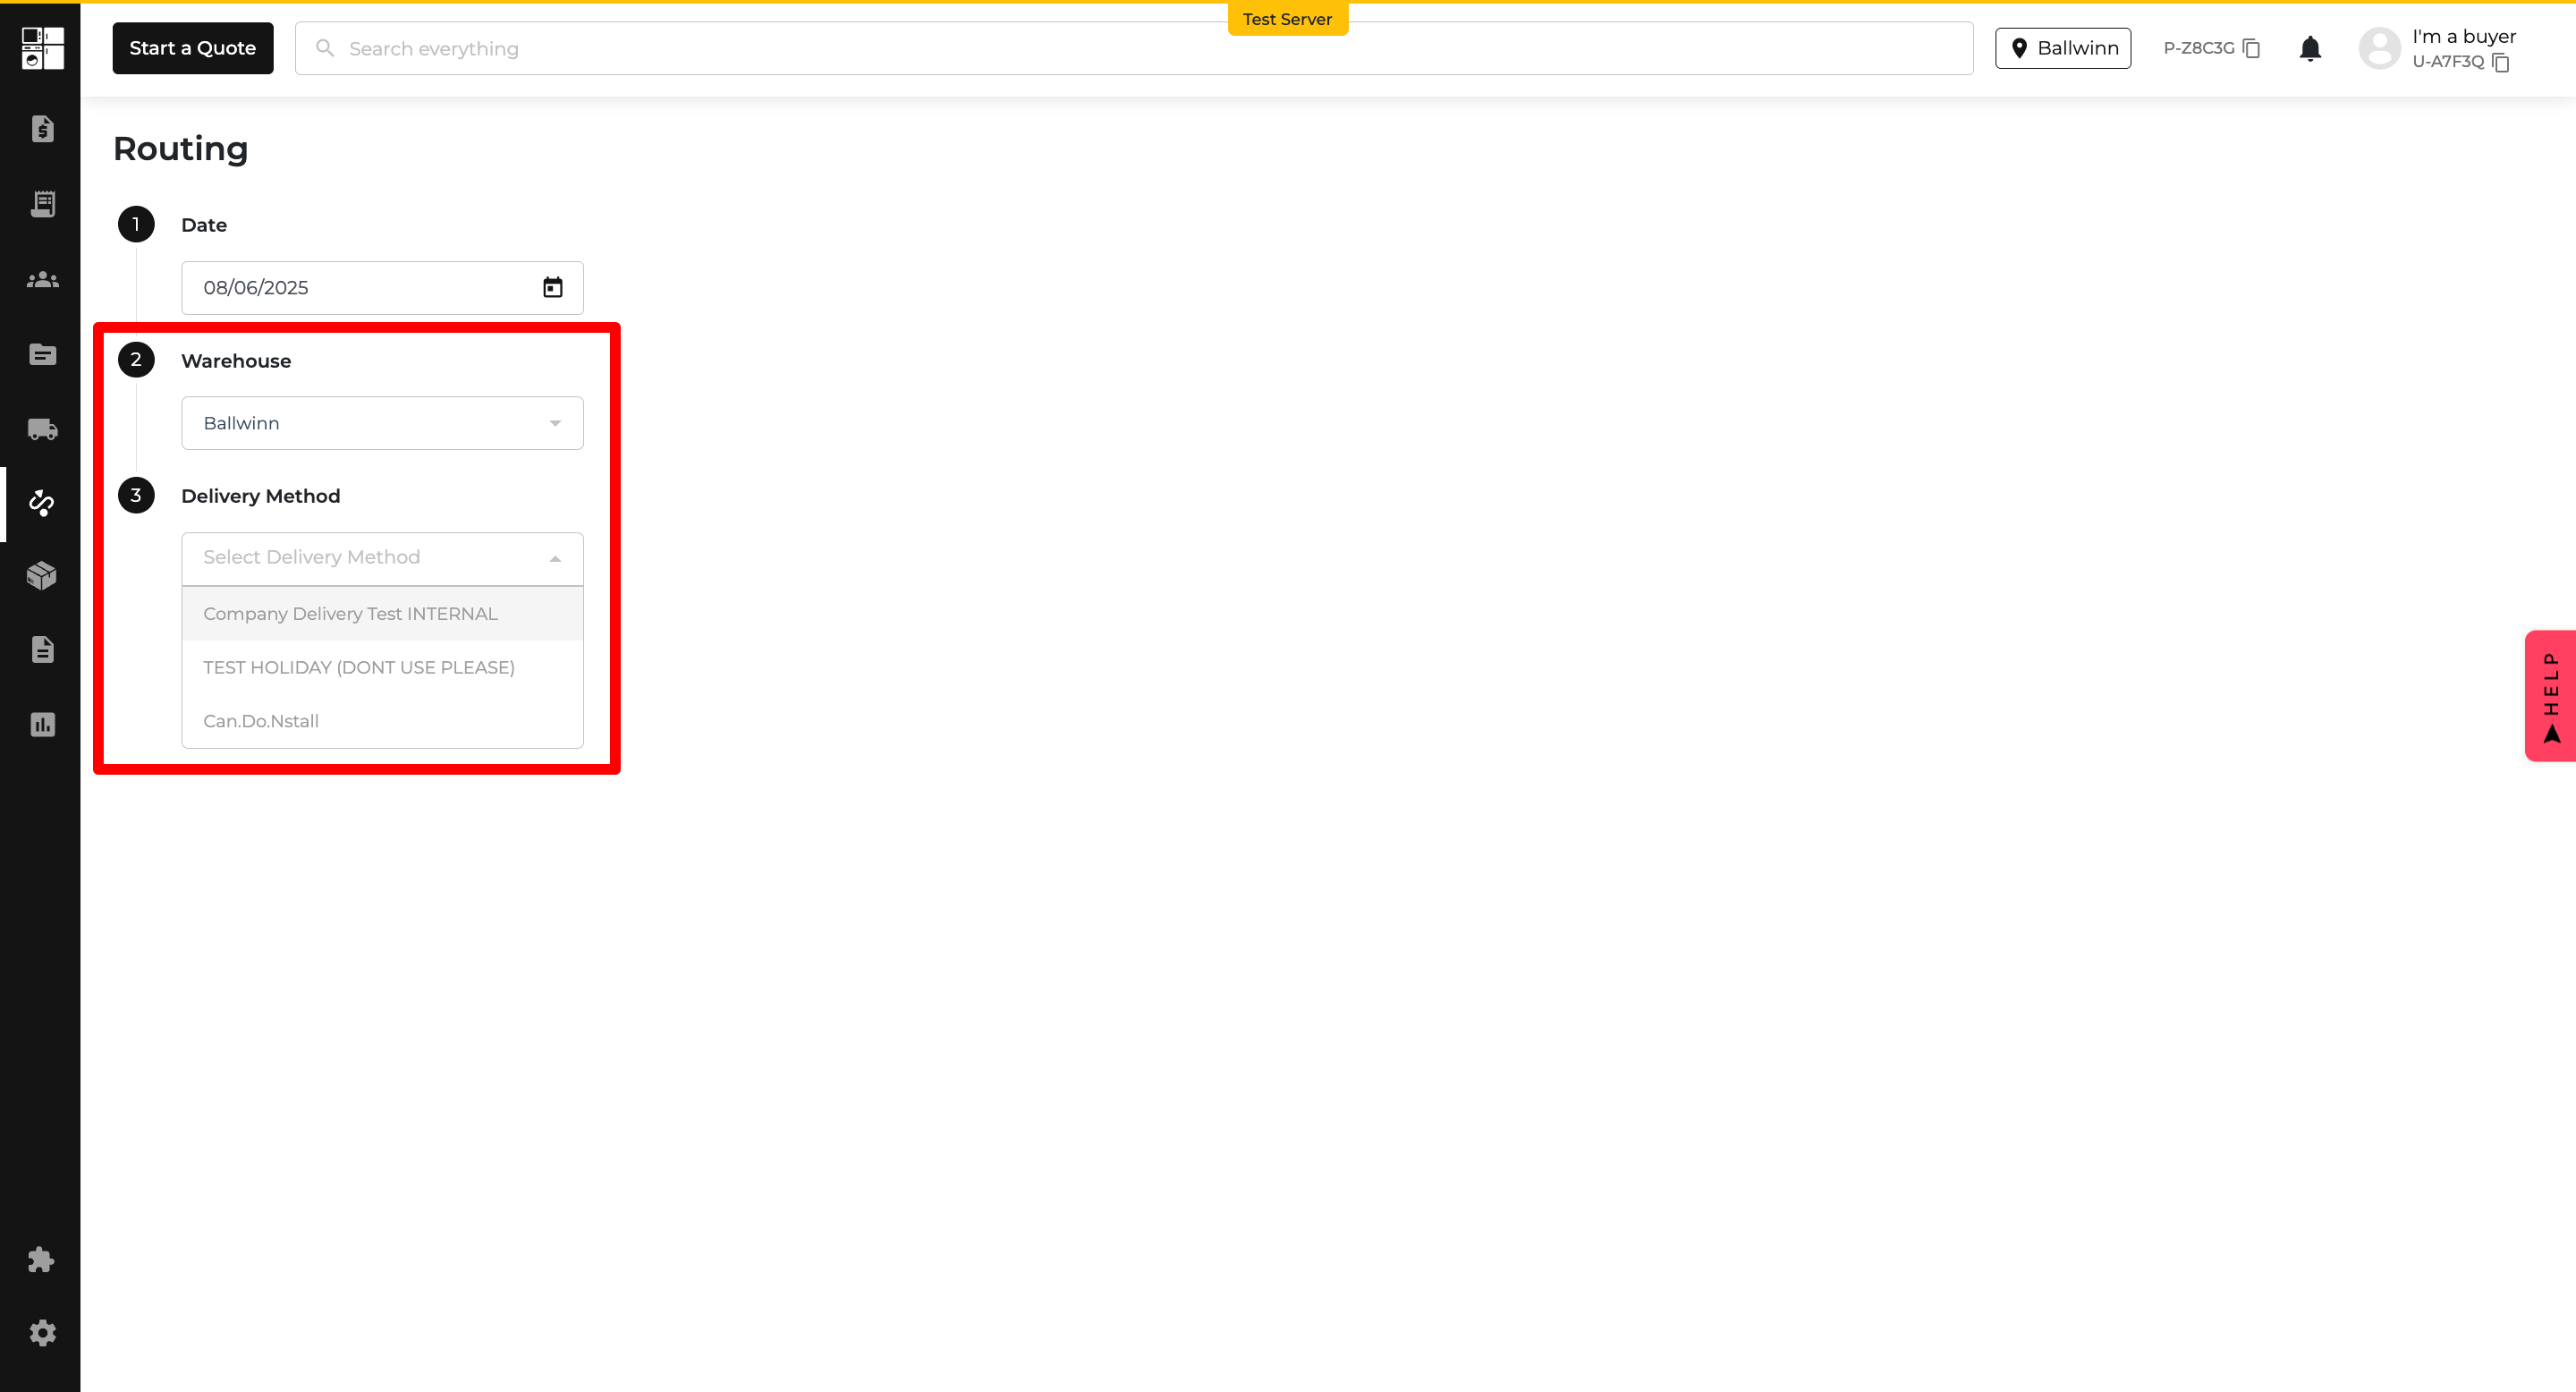
The routing experience has been updated to better support multiple warehouses and dynamic delivery options — giving users smarter, location-based delivery suggestions before the order is finalized.

💡 Here’s How It Works:

During the Routing Step

:
  1. Select delivery date
  2. Choose source warehouse
  3. System shows available delivery methods based on the selected warehouse

🎯 Update: Smarter Stock Reservation Rules by Role

What’s New?

We’ve made stock reservation smarter and more secure — now, who can reserve from where depends on their role and your warehouse settings.

💡 Here’s How It Works:

🏬 If You Have Only One Warehouse:

  • No change — users can reserve from any location.

🏬 If You Have Multiple Warehouses:

For Super Admin / Delivery Manager:

  • Can reserve from any location (warehouse or not)
  • Not affected by "Reassignment" toggle

For All Other Roles:

🔒 Reassignment OFF:

  • Can only reserve from the default warehouse
  • All other warehouses and non-warehouses are disabled

🔓 Reassignment ON:

  • Starts with default warehouse
  • If out of stock, system allows reservation from other warehouses based on nearest zipcode
  • Non-warehouses stay disabled

📍 Where You’ll See It:

  • Quote / Checkout page → Location selection dropdown
  • Disabled location options based on role & settings

📦 Update: Smarter Delivery Method Visibility on Orders

What’s New?

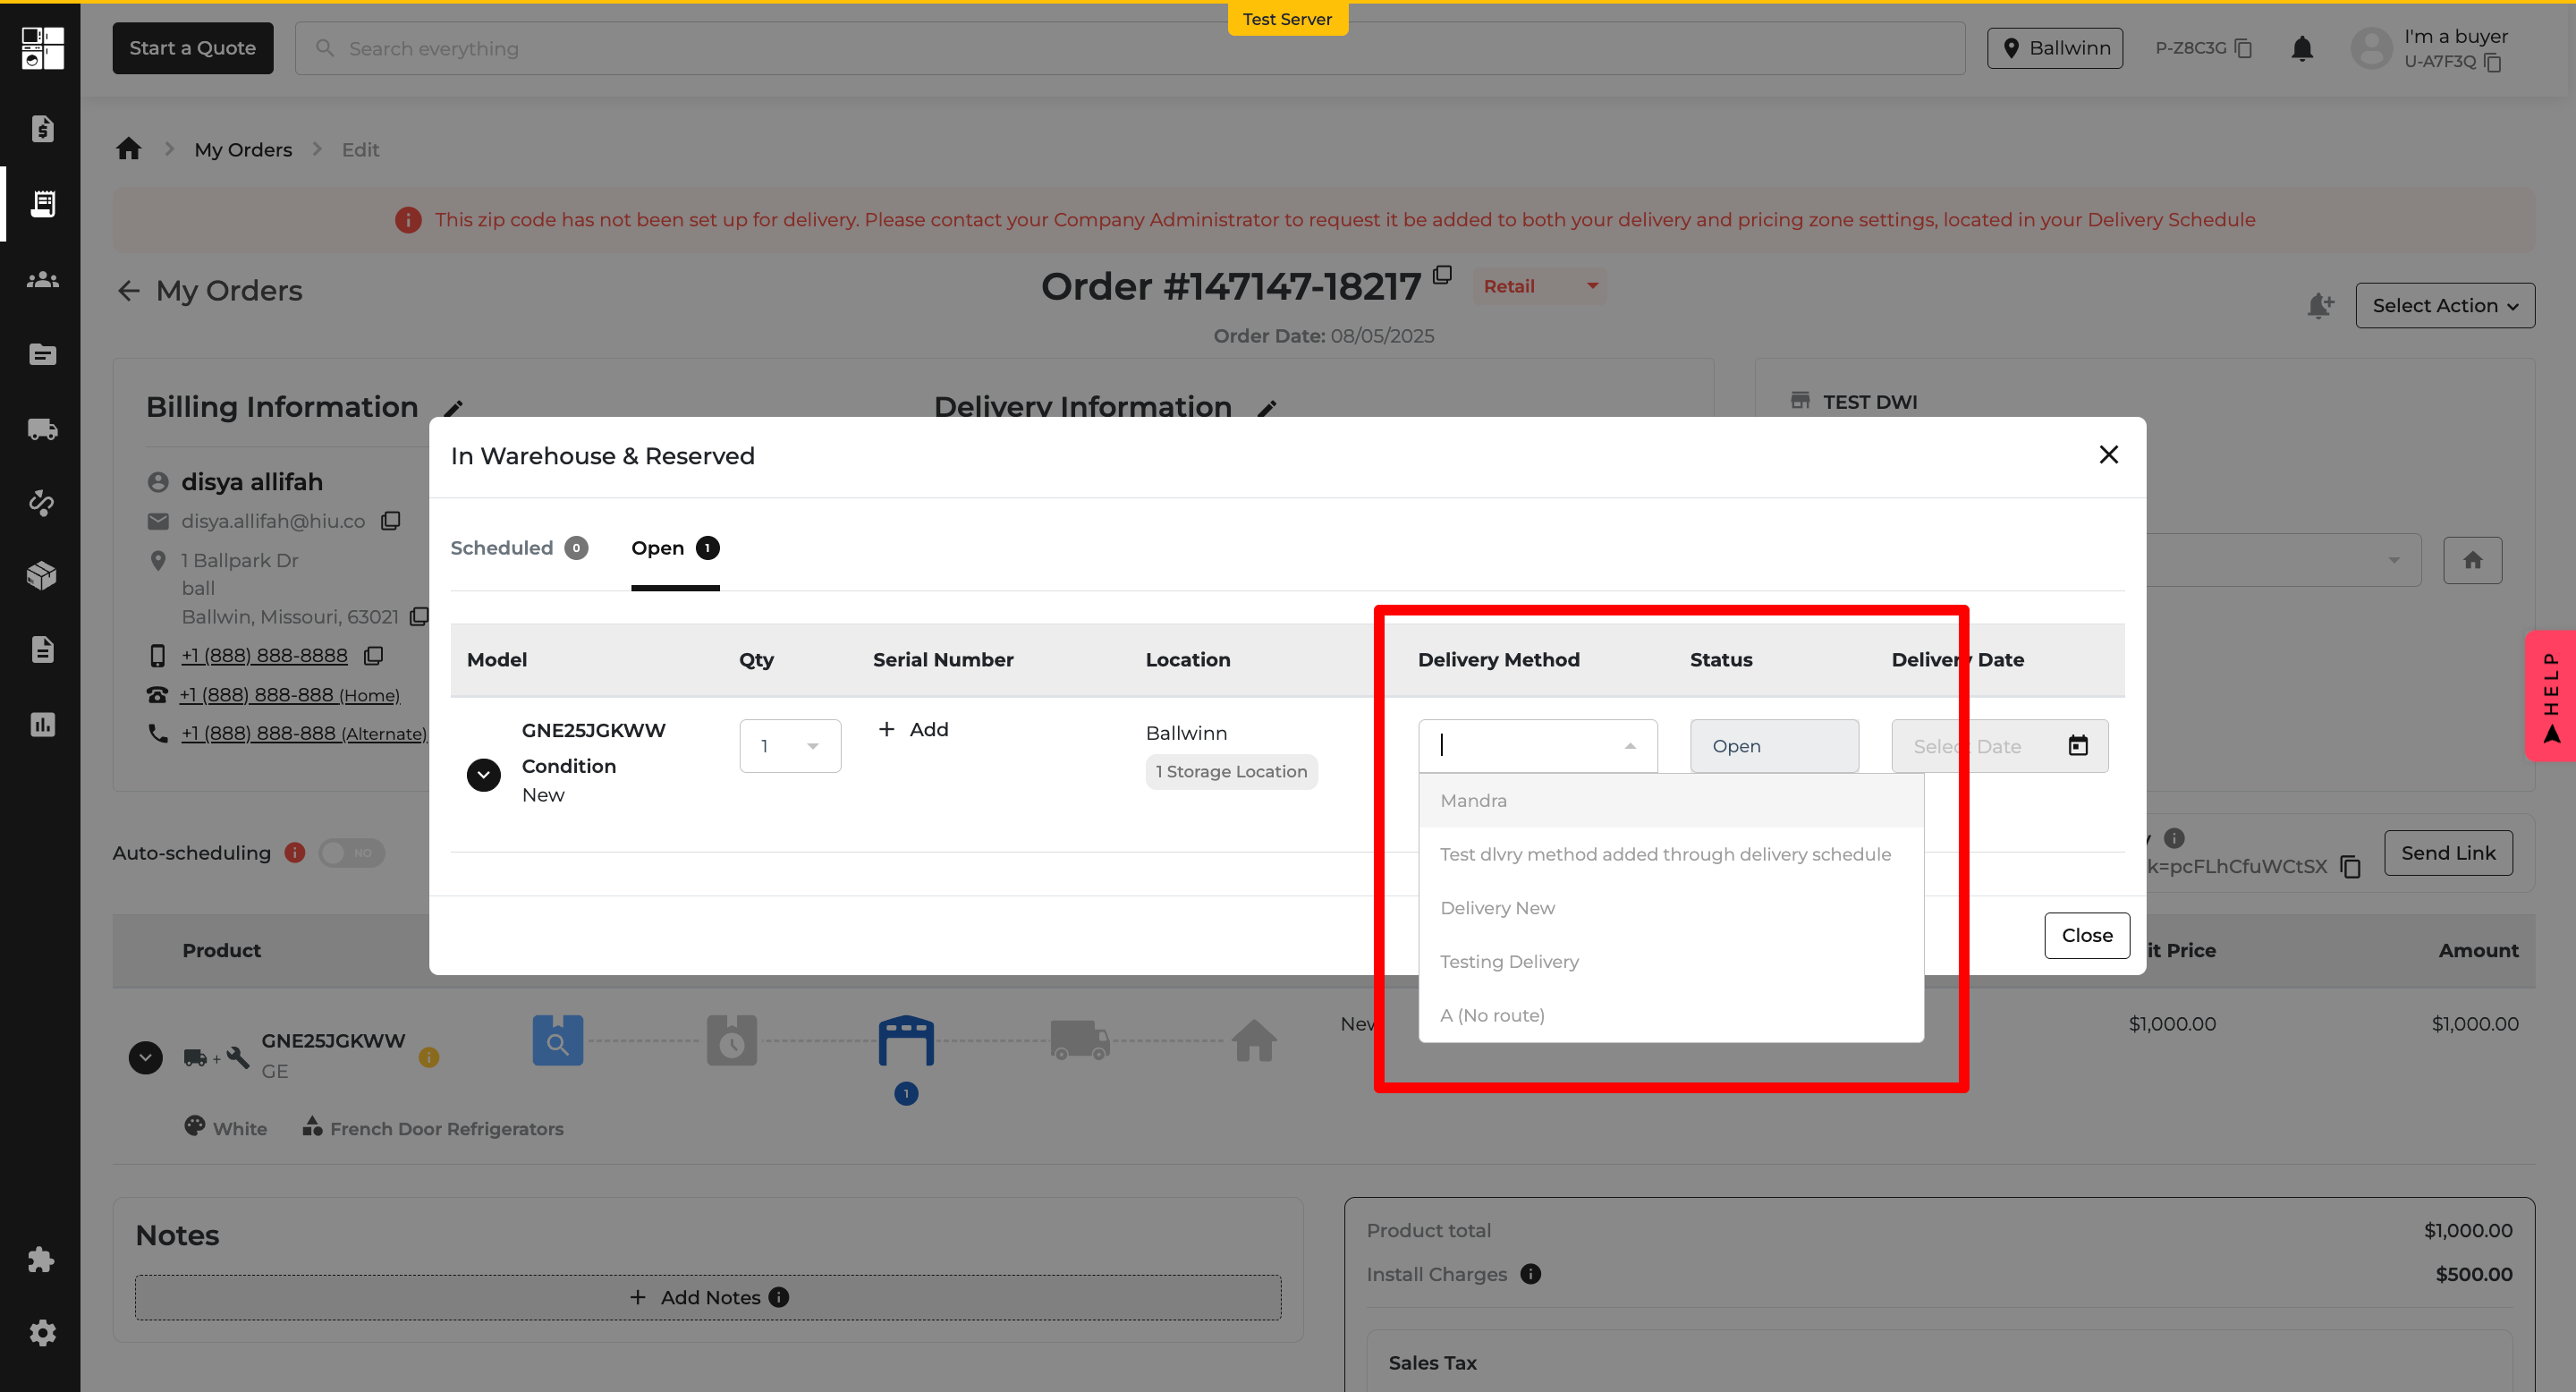
We’ve improved how delivery methods appear on the Order Page — making sure users only see options that are properly configured and relevant to the order.

💡 Here’s How It Works:

A delivery method will only show up on an order if:

  1. It has been assigned to the warehouse used for stock reservation
  2. The zipcode of the delivery address is included in that delivery method’s settings
  • If the reservation is made to a non-warehouse (only allowed by Super Admin / Delivery Manager):
  • ➤ The system falls back to delivery methods assigned to the default warehouse

✅ Reminder:

The default warehouse is automatically assigned to all delivery methods, so it’s always covered.

📍 Where You’ll See It:

  • Order Page → Delivery method dropdown

🌐 Website: Smarter Checkout & Location Handling

What’s New?

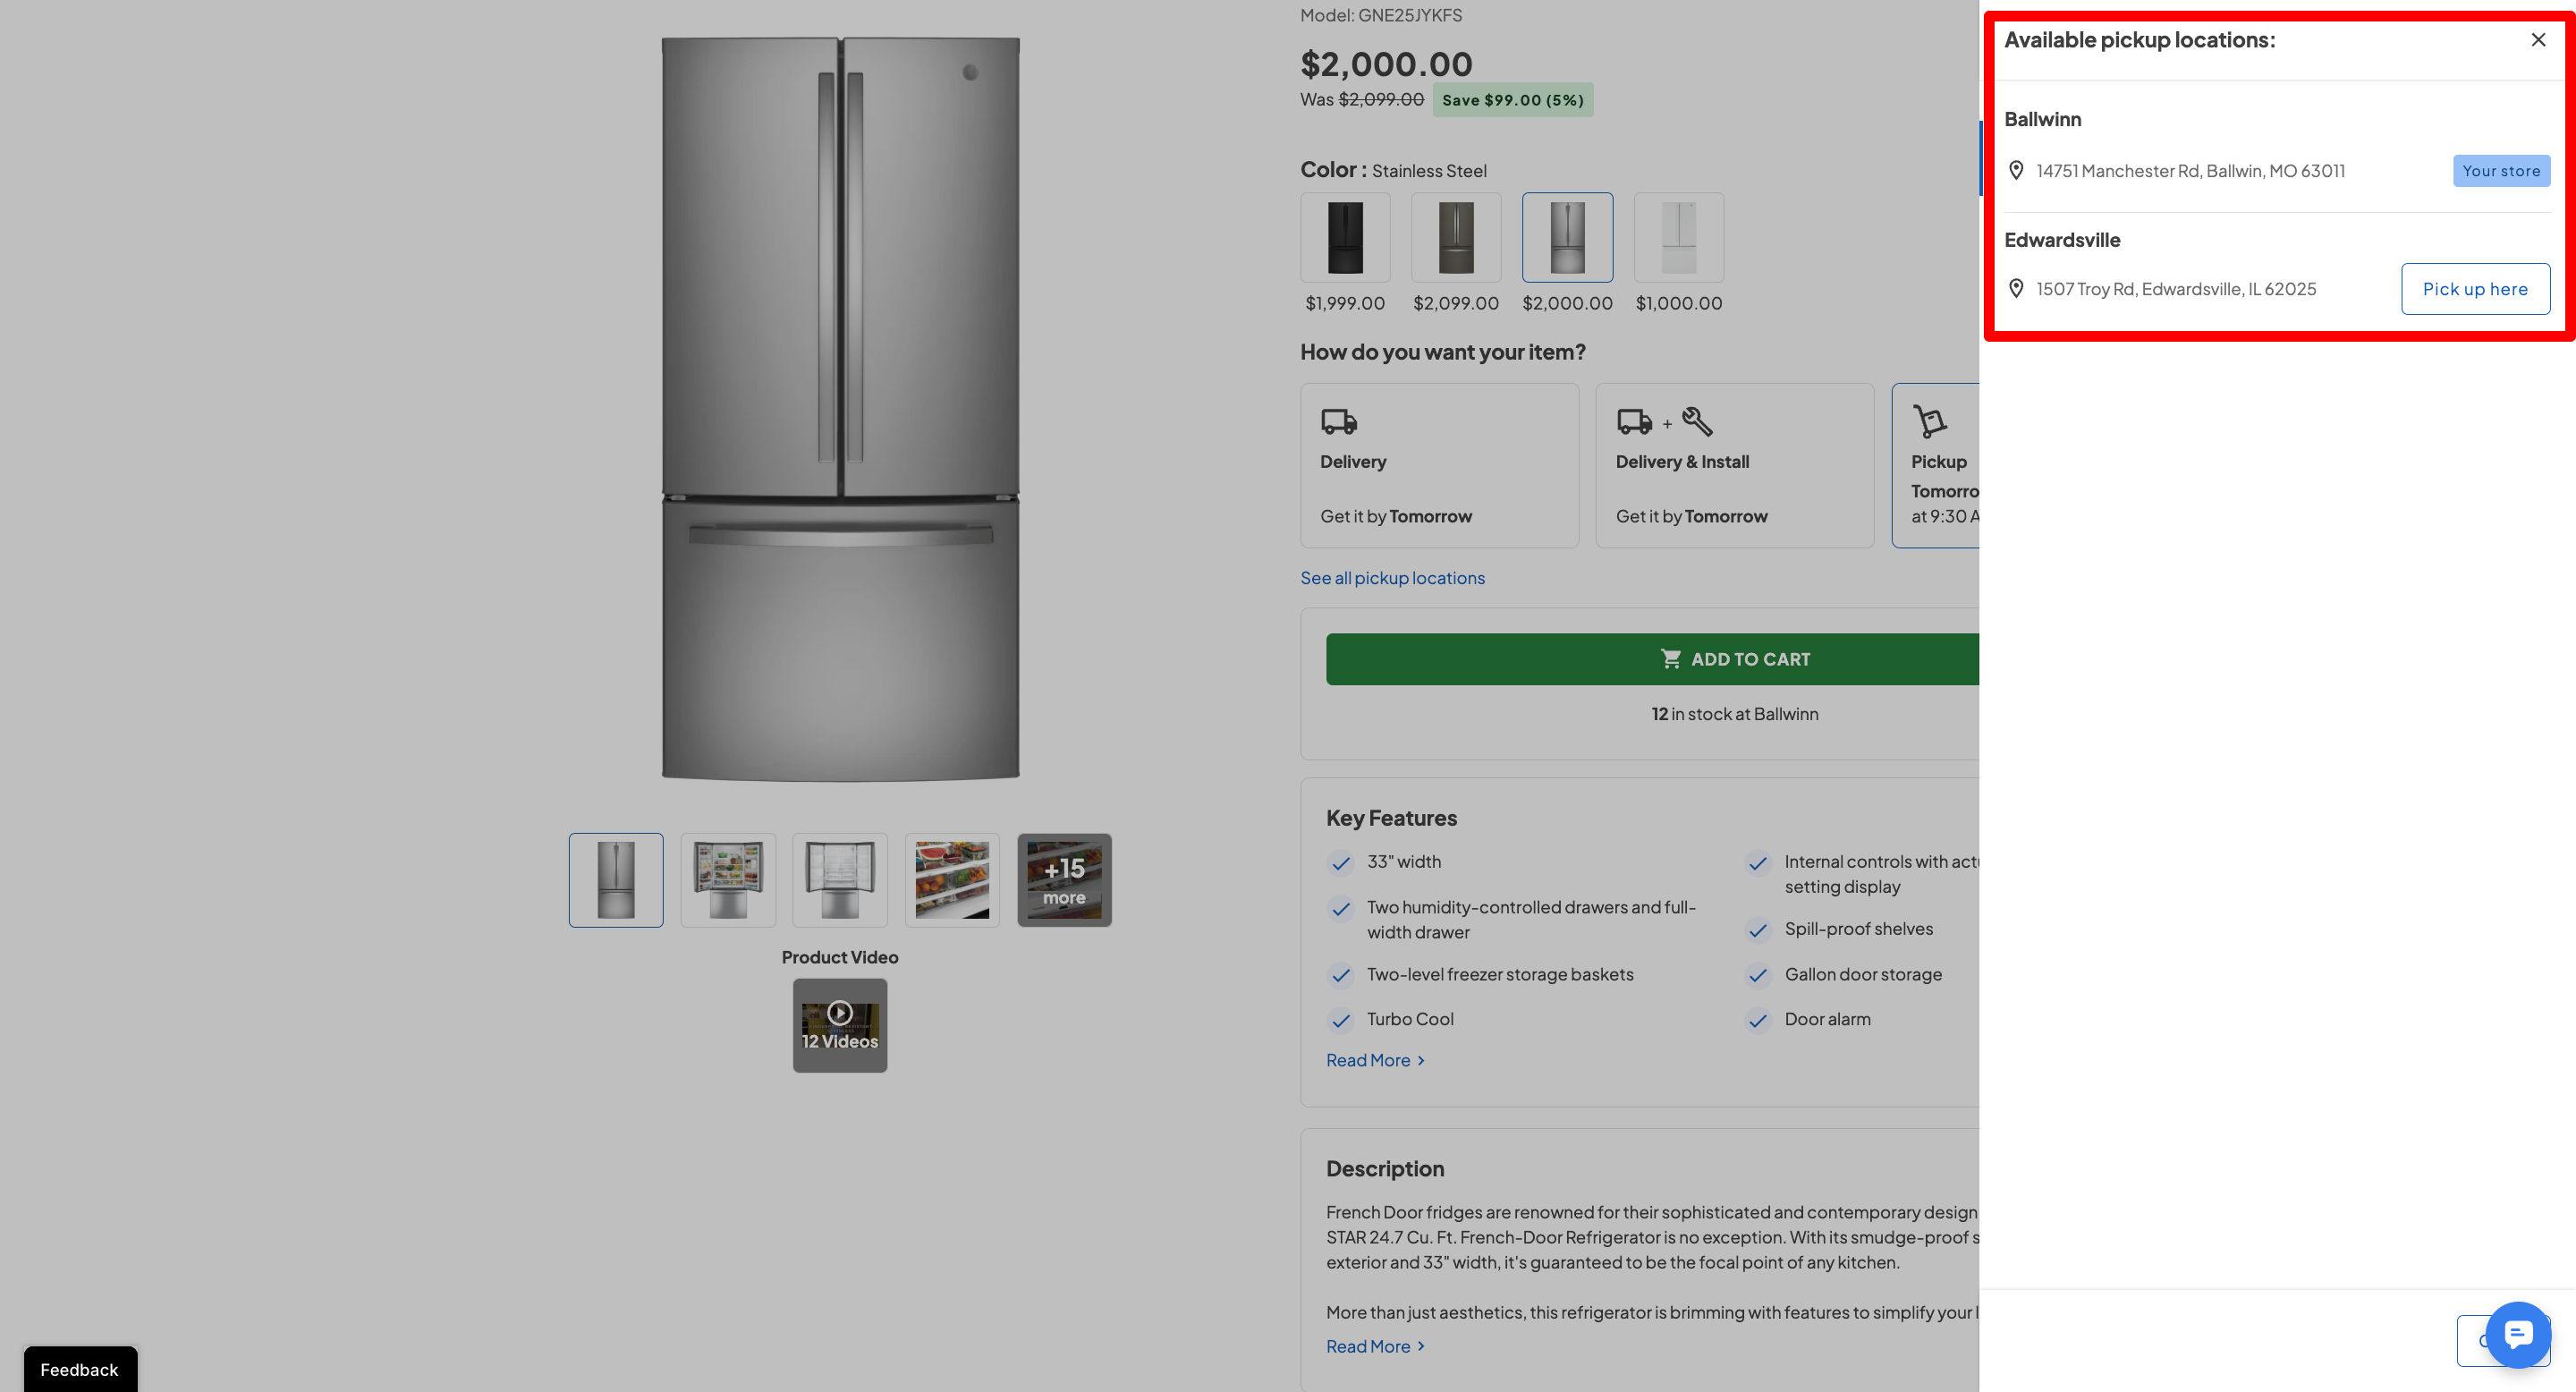
The website checkout experience just got smarter — it now automatically prioritizes the best location based on stock and proximity, giving customers clearer, faster options when placing orders.

💡 Here’s How It Works:

🚚 For Delivery Orders:

  • The system automatically selects a warehouse based on:
    • The customer’s zip code
    • Stock availability
  • No manual selection needed — it happens quietly in the background. 🧠

🛍️ For Pickup Orders:

  • Customers can still choose a pickup location
  • All locations with stock are shown, but they are ordered smartly:
    • The default warehouse appears first
    • Followed by other warehouses, sorted by proximity based on the customer’s zip code
  • If the default warehouse doesn’t have stock, the next closest location with inventory will naturally appear higher in the list.

✅ Order Confirmation:

  • The confirmation page now clearly shows which warehouse will fulfill the order — keeping customers informed and confident.

📍 Where You’ll See It:

  • Pickup location list → Sorted by proximity & availability (pic8)
  • Order confirmation → Selected warehouse shown (pic9)

pic8

pic9